Rho Ophiuchi region

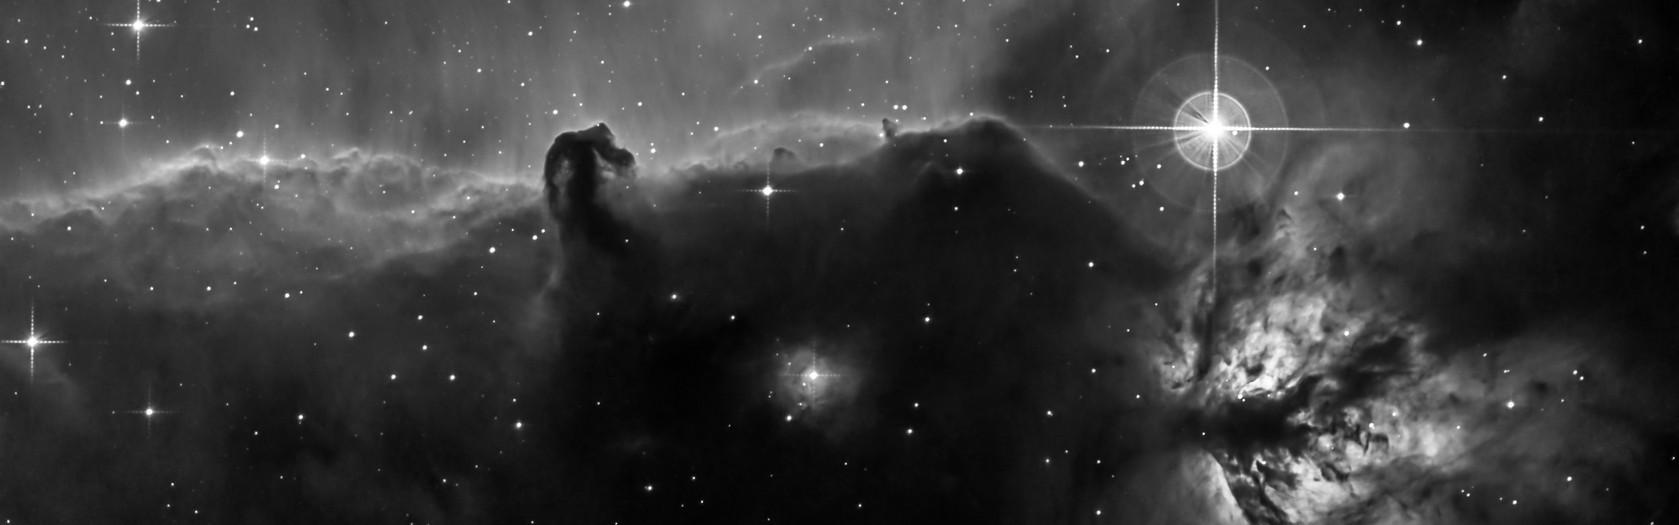
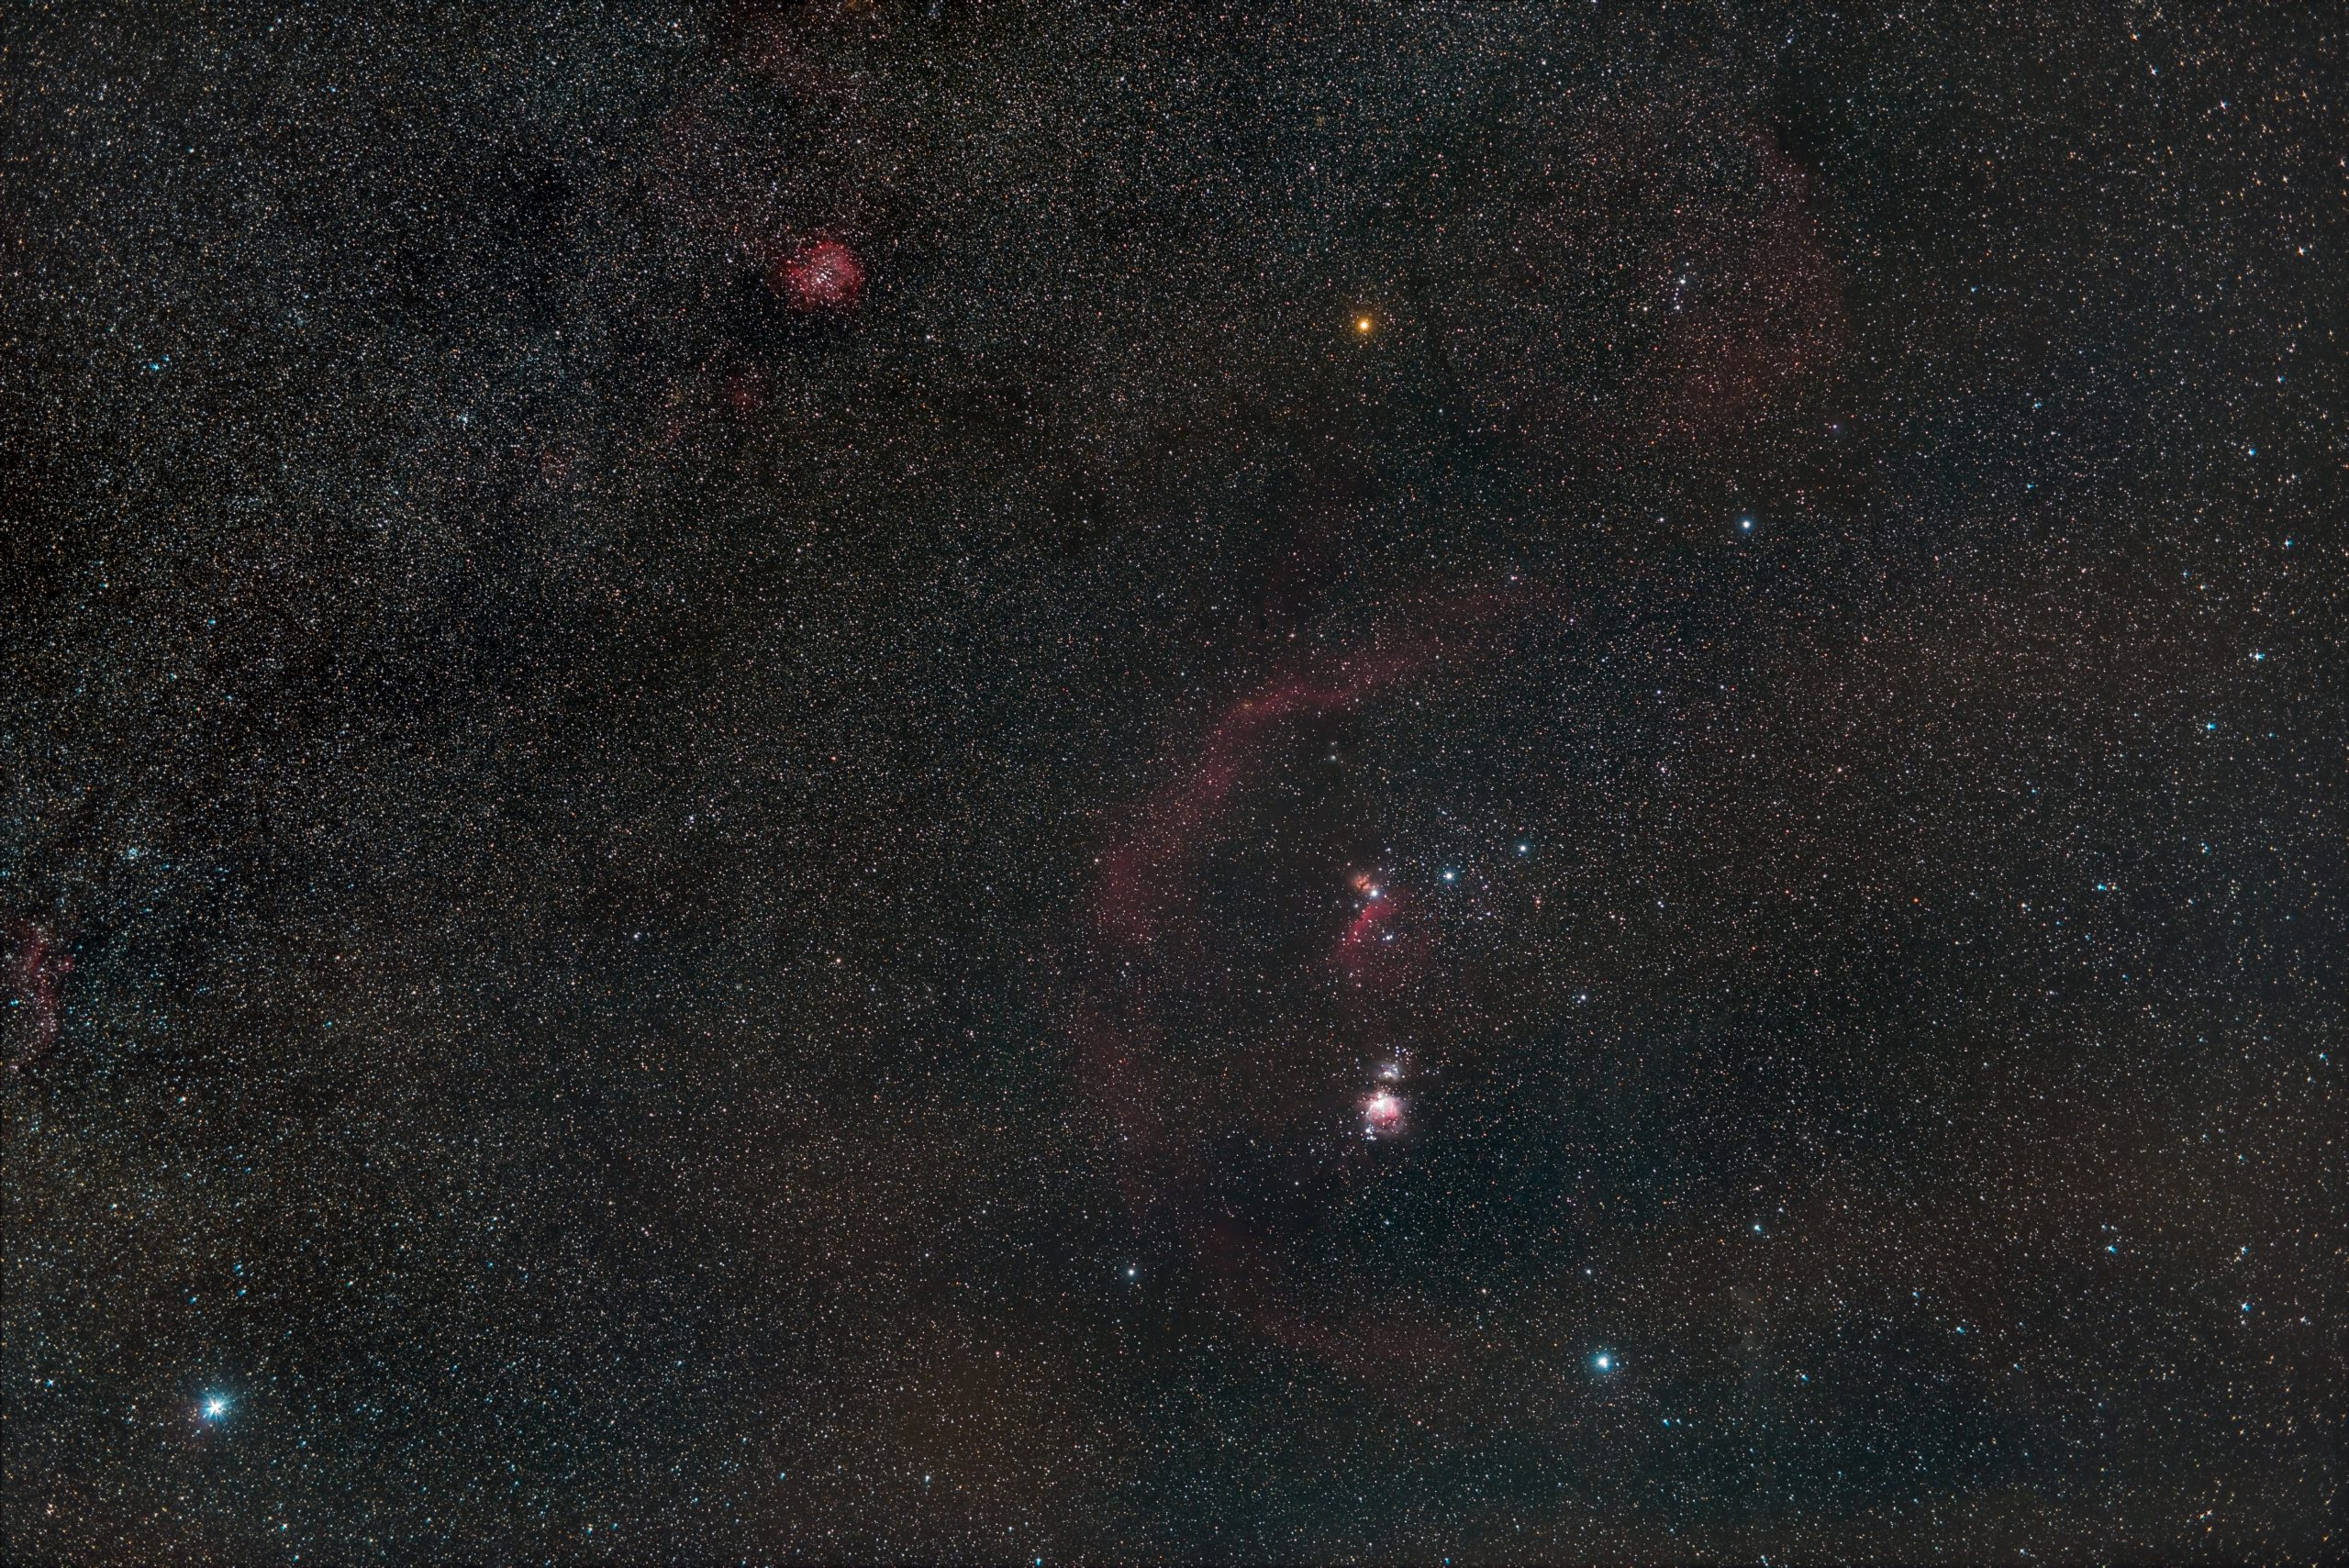
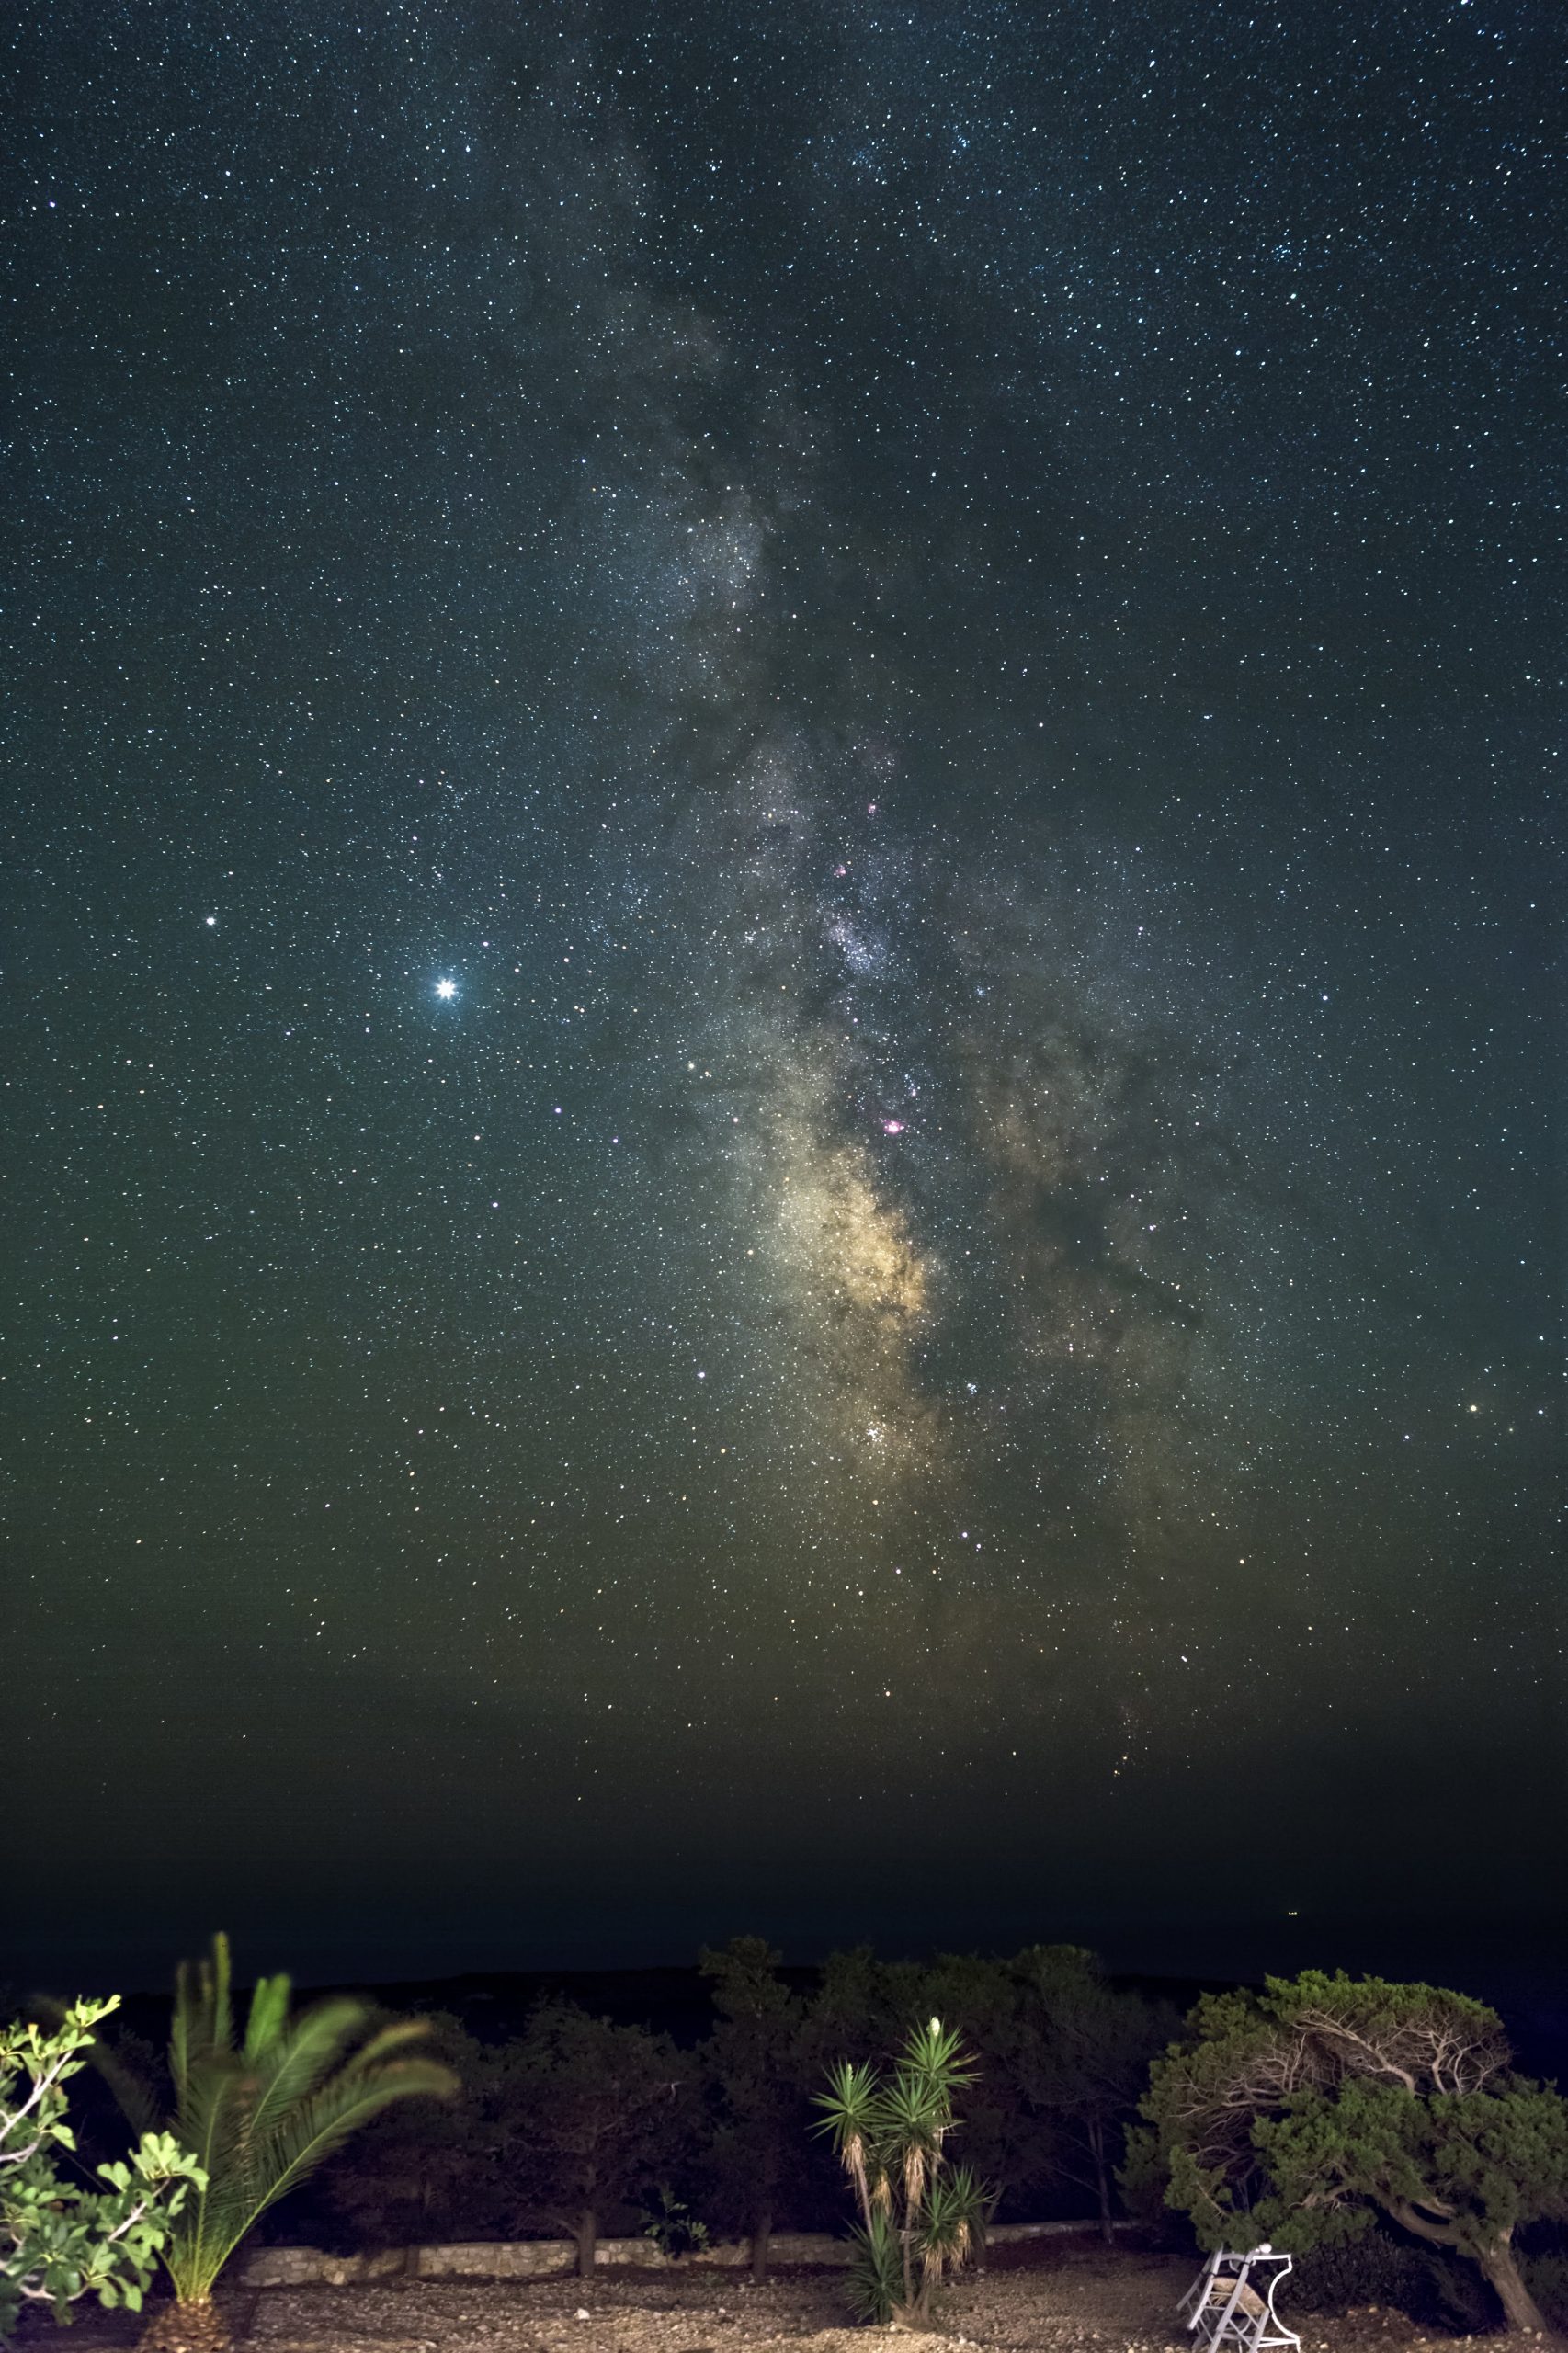
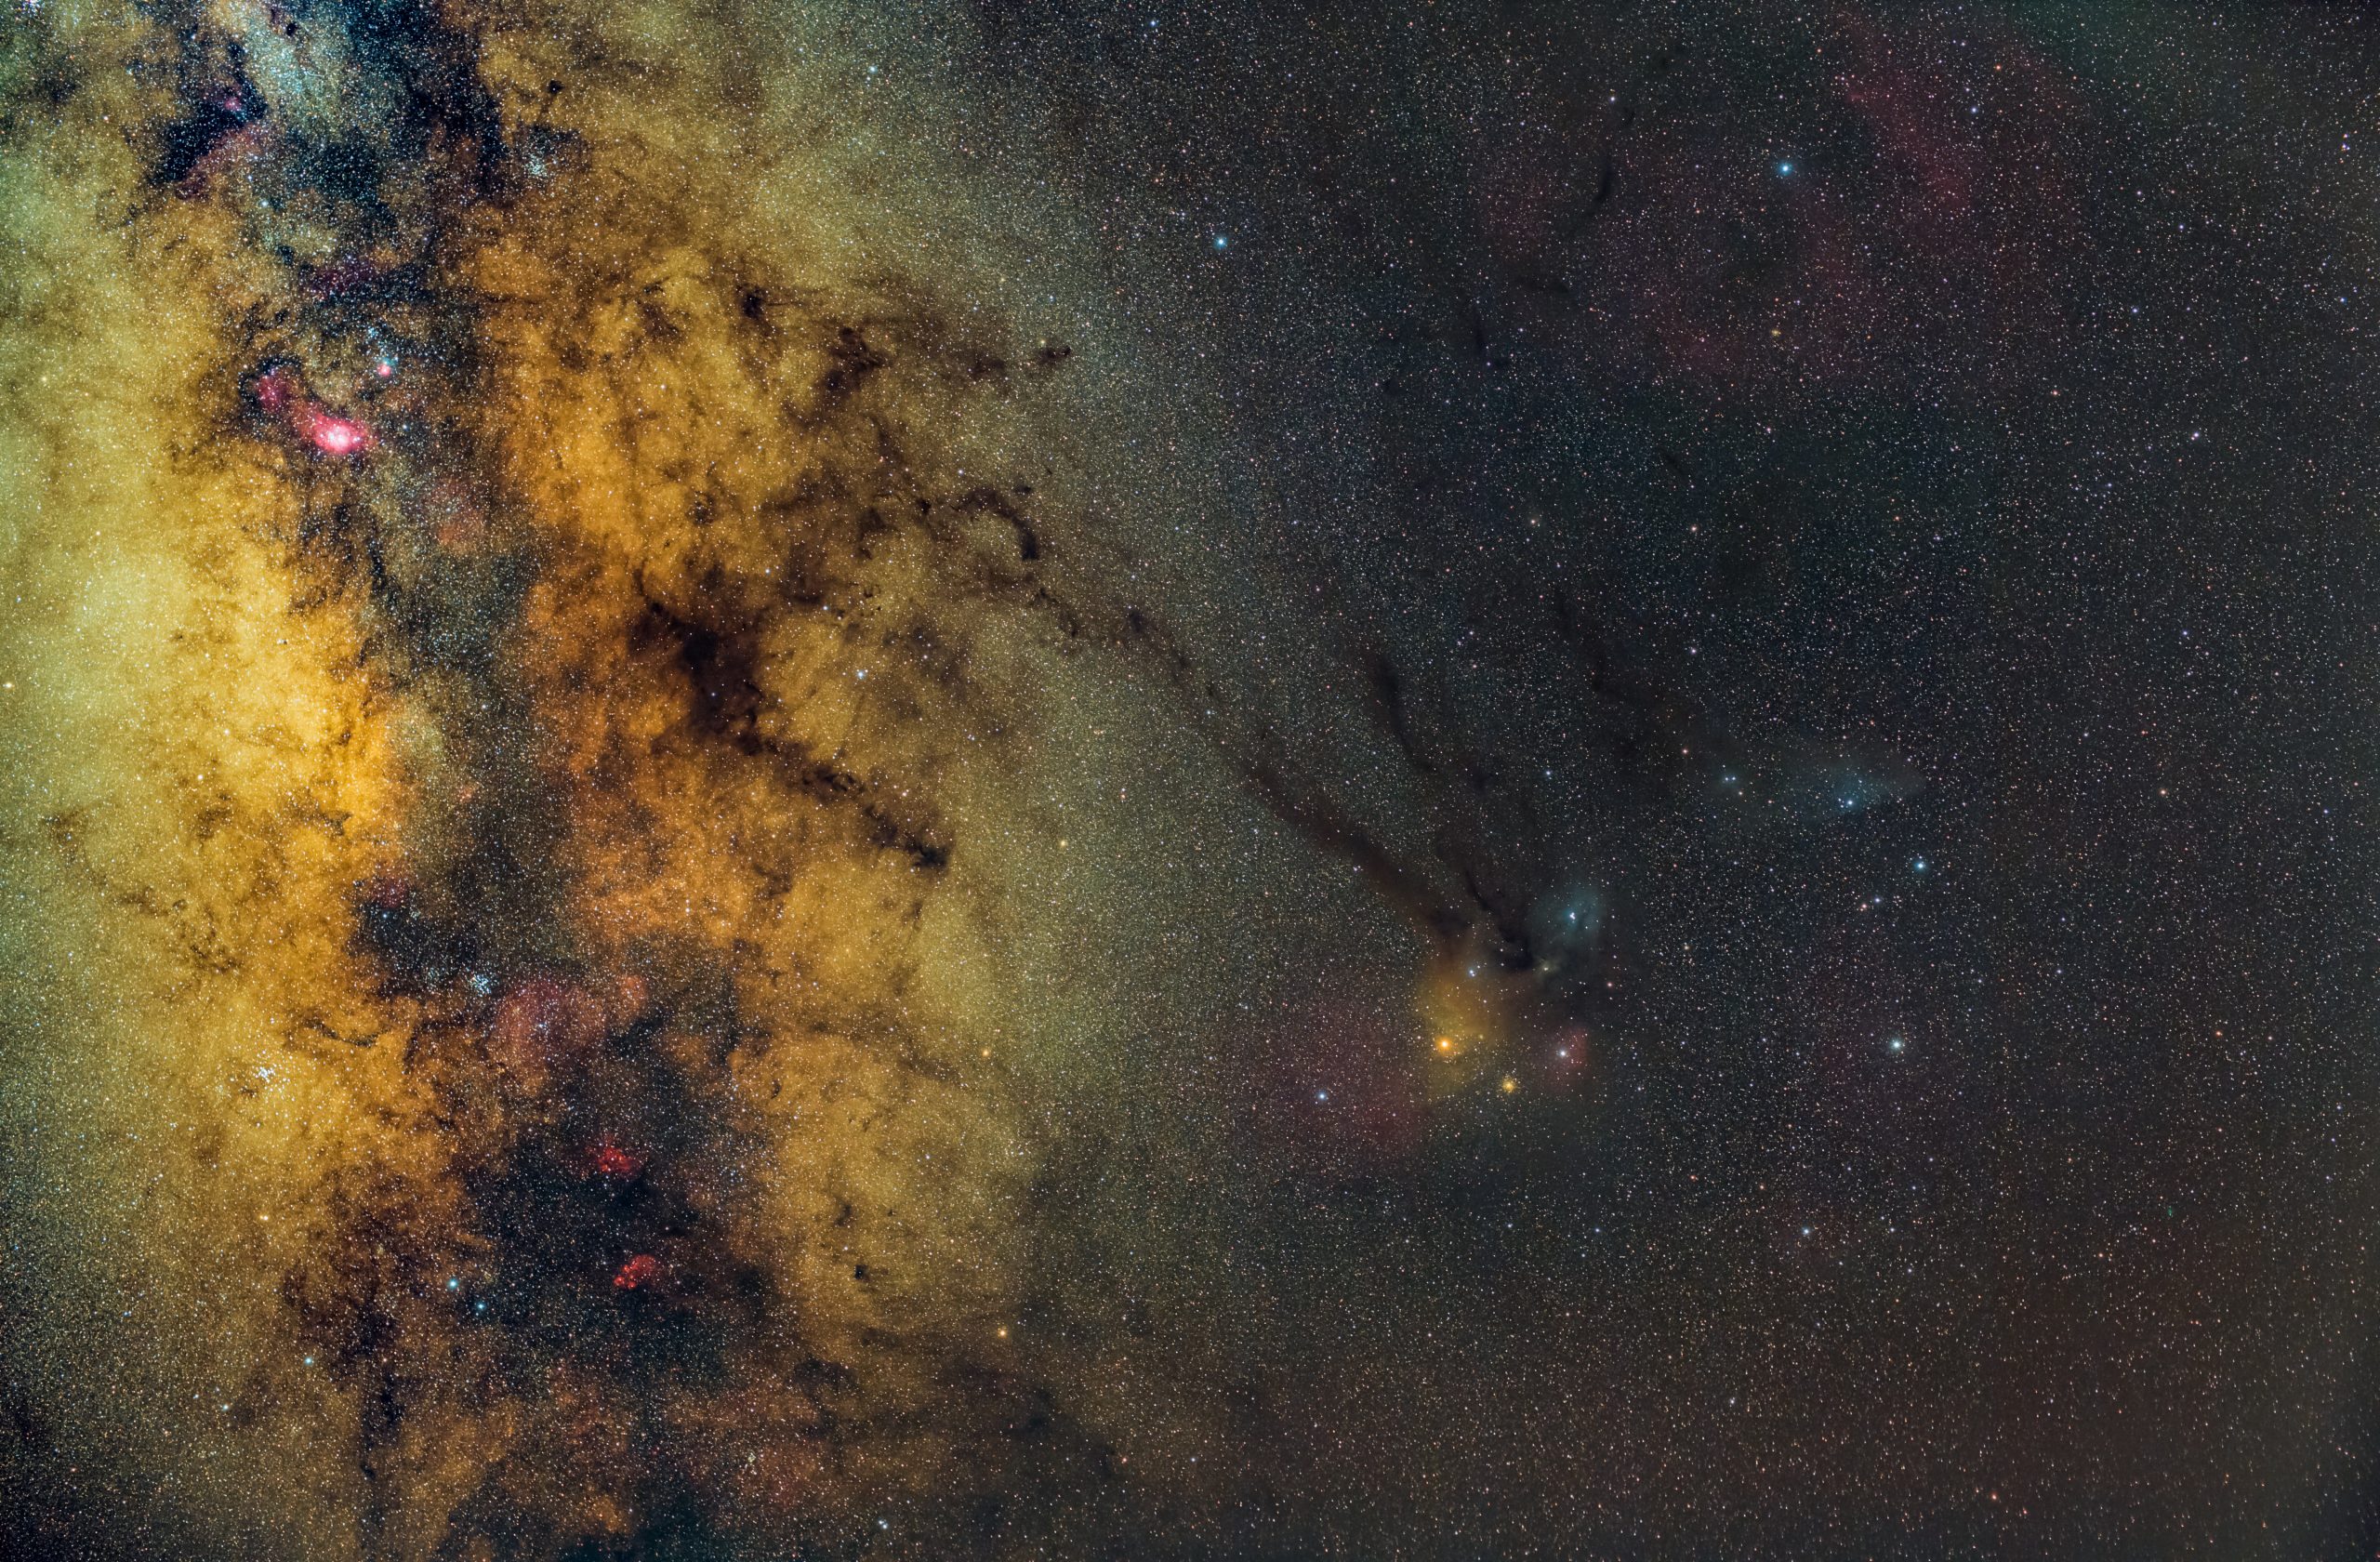
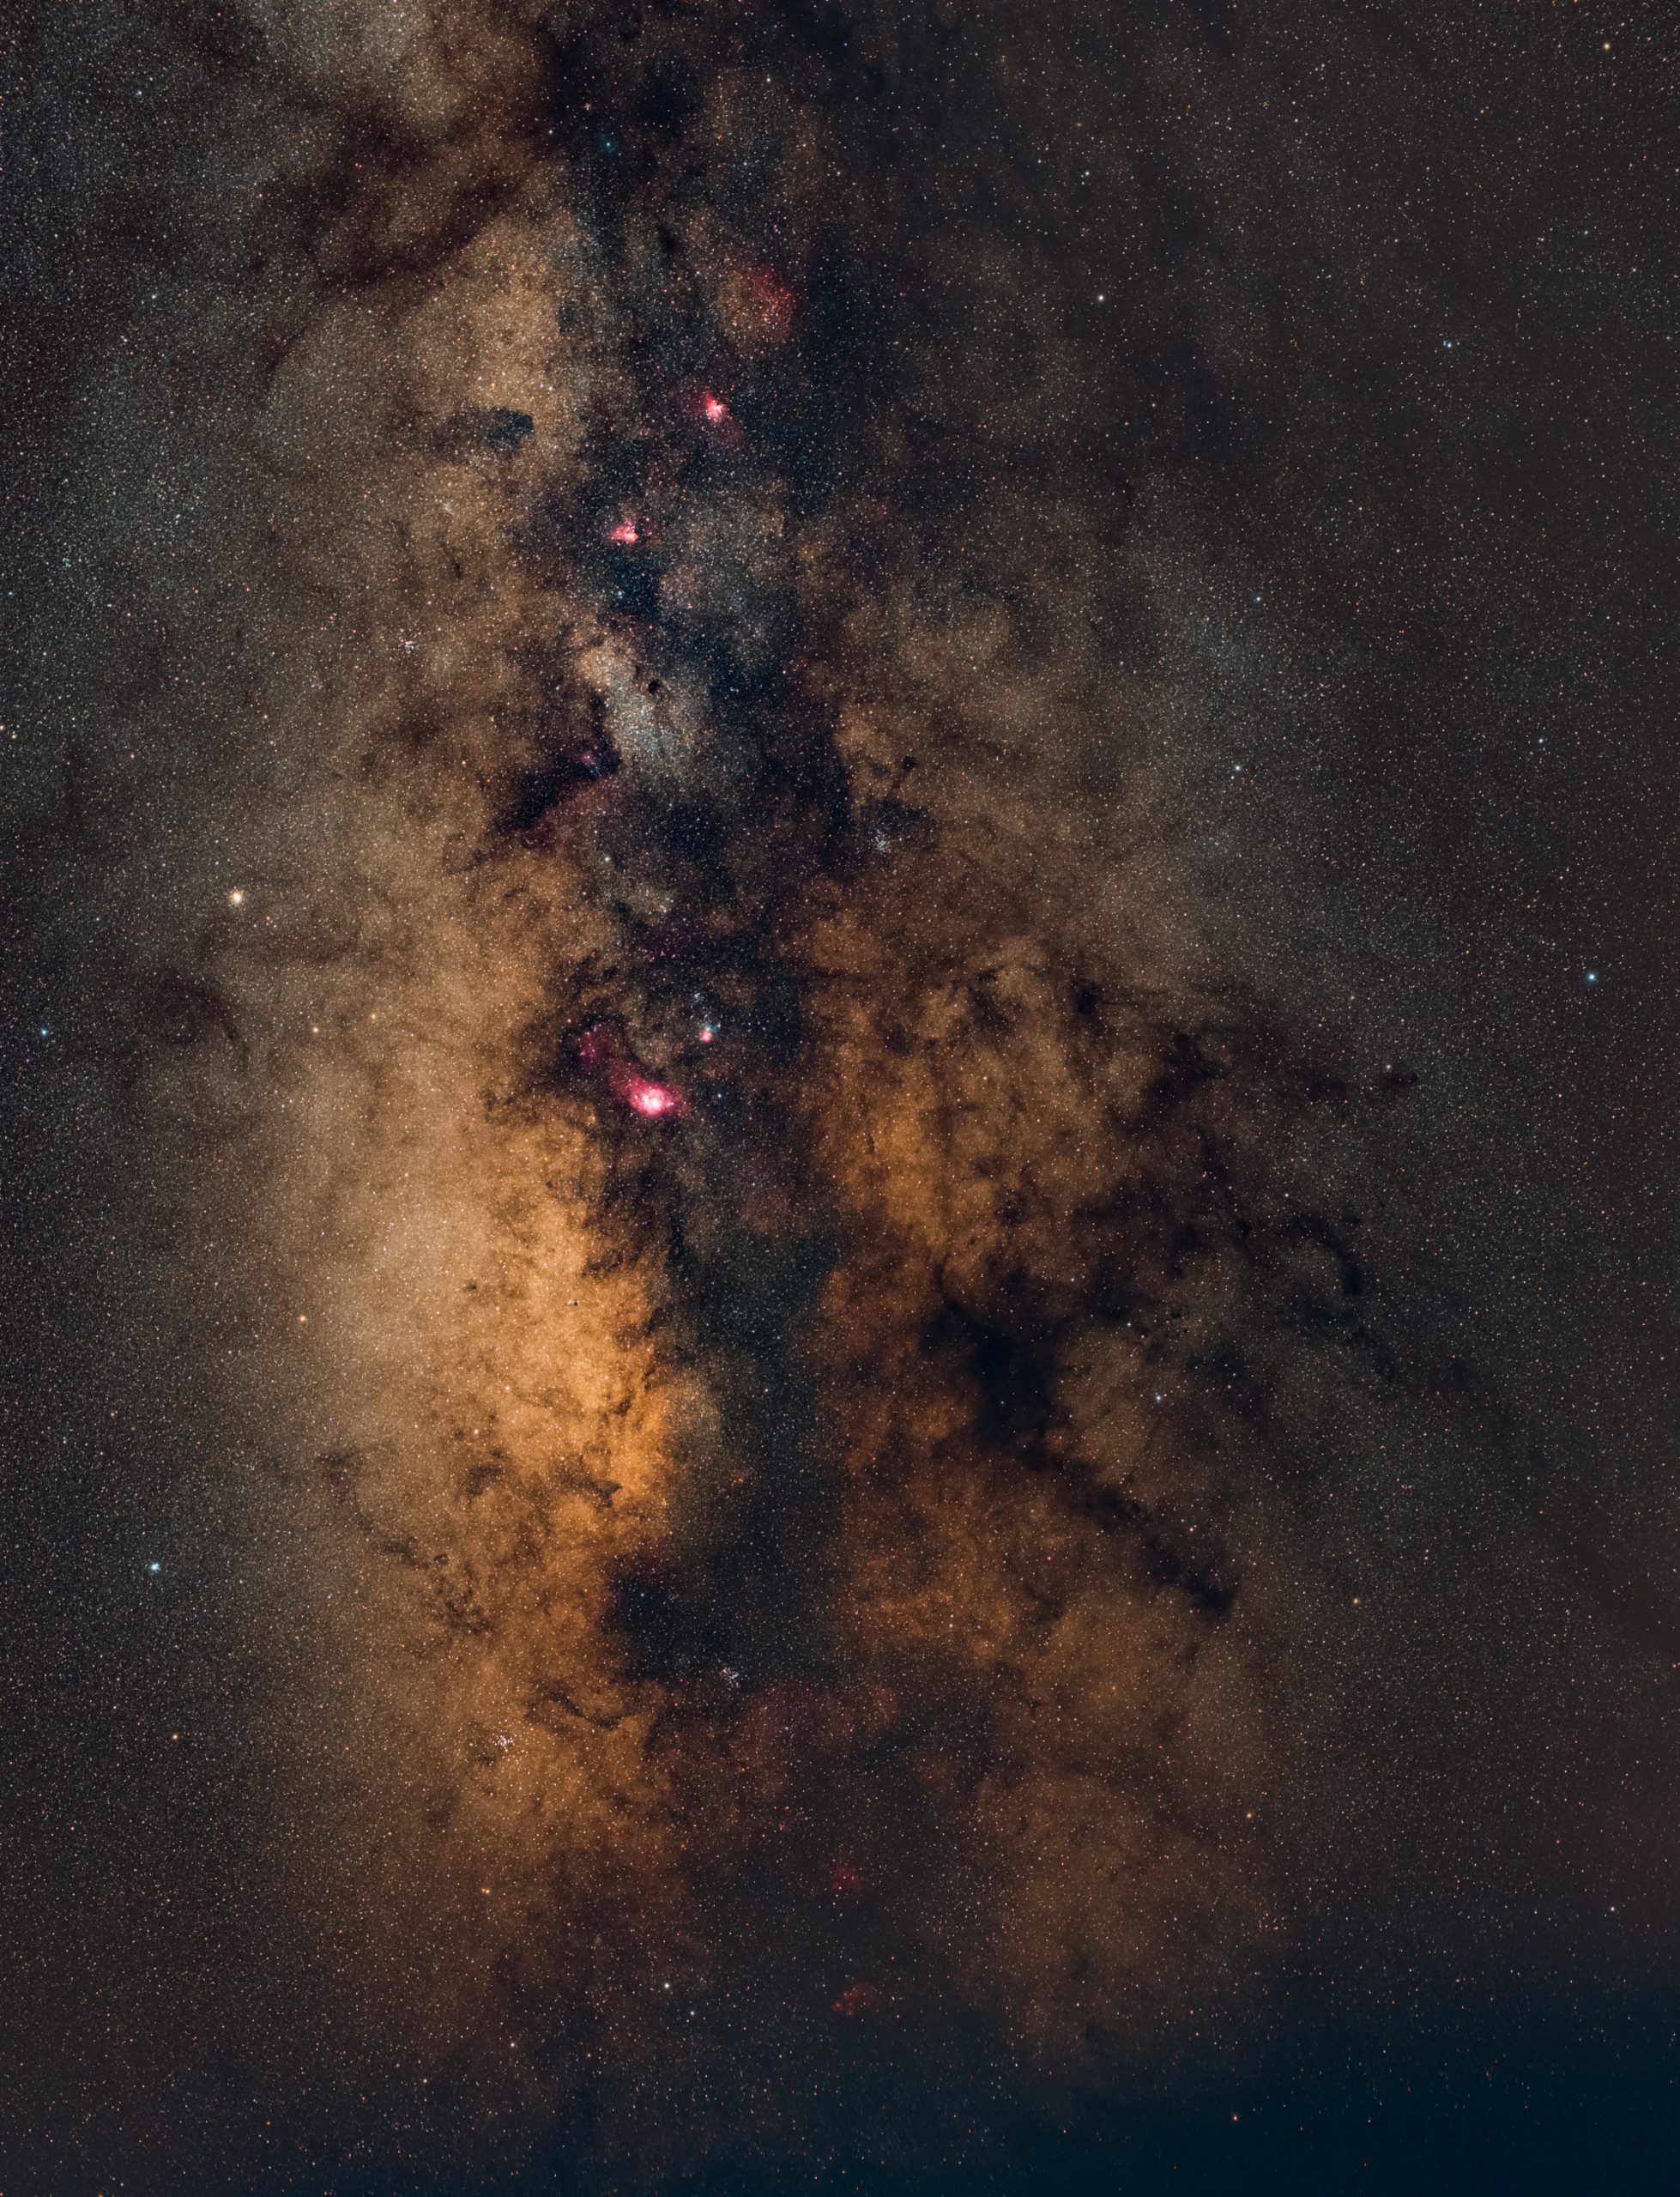
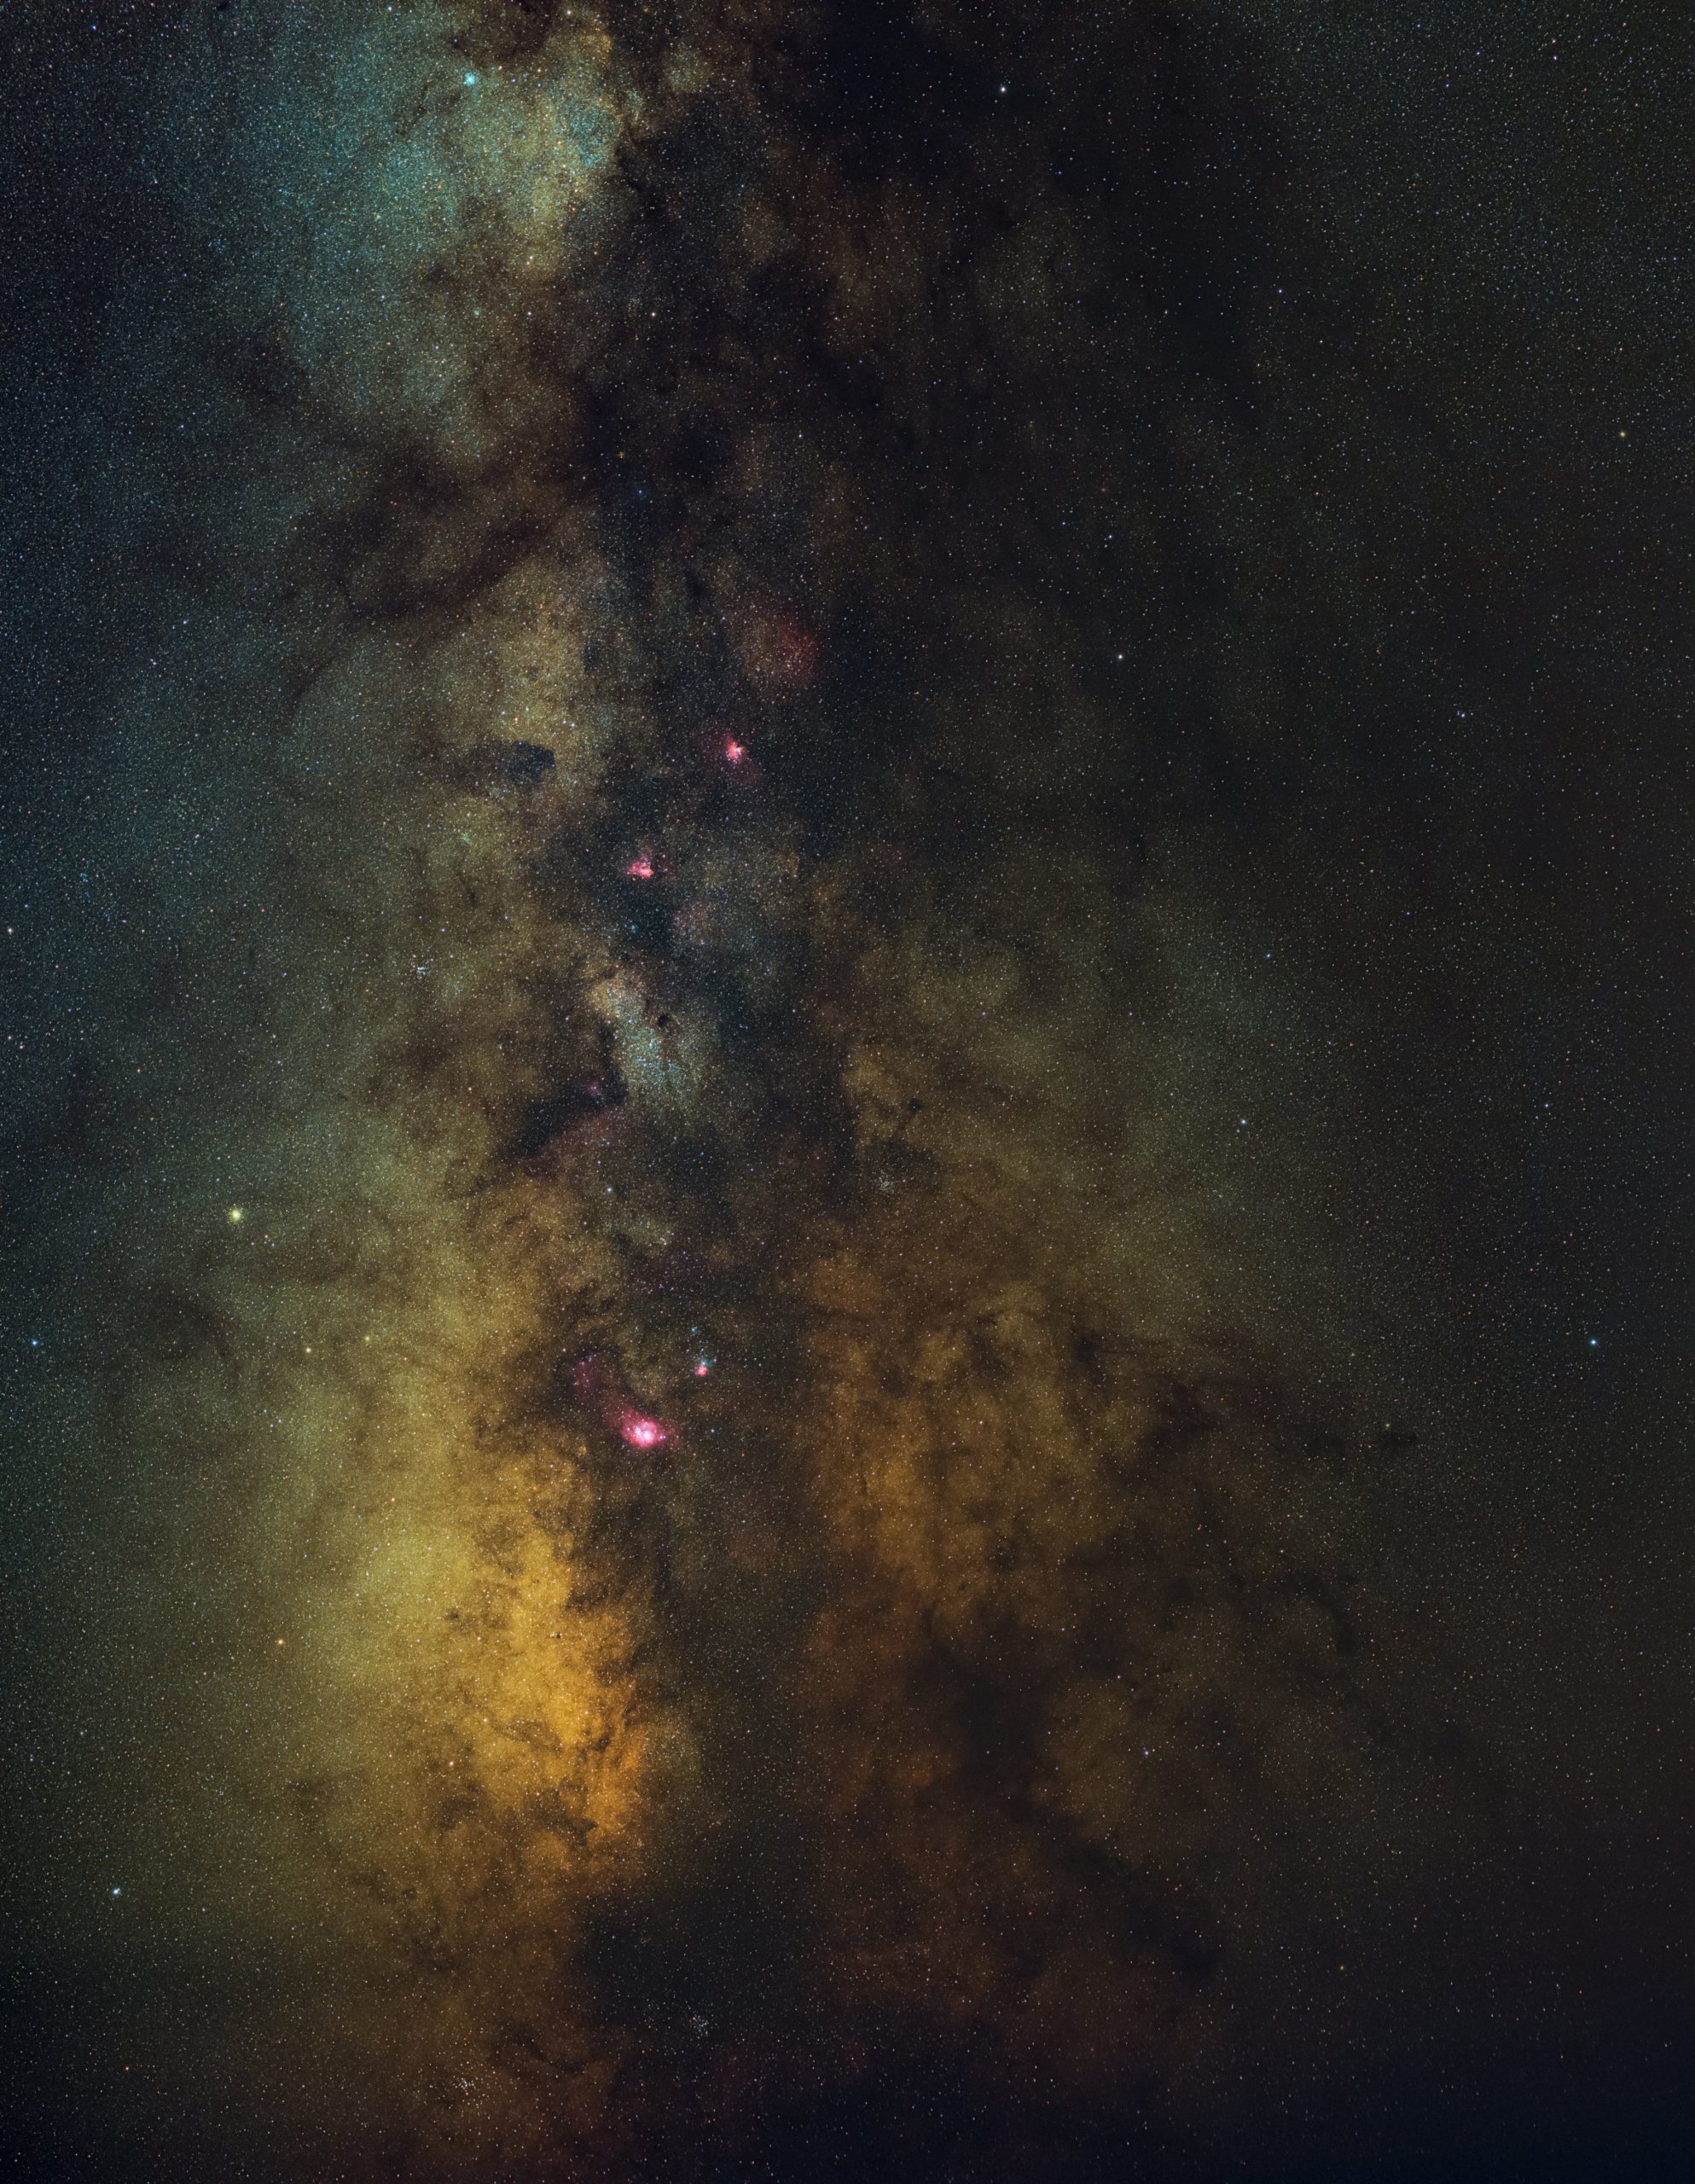
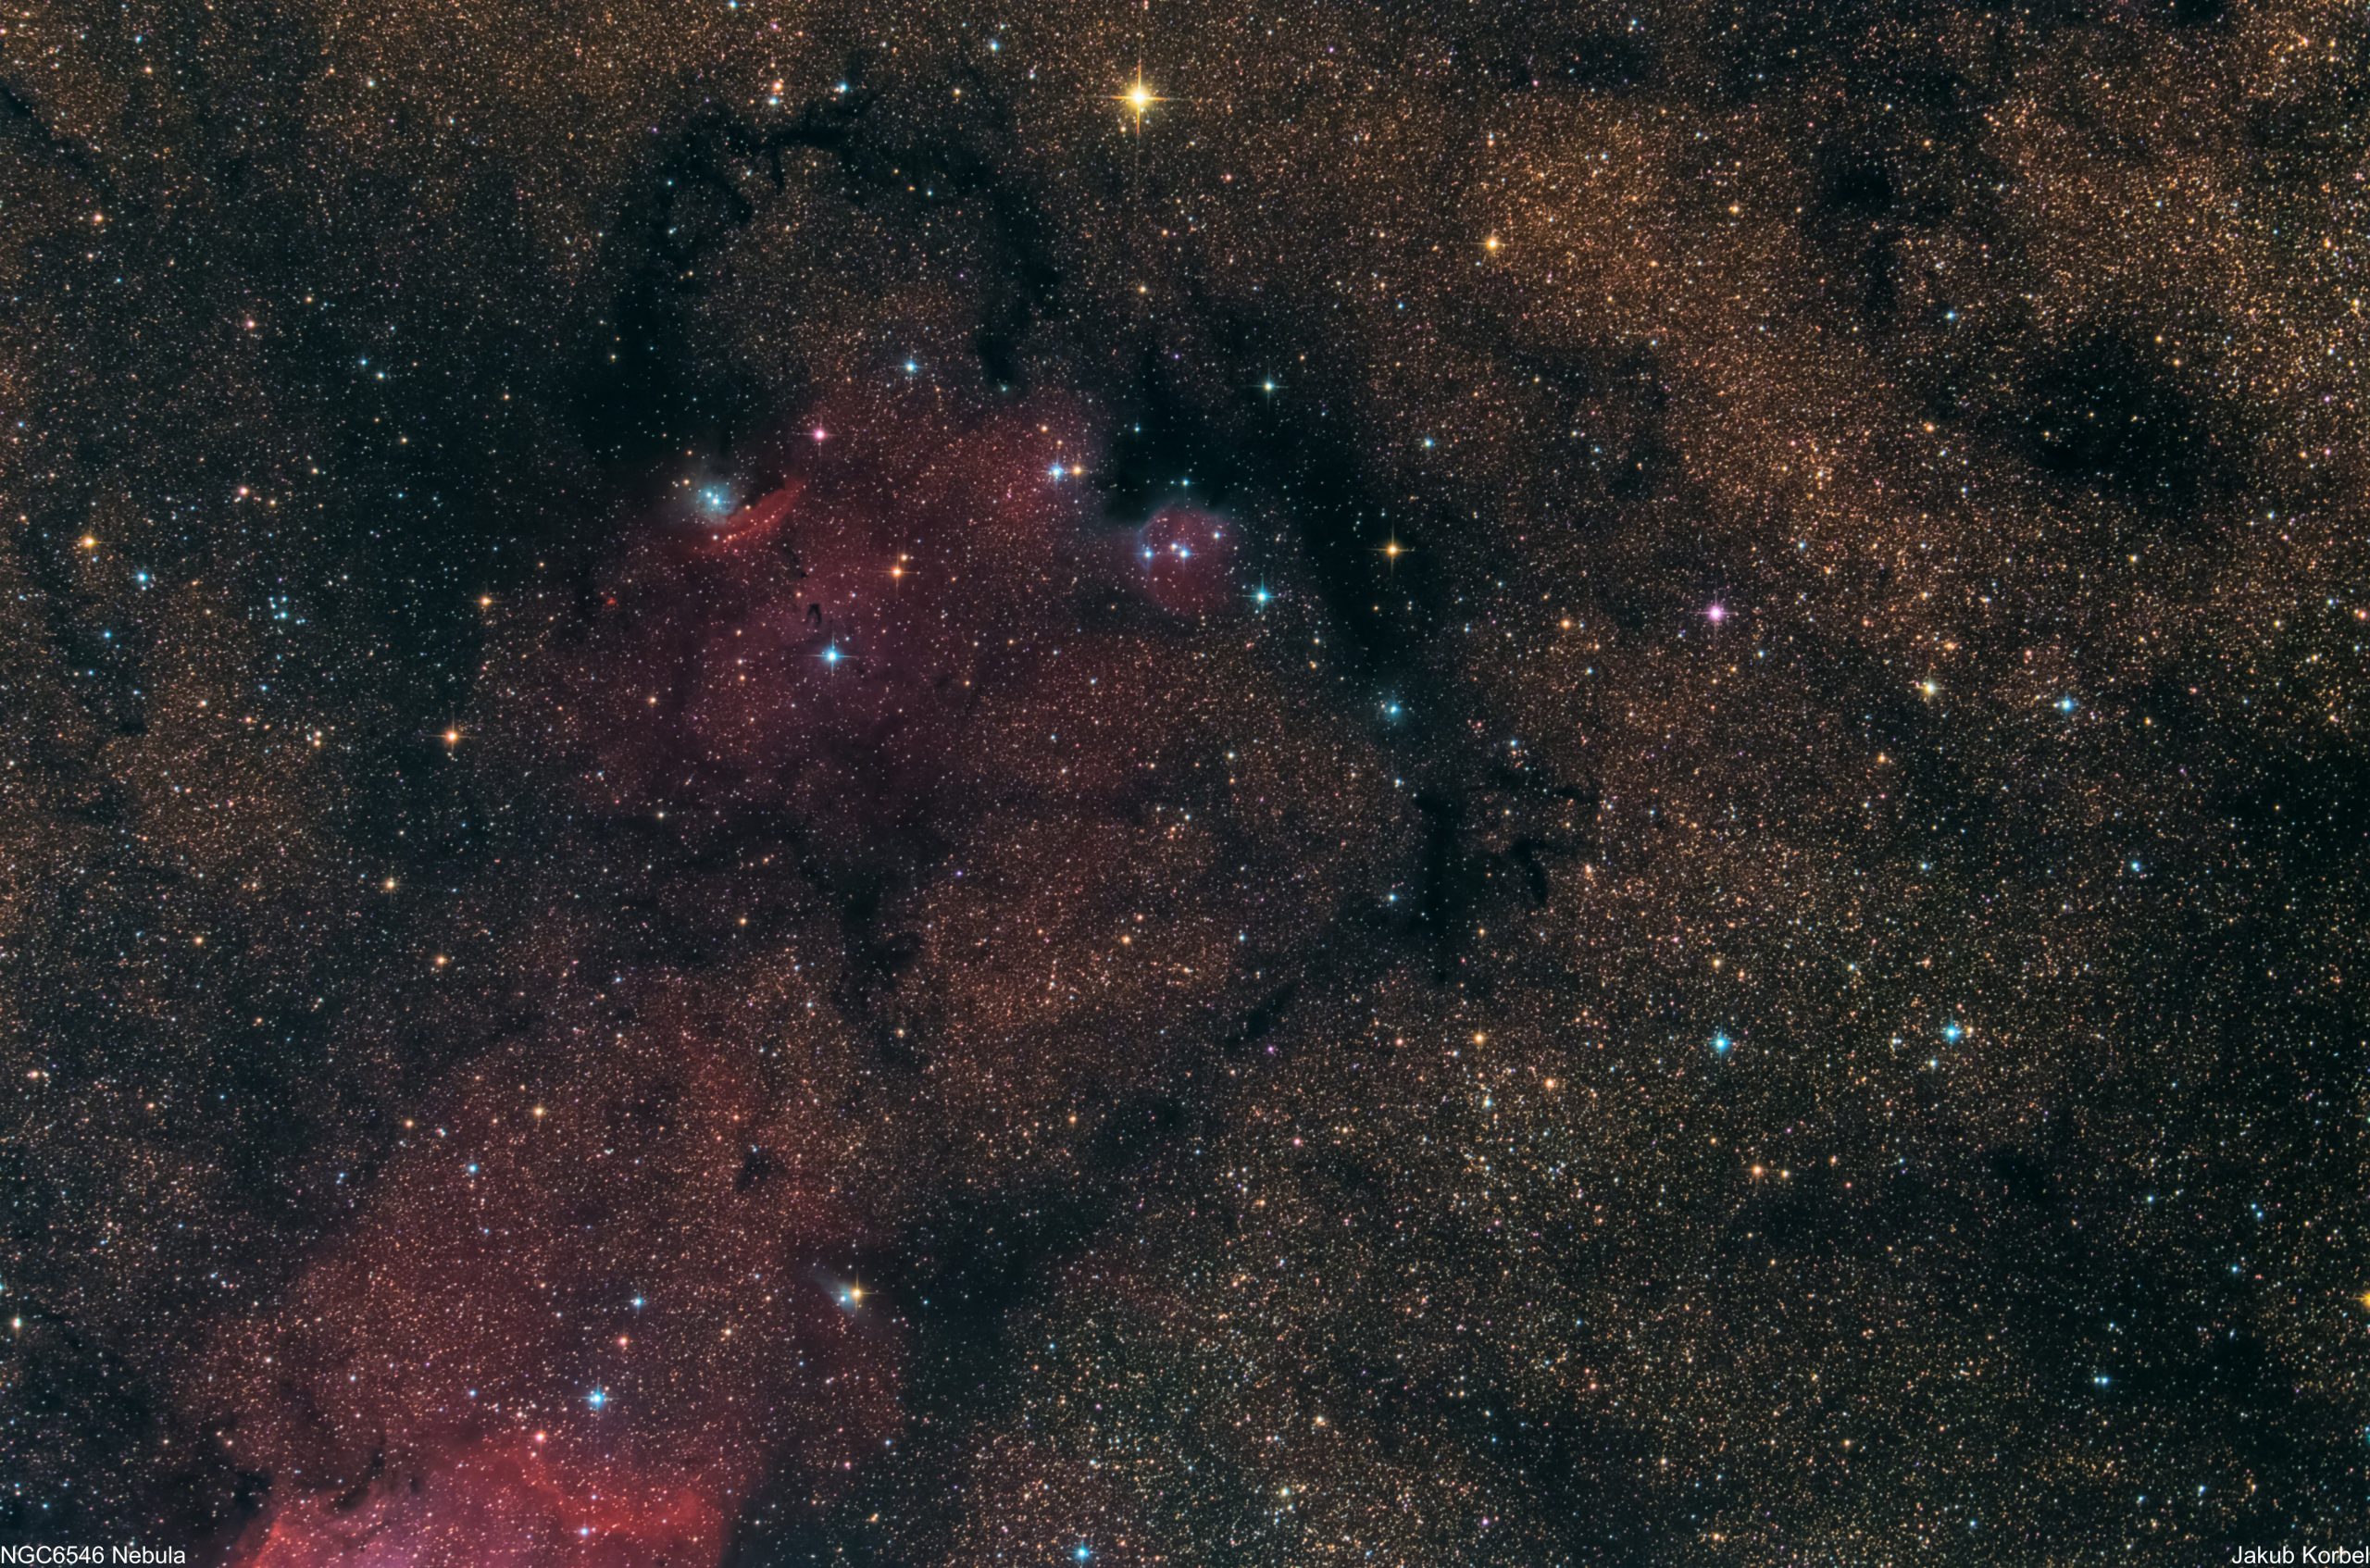
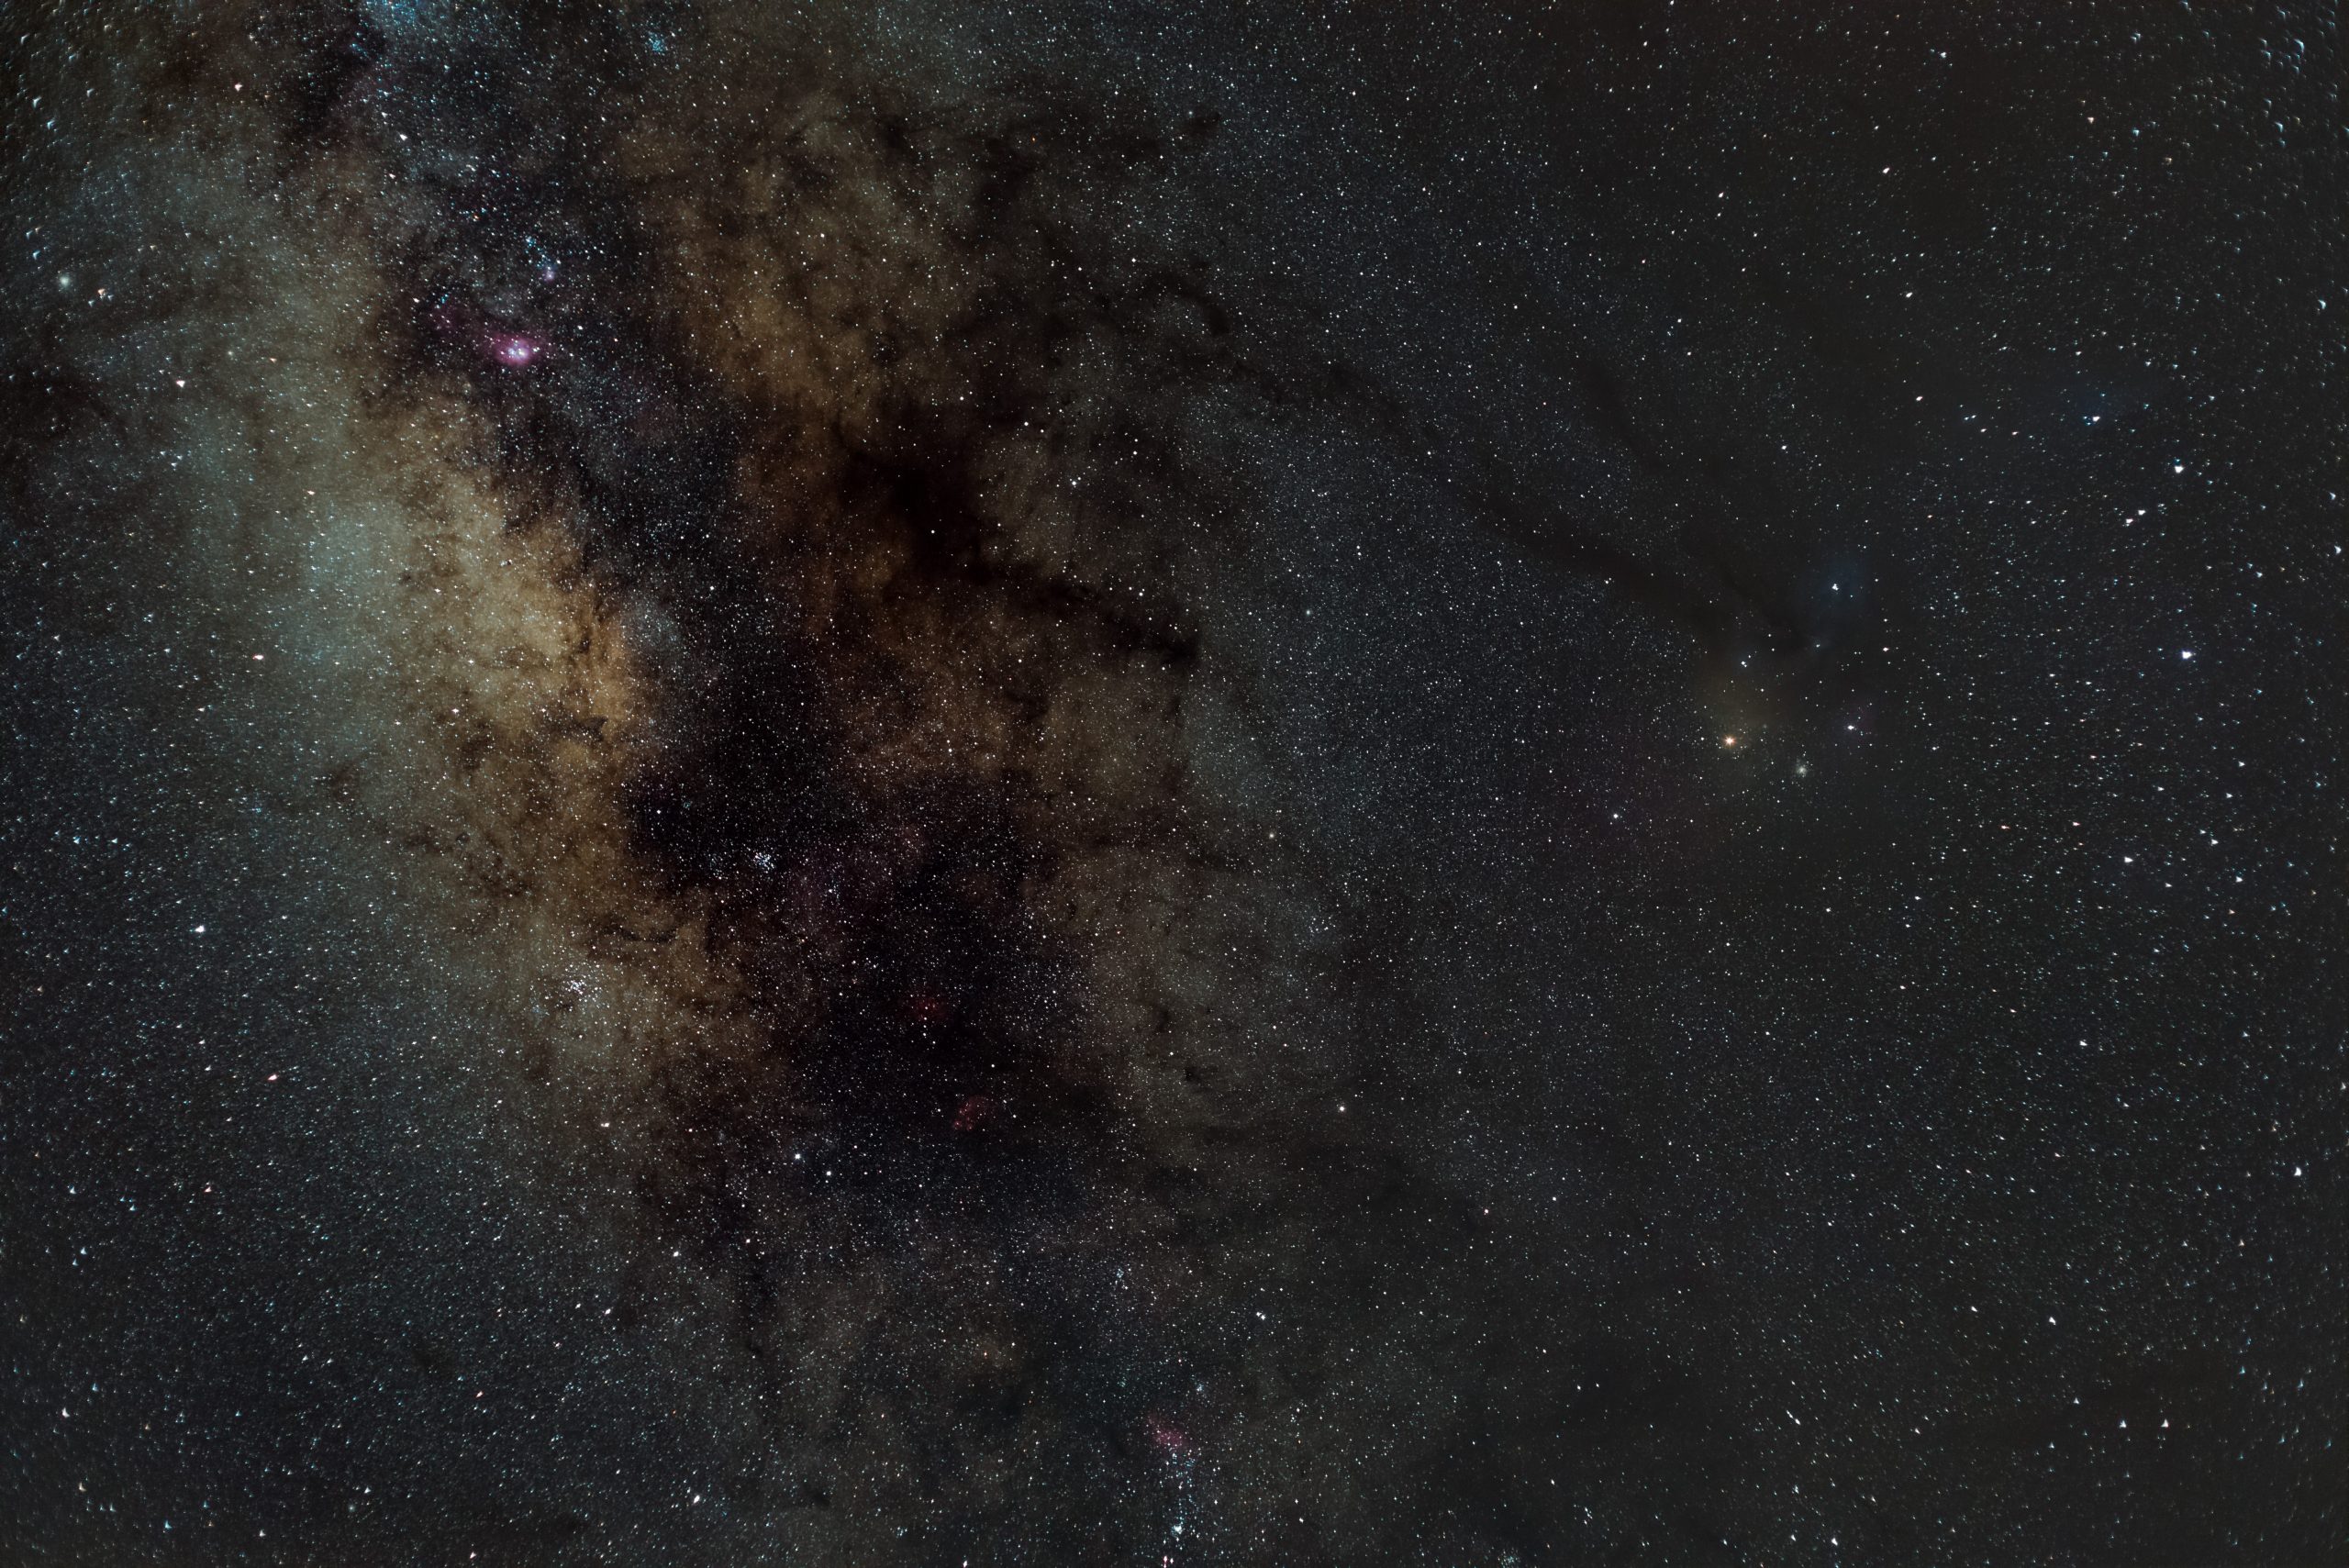
Rho Ophiuchi is in my opinion the most beautiful assembly of the nebulae in the universe. Blue, red, and orange colors are combined to create this magnificent cloud complex. The dominant yellow star Antares (Alpha Scorpii) is a red supergiant, one of the largest visible stars. The star Alniyat (Sigma Scorpii) is surrounded by ionized hydrogen gas. Between these two stars is the M4 globular cluster, which I captured on Fuerteventura. The blue nebula is Rho Ophiuchi, also captured by me earlier.

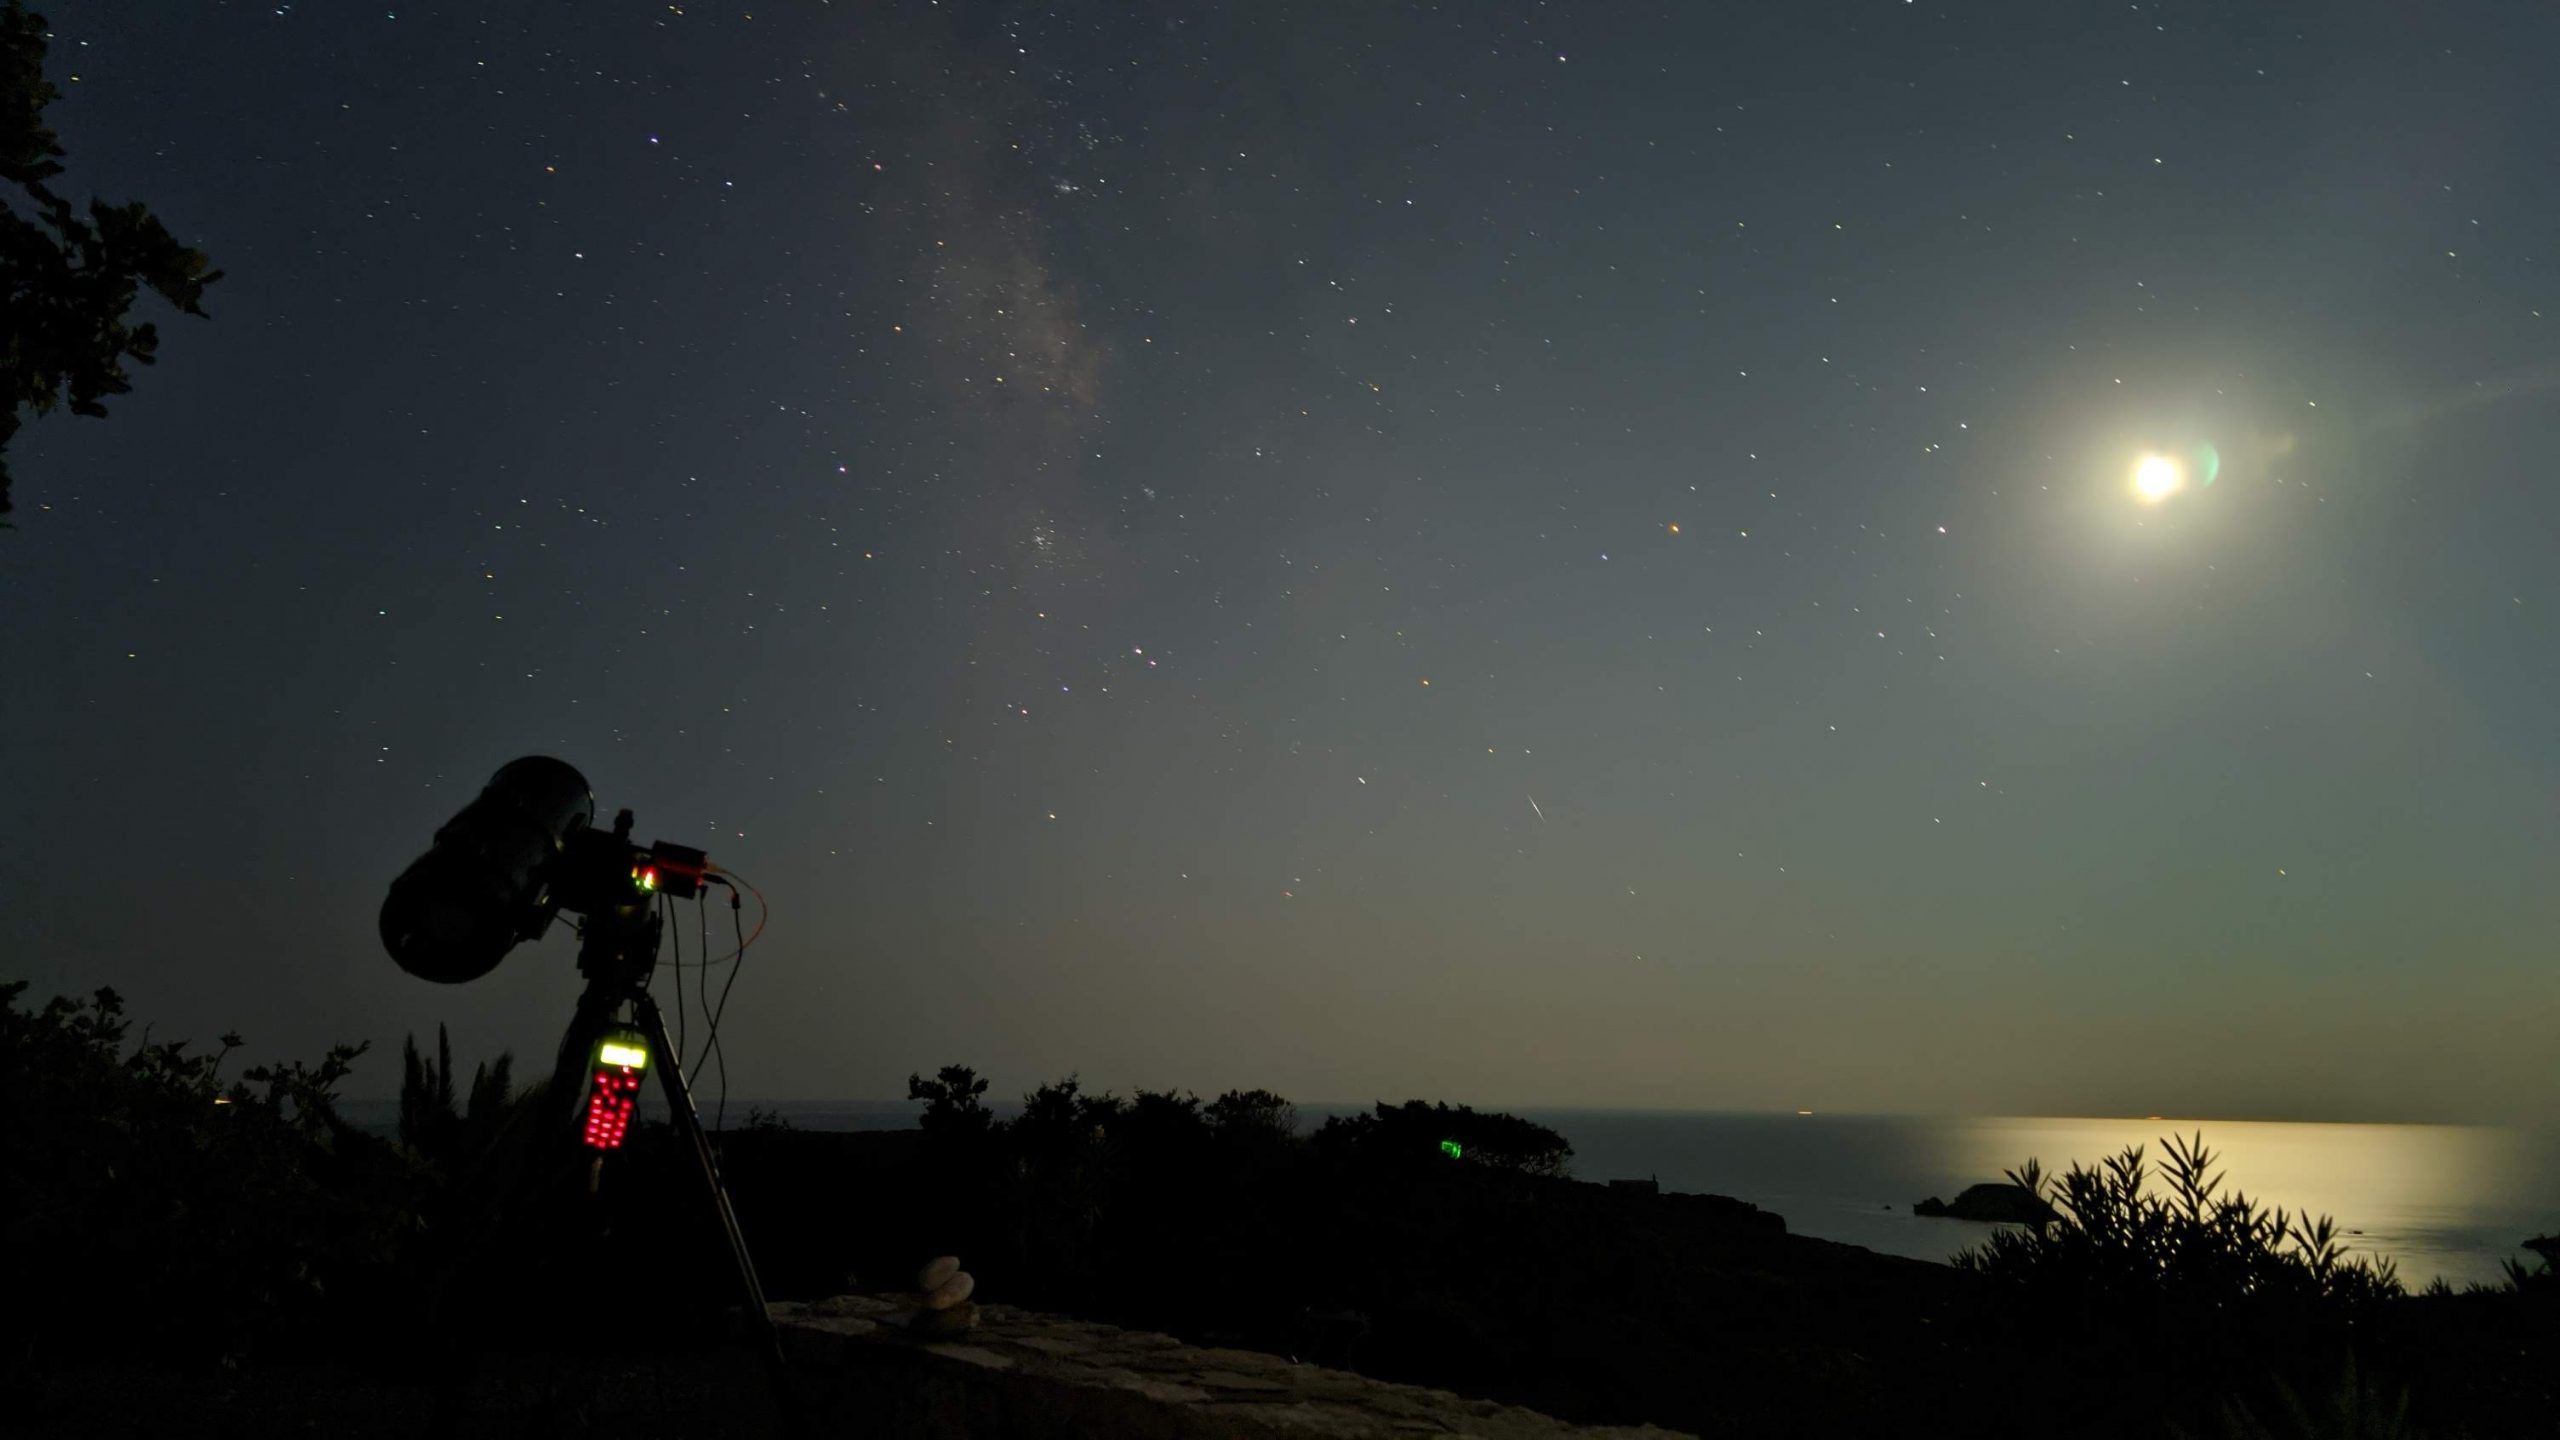
In order to capture the whole beauty, one has to use a relatively short focal length (I used 180 mm), combined with a large sensor area (I used full frame 36×24 mm), and take the shots at a very dark location. This was my primary target during our trip to Crete 2021 and I am very happy that I finally got it framed. However, there is another beautiful nebula called Blue Horsehead in the visual vicinity and if I would turn the camera 90°, I would manage to capture it. So, there is a target for my next expedition.
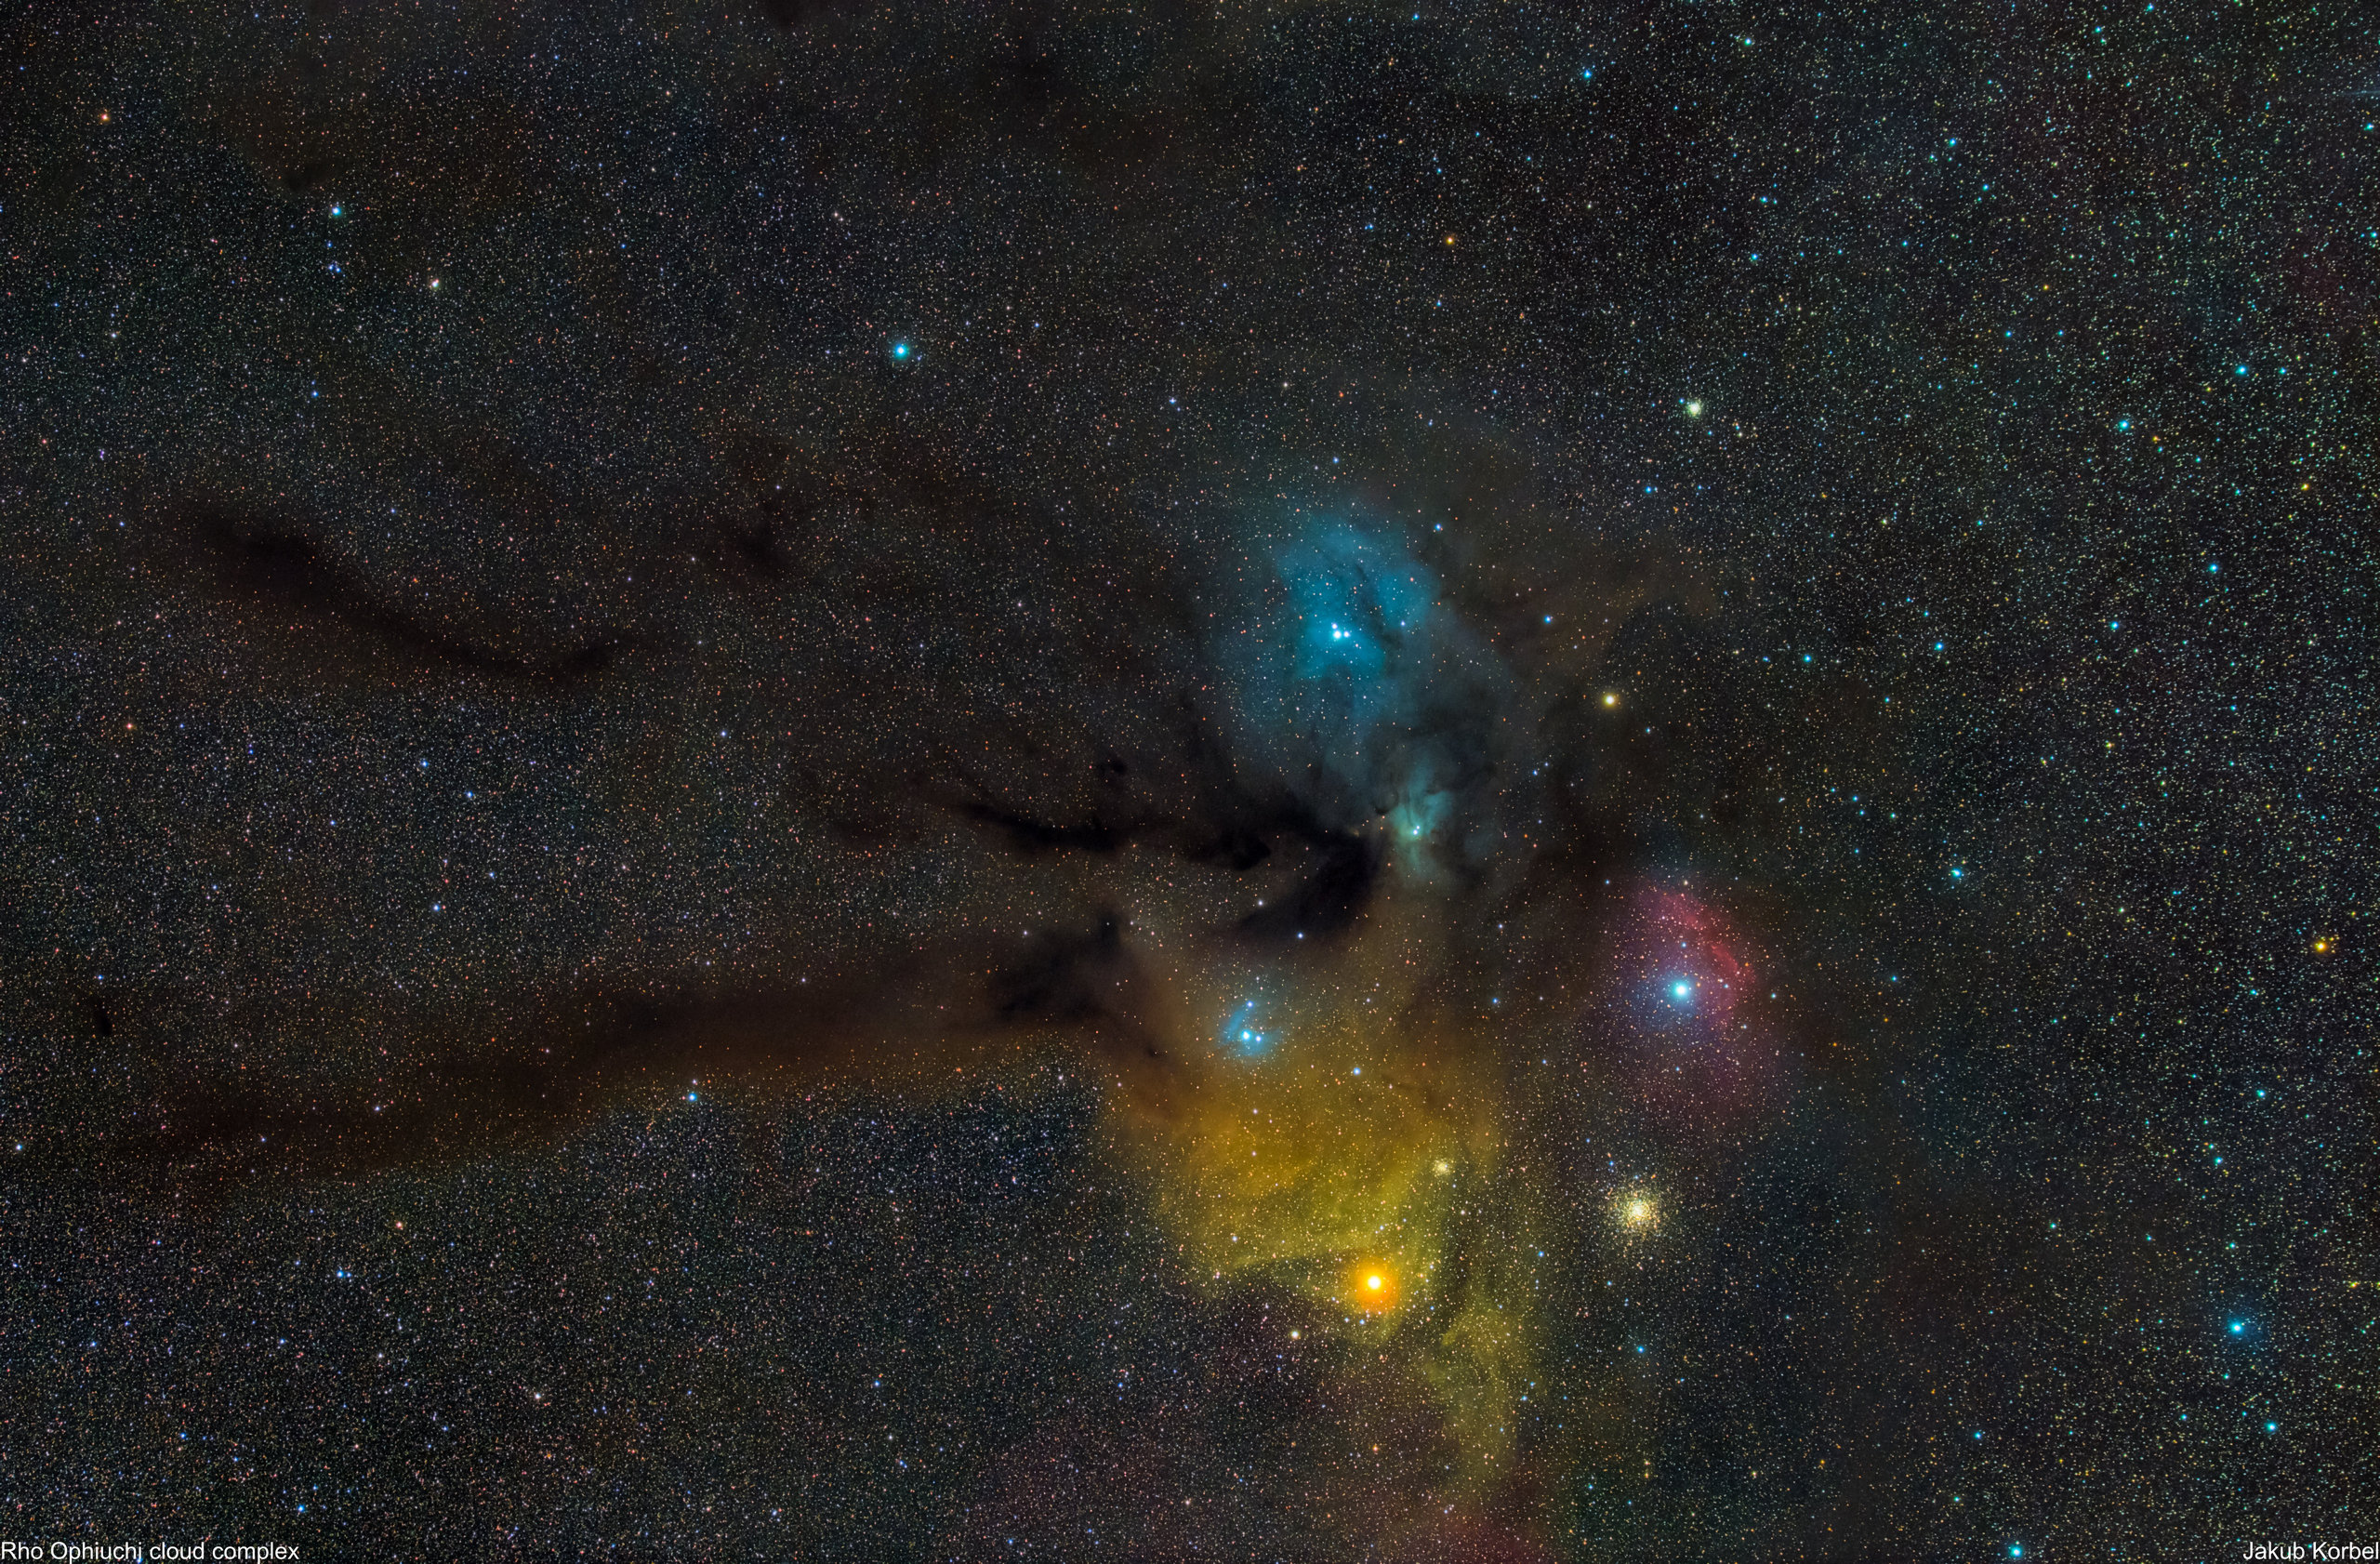
Technical details:

LensAskar FMA180 F4.5
CameraCanon EOS 6Da
MountiOptron Skyguider Pro
Exposure38x120s, ISO 1600
Date2021-07-07

M8 Lagoon nebula M20 Trifid nebula

Constellation Sagittarius is full of deep space objects. I think we all agree that the most beautiful one is the Lagoon nebula, accompanied by the Trifid nebula. I captured these nebulae already, but with a much longer focal length. This time I used a significantly shorter telescope – only 180 mm to reveal the other deep space objects. The bright star at the bottom left is the star Kaus Bolearis, where the archer has his head. This star is surrounded by the globular clusters: M22 Great Sagittarius cluster on the left and M28 on the top.

Technical details:

LensAskar FMA180 F4.5
CameraCanon EOS 6Da
MountiOptron Skyguider Pro
Exposure50x60s, ISO 1600
Date2021-07-03

Newtonian 250/1000 homemade upgrade

After 6 fruitful years with my 10” Newtonian, I started to think about an upgrade. However, I concluded that there is simply no better, reasonably priced telescope, which I can still carry. Ritchey-Chrétien telescopes are better from an optical design point of view, but they are slow F8 and with the best reducer one can speed up the scope to F6, which is still more than one f-stop slower compared to F4 Newtonian. Refractors are slow and the aperture is small compared to any Newtonian. Officina Stellare makes a very nice and fast telescope, but unfortunately out of my budget.

There is simply no other option than to keep using my Newtonian. Instead of a complete change of the telescope, I decided to upgrade the Newtonian. I noticed that the brighter stars have an ugly reflection, especially if the dual-band filter is used. The reflections can be caused by many reasons, for instance:

  • Internal reflections
  • Primary mirror holder
  • Filters

The first issue can be solved by flocking the secondary mirror, but mine is already black on the sides. Another source could be the internal surface of the tube. The simple solution is just to attach some black velour material inside. Nowadays one can get peel and stick sheets for example FLO offers a 5-meter long roll, which is nicely advertised: “Blacker than the blackest black stuff”. I had to completely disassemble the Newtonian and started to place the velour inside:

You can see how darker it gets inside even if you illuminate inside by the LED flashlight. Then, I continued and covered the whole internal surface. It was a straightforward and inexpensive upgrade.

The second upgrade was also straightforward, but more expensive – the primary mirror. I think this is the root cause of the ugly reflections/halos around the brighter stars. The problem is well described on the internet (e.g. cloudy nights) and it’s caused by the three clamps, holding the mirror. Inexpensive would be to use an aperture mask and simply cover these clamps (like suggested on cloudy nights). However, this reduces the aperture and ability to collect as much light as possible. I decided to choose another path. I noticed that Teleskop-express offers Quartz primary mirrors with thread M50 on the backside of the mirror. This is exactly what I need – a new method of clamping. I ordered the mirror with the mirror cell because the old one cannot be used. Well, I thought that this will solve all my problems with the reflections, but a surprise popped up during the unboxing. The mirror had finger imprints, but this would be the smallest problem. The main problems are the uncoated marks on the edges:

I immediately contacted Teleskop-express for an explanation. I was told that these uncoated marks have all Quartz mirrors and they are caused by the clamping during coating in a vacuum chamber and it is not a quality issue. They also claim that it should have no influence on the quality of the astrophotos. Well, we will see about that.

The uncoated regions are roughly 2 mm wide and 12 mm long. I assumed that the external edge is perfectly round and if I would know that the mirror has these defects, I would not order it. I use CatsEye collimation tools, which is a very precise method, but it requires attaching a self-adhesive triangle on the primary mirror. It’s quite a straightforward procedure. I tried to be as precise as possible and when I attached the triangle, I noticed that the original circle denoting the center of the mirror is roughly 2 mm off. Here is the picture from distance:

And here is the comparison – the new mirror (left) vs. the old mirror (right):

I had an opportunity to recapture the M99 galaxy this year. In the field of view, there is the HIP 60089 star with a magnitude of 6.5. The left picture was captured with the old primary mirror and the right one with the new Quartz primary mirror. Obviously, the new one has fewer reflections and three dark shadows in the shape of the radioactive symbol vanished. However, there are still some shadows in the halo around the star. Please note that I didn’t use any filter in the optical train, only the MaxField coma corrector. So the filter can be excluded as a root cause of this problem. There are two uncoated regions on the mirror, approximately 45° from each other, which corresponds well with the shadows. On the other hand, there is another star in the field of view, in the upper left corner. This star has a magnitude of 8.95. This one looks significantly better and definitely more circular.

Conclusions:

Well, I have mixed feelings about the upgrade of my Newtonian. It was easy and inexpensive to attach the velour material inside the tube. The change of the mirror and its fixation was also simple, but quite expensive and it didn’t solve the problem fully. It only reduced the reflection around the +6 magnitude starts, but there are still some reflections, most probably caused by uncoated regions on the edge of the mirror. If you already have a Newtonian and if you are considering purchasing TS-Optics Quartz Newtonian Primary Mirror, probably the aperture mask would be a more effective and significantly cheaper solution.


M81 Bode Galaxy M82 Cigar Galaxy

I already captured these magnificent galaxies some time ago (short description here), but with a different camera. Moreover, I upgraded the primary mirror of my Newtonian telescope and the difference is noticeable. My current camera has a slightly bigger sensor, therefore I managed to squeeze an additional galaxy NGC 3077 The Garland Galaxy (upper left corner) into the field of view.

The image was captured during two nights and in total it’s a stack of 100 pictures each 180 s long. Unfortunately, the light pollution in my area doesn’t allow me to capture a better picture.

TelescopeNewton 254/1000 mm
Aperture254 mm
Focal length950 mm
MountGemini G53f
AutoguidingZWO 174MM, TS 60/240 mm
CameraZWO 071 Pro @-10°C
CorrectorMaxField coma corrector
FiltersNo
Exposure100x180s, Gain 95, bin 1x1,
Date2021-04-09

M99 Galaxy

This beautiful spiral galaxy is listed under number 99 in Messier’s catalog. It can be visually located during the spring months in the southwest corner of the constellation Coma Berenices. The galaxy has several spiral arms, which are the product of the interaction with another galaxy. This interaction also induced very high angular velocity, which is the highest in Messier’s catalog. Specifically, the outer parts move with a velocity of 1200 km/s with respect to the center of the galaxy.

I dedicated two nights to this galaxy. The telescope was collecting two whole nights the light traveling 45 million light-years. In total, the picture is a stack of 130 single shots, each 3 minutes long.

TelescopeNewton 254/1000 mm
Aperture254 mm
Focal length950 mm
MountGemini G53f
AutoguidingZWO 174MM, TS 60/240 mm
CameraZWO 071 Pro @-10°C
CorrectorMaxField coma corrector
FiltersNo
Exposure130x180s, Gain 95, bin 1x1,
Date2021-04-05

iOptron SkyGuider Pro, Askar FMA180 f4.5 review

I made a big step towards ultra-portable astrophotography. On Kythira I first time placed my workhorse Canon EOS 6Da on mini mount Baader Nanotracker and made quite stunning pictures of the Milky Way. I was so excited and started to think about more serious “pocket-size” astrophotography. The requirements were the following: no external batteries, telescope, and camera should have max. 1.5 kg weight, focal length around 200 mm. The camera it’s simple, I simply keep using my modified Canon 6D.

The telescope is quite trickier, but I found Askar FMA, which has a 220 mm focal length, which is shortened by included a full-frame reducer to 180 mm. Aperture 40 mm yields for this focal length to speed F 4.5. The scope weighs only 400 g (700 g with the rings and EOS adapter). There is an M48 thread at the front of the telescope, which is very useful to attach the 2” mounted filters, particularly if you live in a light-polluted area.

There are several travel mounts on the market. Probably the most famous is Skywatcher Star Adventurer. I was about to pull the trigger on this mount, but I found another one, which will fulfill my requirements even better – iOptron SkyGuider Pro. iOptron has the same payload (5 kg with counterweight, 1.5 kg without) and has many interesting features:

  • Integrated illuminated polar scope
  • The torque from the motor to the worm gear is transmitted by a belt (this should minimize the backlash),
  • Integrated battery, which can be changed by USB cable
  • ST-4 socket for autoguiding

iOptron is slightly lighter than Skywatcher, so the decision was made. And how does it perform? I must say: VERY WELL! I got a chance to use it at home, so I screwed the IDAS NB1 filter in front of the Askar and captured the center region of the Orion and California nebula. The mount is tracking very accurately even without any counterweight and the number of bad photos caused by poor tracking was zero.

The telescope surprised me very positively as well. The connection to the camera is done by T-thread (M42), so I expected significant vignetting on the full-frame sensor, because the diameter of the thread is 42 mm, whereas the diagonal of the sensor is 43 mm. Surprisingly, it vignettes very little, and even flat frames are not necessary. The darker corners can be corrected by dynamic background extraction in PixInsight. The stars are a little bit oval at the bottom corners, but we are here looking at a full-frame sensor. In the end, I am very happy with the price/weight/performance ratio of Askar.

Let’s have a look at how heavy is the whole rig:

Tripod2.3 kg
iOptron SkyGuider1.5 kg
Canon EOS 6D0.8 kg
Askar0.7 kg
Total5.3 kg

This can fit into any backpack.

Here are the pictures:

Technical details:

LensAskar FMA180 F4.5
CameraCanon EOS 6Da
MountiOptron Skyguider Pro
Exposure60x60s, ISO 1600
Date2021-02-18

Technical details:

LensAskar FMA180 F4.5
CameraCanon EOS 6Da
MountiOptron Skyguider Pro
Exposure44x120s, ISO 1600
Date2021-02-18

Chasing darkness in Switzerland – Flims Laax

I got a fantastic idea to combine our ski vacation with chasing darkness and creating some spectacular wide-angle astrophotography. I started to search for a hotel, preferably at the top of the mountain, where would be very low light pollution. I found one – Berghaus Nagens in ski resort Flims-Laax. According to the light pollution map, there should be ideal conditions given by the altitude 2000 meters above the sea level, leaving the bright villages in the valley. The hotel has a south-oriented terrace, which should be also optimal to capture the most interesting deep space objects. I knew that to take even the portable telescope together with ski equipment is not feasible, so I took just an astro-modified Canon EOS 6D, two lenses, a tripod, and a portable mount. During our trip to Kythira, I used Baader Nanotracker, which did the job, but I was struggling a lot with polar alignment, so I decided on an upgrade. Specifically, I purchased iOptron Skyguider Pro. It is still very portable, but almost like a real equatorial mount with integrated polar scope.  

So, I booked the hotel, packed ski, previously mentioned astro-equipment, and left for a couple of days towards a new experience. The arrival is quite strict – you have to be at the bottom gondola station between 15:00 and 15:30, to take the lift up. If you miss this gondola, you will not get up. Fortunately, we managed and even first evening we saw few stars in holes between the clouds. The next night the weather improved, but the clouds were still making serious astrophotography nearly impossible. Last two nights the sky cleared and even the Orion arm of the Milky Way was visible by the naked eye. I grabbed a sky quality meter and measured only 21.0, which is not that spectacular. The problem was not caused by the light from the hotel’s restaurant (they switched the lights off at 23:00), but the reason is that we were surrounded by slopes, which have to prepare and the Pistenbullys making the job done have extremely powerful headlights. I can imagine that as soon the ski season is over and the snow melts away, the conditions will be excellent. In the end, I took only two pictures 24 mm and 50 mm of the constellation Orion. Such poor performance can be explained by the extreme weather conditions (freezing -15°C) and my complete tiredness after the whole day of skiing. It’s definitely easier to spend a whole day on the beach and in the evening do some astrophotography because your body is charged by solar power.

Anyway, these few days were mainly about skiing and we enjoined that very much. I cannot imagine a better place for this purpose. One can simply put the ski on at 8:00 be alone on the very well-prepared slopes. Berghaus Nagens is therefore 100% recommendable.

Technical details:

LensSamyang 24 mm f1.4 @ f2.8
CameraCanon EOS 6Da
MountiOptron Skyguider Pro
Exposure46x15s, ISO 1600
Date2021-02-14

Technical details:

LensSigma 50 mm f1.4 Art@ f2.0
CameraCanon EOS 6Da
MountiOptron Skyguider Pro
Exposure44x30s, ISO 1600
Date2021-02-13

Mars

I have been waiting for this planet very long. It doesn’t mean that Mars hasn’t been visible, it was, but not from my backyard. I live in central Europe, specifically on the 47 parallel. This means that all planets should be 43° above the horizon during the conjunction (when Sun, planet, and observed planet are in one line). Well, this would be true, if the Earth would be spinning perfectly perpendicular to the plane of the Solar System. In reality, the Earth has a tilt, which causes that some years are much better than the others. A better year for a certain planet means that the planet raises a lot above the horizon, a bad year means that it stays close to the horizon.

This year was one of the best years for the planet Mars. The next opportunity will occur in 15 years.

The picture is a stack of 750 best frames, each 7.3 ms long. The focal length of the Celestron C14 telescope was extended from 4000 mm to 6400 mm by the Siebert Barlow lens.

Telescope:Celestron EdgeHD C14
Aperture:354 mm
Focal length:6400 mm
MountGemini G53f
Autoguiding-
Camera:ZWO ASI228MC
Corrector:Barlow 1.6
Filters:UV IR cut
Exposure:3000xRGB (25% used), 7.3 ms, Gain 219
Date:2020-10-25

Chasing darkness on Kythira

Even across the Covid pandemic in 2020, we managed to organize the second trip to chase the darkness. As usual, our summer vacation took place in Greece, this time on the island Kythira. Based on the search on the light-pollution map, I concluded that the best would be the south-west side of the island. I found Vanis house in this location and booked it. The place was fantastic. Westside is obviously optimal for observation of the sunsets – and they were magical.

After the sunset, the Milky Way showed up and it was spectacular. Measured SQM reached 21.5, which means it was one of the darkest locations I have ever been to. My primary target was the Milky Way and I managed to capture it really well. Detailed pictures are in a separate post, but here is the view south during a moonless night.

Milky Way in fron of Vanis House
Vanis House – Waxing Crescent and Milky Way

Besides the Milky Way, I also took my portable Newtonian and captured a few deep space objects. I have to say that our vacation was not just about astrophotography, but also about enjoying the Greek sun, beautiful beaches, tasting delicious food, and simply relaxing. Conclusions: I love Kythira!

View from Vanis House
Avlemonas
Kaladi beach – the most beautiful beach on the island
Paralia Kalami

Milky Way on Kythira

To capture our home galaxy Milky Way properly was my dream for a very long time. A long time ago I started with Canon EOS 40D with Tokina 11-20 f2.8. Then I changed the rig to Olympus PEN-F with Zuiko 12-40 mm f2.8. A year later I upgraded to Zuiko 8 mm f1.8. Recently I purchased a second-hand full-frame camera Canon EOS 6D and I let it modified for astrophotography. All my previous attempts were based on a single photo strategy, following the 500 rule. Basically, you divide 500 by the focal length of your lens and you get maximal exposure time. Of course, you have to crank up the ISO, use as wide aperture as possible, and a tripod. Photos produced by the above-described methods lack the details or they are very noisy, depends how much you de-noise in post-processing.

However, there is another method, which requires a tracker, which is basically a motor with a gear, which makes a full revolution in one day. By other words, it compensates for the Earth’s rotation. This means, you are not limited by a single picture, but you can make as many pictures as the weather allows. Of course, you have to stack the pictures. Therefore the post-processing is a bit complicated, but the signal to noise ratio can be significantly improved. I purchased Baader Nano tracker for my trip to Fuerteventura, but I was struggling with the equipment (shutter release, polar alignment, and lens) and as soon I got familiar with the setup, the weather got really bad, so the outcome was not as expected.

I got a new opportunity to test this set up on Kythira, where the Milky Way was not spoiled by the light pollution, because in direction south, there was nothing else than the Mediterranean sea. The primary target was the Rho Ophiuchi cloud complex. I have to say that I managed to capture it really well:

LensSigma 50 mm f1.4 Art@ f2.8
CameraCanon EOS 6Da
MountBaader NanoTracker
Exposure80x25s, ISO 1600
Date2020-07-11

After collecting 80 photos of Rho Ophiuchi, I pointed the camera to the east side of the Milky Way and I tried to capture the brightest objects in the sky – Jupiter and Saturn (upper left corner). Can you see the dark cloud at the bottom left corner? This is NGC6726 Nebula and NGC 6723 Chandelier Cluster.

LensSigma 50 mm f1.4 Art@ f2.8
CameraCanon EOS 6Da
MountBaader NanoTracker
Exposure40x23s, ISO 1600
Date2020-07-11

The next day I turned the camera 90 degrees and capture the Milky Way again. At the bottom, there is “a line” of red nebulas. From left to right: Cat’s Paw Nebula, Lobster Nebula, Lagoon and Trifid Nebulae, Omega Nebula, and Eagle Nebula. The brightest object at the top right is Jupiter, making some reflections.

LensSigma 50 mm f1.4 Art@ f2.8
CameraCanon EOS 6Da
MountBaader NanoTracker
Exposure47x25s, ISO 1600
Date2020-07-12

Here is another stack of 40 pictures targeting the core of the Milky Way.

LensSigma 50 mm f1.4 Art@ f2.8
CameraCanon EOS 6Da
MountBaader NanoTracker
Exposure40x25s, ISO 1600
Date2020-07-12

Later on, the Milky Way started to submerge into the Mediterranean Sea, so I changed the composition slightly, to capture the constellation Scutum. I also changed the post-processing technique and left bit of the green color. 

LensSigma 50 mm f1.4 Art@ f2.8
CameraCanon EOS 6Da
MountBaader NanoTracker
Exposure47x25s, ISO 1600
Date2020-07-12

I also took a different lens with me – Samyang 24 mm f1.4. This lens is theoretically very fast, but I experienced very ugly stars if it’s fully opened. The reasonable aperture starts at f2.4, but at f2.8 the sharpness is very good, except in one corner. Here is a stack of 55 pictures, 60 second each:

LensSamyang 24 mm f1.4 @ f2.8
CameraCanon EOS 6Da
MountBaader NanoTracker
Exposure55x60s, ISO 1600
Date2020-07-17

Or here is another wide-angle picture, which is a stack of 60 samples, each 24 second long:

LensSamyang 24 mm f1.4 @ f2.8
CameraCanon EOS 6Da
MountBaader NanoTracker
Exposure60x24s, ISO 1600
Date2020-07-13

The last picture I would like to post here is made by the smartphone Xiaomi Mi 10 Pro. The camera has a night mode, but for astrophotography, one would need something better. Google Pixels has a special feature for it. Moreover one can install a non-official port of the Goggle Camera App to third-party Android phones. So I purchased the holder for the phone, placed on a tripod, and pressed the shutter button. The camera collected photons for 3 minutes and made multiple shots and stacked them automatically. The result is, however, not impressive and I have to conclude that smartphones cannot replace the DSLR or mirrorless cameras. There is Milky Way visible in the picture, but it lacks details and stars are elongated. The conclusion: for my next expedition I still cannot leave the camera at home and take only the smartphone.


NGC 253 Sculptor Galaxy

Every time when I chase the darkness in southern lands, I try to capture some deep space objects in the southern hemisphere, which are not visible from Central Europe. One of these objects is the Sculptor Galaxy, which can be found, surprisingly, in the constellation Sculptor (south from Aquarius). Here are some features: it is approximately 11 million light-years away from us, it has roughly 90 000 light-years in diameter (similar to Milky Way) and it is characteristic by the intense star formation. This galaxy is sometimes called Silver Coin or Silver Dollar Galaxy, but I pushed the colors into the yellow spectra, therefore it looks like a gold coin.

TelescopeNewton 150/600 mm
Aperture150 mm
Focal length570 mm
MountRainbow Astro RST 135
AutoguidingZWO 174MM, Guidescope 30 mm
CameraZWO 071 Pro @-0°C
CorrectorTS MaxField
FiltersNo
Exposure127x180s, Gain 94, bin 1x1,
Date2020-09-21

NGC 6559 Nebula

f we look in the middle of the night during the summer months (on the northern hemisphere) into the Milky Way’s core, we can find many prominent deep space objects, like Lagoon, Omega, Eagle, or Trifid nebulae. However, there are also not so well known, but also very beautiful, objects. For instance emission nebula NGC 6559, which can be located in constellation Sagittarius. The star-forming region is surrounded by the dark nebula B 91 in the shape of a heart. At the bottom left corner, a part of the Lagoon Nebula is visible.

TelescopeNewton 150/600 mm
Aperture150 mm
Focal length570 mm
MountRainbow Astro RST 135
AutoguidingZWO 174MM, Guidescope 30 mm
CameraZWO 071 Pro @-0°C
CorrectorTS MaxField
FiltersNo
Exposure54x180s, Gain 94, bin 1x1,
Date2020-09-21

NGC 6726 Nebula

NGC 6726 is a reflection nebula located in the constellation Corona Australis. Visually, there is a deep space neighbor, the Chandelier globular cluster NGC 6723. These deep space objects can be also found on my wide-angle picture of the Milky Way in the left bottom corner .

TelescopeNewton 150/600 mm
Aperture150 mm
Focal length570 mm
MountRainbow Astro RST 135
AutoguidingZWO 174MM, Guidescope 30 mm
CameraZWO 071 Pro @-0°C
CorrectorTS MaxField
FiltersNo
Exposure44x180s, Gain 94, bin 1x1,
Date2020-09-13

M22 Great Sagittarius Cluster

Messier 22, sometimes called Great Sagittarius Cluster is a globular cluster, visually located very close to the galactic core of the Milky Way. If we look in this direction by a telescope, the surrounding of this cluster is filled with many stars. The cluster itself contains approximately 100 000 stars and it has roughly 97 light-years in diameter. The region of the sky where is this cluster located is poorly visible from my home, therefore every time I travel south with my portable telescope, I capture some deep space objects in this region. This picture was taken under the dark skies of Kythira.

TelescopeNewton 150/600 mm
Aperture150 mm
Focal length570 mm
MountRainbow Astro RST 135
AutoguidingZWO 174MM, Guidescope 30 mm
CameraZWO 071 Pro @-0°C
CorrectorTS MaxField
FiltersNo
Exposure59x180s, Gain 94, bin 1x1,
Date2020-09-12

IC 1318 Sadr Region

Sadr Region, sometimes called The Gamma Cygni Nebula is a giant cloud of ionized hydrogen, located in the constellation Cygnus (Swan). The picture shows only a part of the whole complex. In order to capture the whole nebula, I would need a telescope with a much shorter focal length of the much bigger sensor of the camera. This is actually my second attempt. The first one from Milos Island was quite nice, but this time I dedicated a significantly longer time for this deep space object. Specifically, the picture is an integration of 405 minutes, which means nearly 7 hours in total.

TelescopeNewton 150/600 mm
Aperture150 mm
Focal length570 mm
MountRainbow Astro RST 135
AutoguidingZWO 174MM, Guidescope 30 mm
CameraZWO 071 Pro @-0°C
CorrectorTS MaxField
FiltersNo
Exposure135x180s, Gain 94, bin 1x1,
Date2020-09-11

NGC6888 Crescent Nebula

Another cloudless night and I decided to test the IDAS NB1 filter again This time on Crescent Nebula, located in constellation Cygnus. The nebulosity was captured well and it’s comparable to the narrowband image I captured a long time ago. However, the bright stars are surrounded by ugly reflections. I am not sure it’s due to the MaxField coma corrector or the filter. Next time I will try with ExploreScientific coma corrector and we will see.

TelescopeNewton 254/1000 mm
Aperture254 mm
Focal length950 mm
MountGemini G53f
AutoguidingZWO 174MM, TS 60/240 mm
CameraZWO 071 Pro @-5°C
CorrectorMaxField coma corrector
FiltersIDAS NB1 Nebula Filter
Exposure103x180s, Gain 95, bin 1x1,
Date2020-08-20

NGC7000 North America Nebula

After capturing the Eagle Nebula, I was searching for another nebula to test the new IDAS NB1 filter and I picked NGC7000 North America Nebula, switched on autoguiding, and went to sleep. The next morning I processed 138 pictures, each 3 minutes long. Well, I must say that this filter is a very good option for astrophotography in light-polluted locations.

Technical details:

TelescopeNewton 254/1000 mm
Aperture254 mm
Focal length950 mm
MountGemini G53f
AutoguidingZWO 174MM, TS 60/240 mm
CameraZWO 071 Pro @-5°C
CorrectorMaxField coma corrector
FiltersIDAS NB1 Nebula Filter
Exposure138x180s, Gain 95, bin 1x1,
Date2020-08-10

M16 Eagle Nebula

Eagle Nebula is probably the most known deep space object, due to one picture from the Hubble Space Telescope. The pillars of creation were detected, where the new stars are born. I already captured this nebula by using narrowband filters and a monochrome camera. This time I used a different approach – a one-shot color camera + a new IDAS NB1 Nebula Filter. This filter should completely suppress the light pollution from sodium lamps and partially from LED lamps, passing the most interesting wavelength of H-alpha, OIII, and H-beta. In my opinion, it works well even in my light-polluted home.

Technical details:

TelescopeNewton 254/1000 mm
Aperture254 mm
Focal length950 mm
MountGemini G53f
AutoguidingZWO 174MM, TS 60/240 mm
CameraZWO 071 Pro @-5°C
CorrectorMaxField coma corrector
FiltersIDAS NB1 Nebula Filter
Exposure82x180s, Gain 95, bin 1x1,
Date2020-08-09

Chasing darkness on Fuerteventura

This year was a special year. The pandemic outbreak ruined my first attempt of chasing the darkness on the Canary Islands in May. I didn’t give up and as soon the restrictions were released, I purchased plane tickets to Fuerteventura again. We rented a house via AirBnB on the south side of the island, in the middle of nowhere, where the light pollution was minimal (measured SQM 21.2).

The island lies on the 28th parallel, which makes the core of the Milky Way pretty up in the sky. And this was exactly my primary astrophotographic target. I packed recently astro-modified Canon 6D, nifty-fifty 50 mm f1.8 lens and headed south. The aim was to capture the Antares region together with the core of the Milky Way and in the end, I somehow managed.  However, the lens disappointed me a lot, because it suffers from comatic and chromatic aberrations, combined with astigmatism. The stars in the corners are not round, even if the lens is slowed down to f 3.5. I was trying nearly every evening to recapture the Milky Way, but I was fighting with the weather (it was very windy) and with the equipment (polar alignment, shutter release, drained batteries), but I somehow managed to generate at least one decent picture of the desired target. Lessons learned – I need a better 50 mm lens.

Technical details:

LensCanon EF 50 mm f1.8
F-stop2.8
Focal length50 mm
MountBaader NanoTracker
CameraCanon EOS 6D Astro modified
Exposure14x20s, ISO 1600
Date2020-07-22

I also packed 150mm Newtonian, together with my new mount Rainbow Astro RS135. This mount is simply excellent and very portable. I still have Avalon M-Zero, but it is significantly heavier, therefore if I travel with Avalon, I have to order a second suitcase and to travel with two suitcases is not that convenient. Rainbow Astro occupies only half of my luggage, so there was a space for some T-shirts. I must say, that the Avalon is a better mount for tracking and there is no need to do a meridian flip, but the portability is for me more important. The primary target was the Lobster nebula, but I managed to capture some DSOs around Antares and in the core of the Milky Way (Lagoon, Trifid, M4, M6, M7, M24, IC4304).

The conclusion: the weather was much better than in La Palma last year. Every night was cloudless, but it was windy. Fortunately not every day, so in the end, it was a quite successful trip.


M4 Globular cluster

Messier 4 (left side of the picture) is a globular cluster located in the constellation Scorpius, close to the brightest star of this constellation Antares (right side). This cluster is the closest one to the Solar System, due to its “short” distance of 7200 light-years and it contains several tens of thousands of stars. There is another globular cluster on the bottom side of the picture NGC 6144. The star Antares is classified as a red supergiant, with a diameter several times bigger than the Sun, which makes it one of the largest know stars. it is only 550 light-years away, which means M4 and Antares are close only visually, but in reality, there is a very long distance between them.
If any brighter star is photographed by the Newtonian telescope, the diffraction cross appears due to the so-called “spider vanes” holder of the secondary mirror. If the spider vanes are not perpendicular to each other (like in my case), the diffraction pattern makes multiple ugly lines. This means I will have to correct it, as soon as I get back from Fuerteventura.

Technical details:

TelescopeNewton 150/600 mm
Aperture150 mm
Focal length570 mm
MountRainbow Astro RST 135
AutoguidingZWO 174MM, Guidescope 30 mm
CameraZWO 071 Pro @-0°C
CorrectorTS MaxField
FiltersNo
Exposure44x180s, Gain 94, bin 1x1,
Date2020-07-23