Introduction
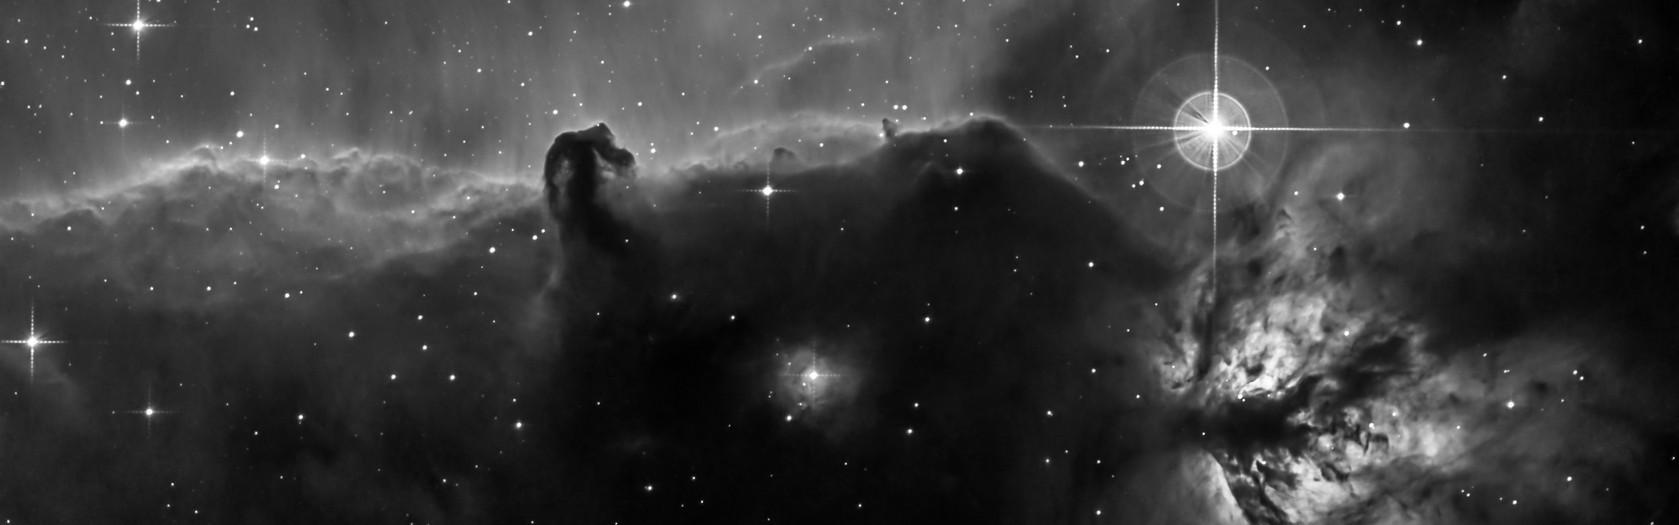
What is coma and why needs to be corrected. Coma is a special type of an optical aberration. It’s mainly visible in the astrophotography – the stars are deformed into comet-like shapes:
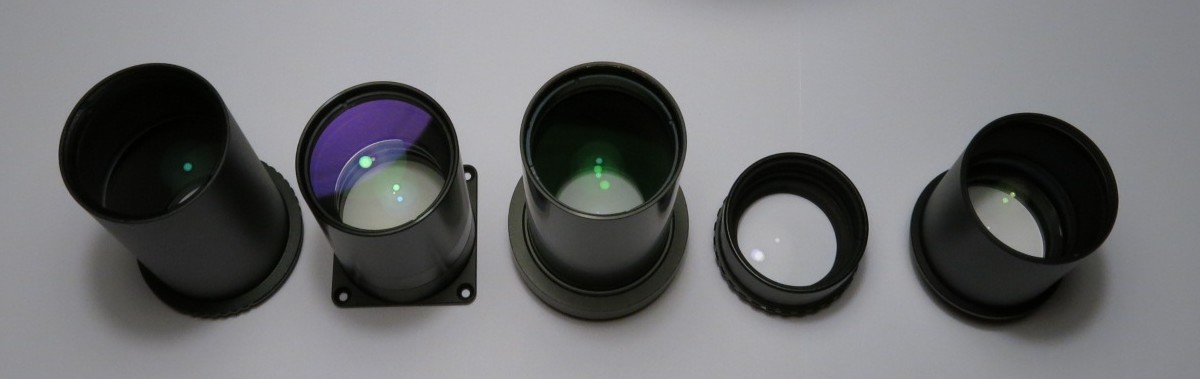
Fast Newtonian telescopes suffer from comatic aberration, mainly in the corners of the photos. These telescopes are nowadays very popular between amateur astrophotographers just like me, because they offer the best price/aperture ratio. There is easy way how to suppress the comatic aberration – coma correctors. There are many coma correctors on the market, but there are just a few published reviews or comparisons between them. Therefore I decided to perform the comparison myself. Quite big collection of coma correctors has assembled in my drawer ready to be tested:
Coma correctors
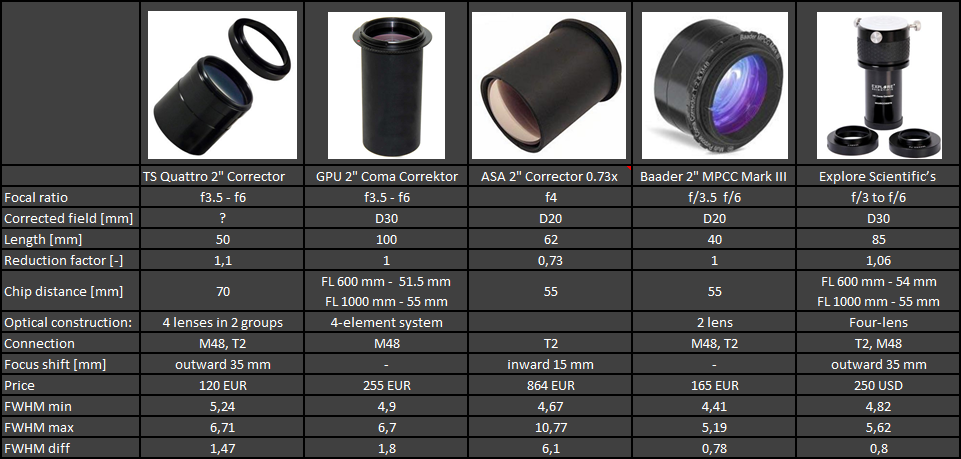
I tested five correctors: ASA 0.73 reducer, Baader Multipurpose coma corrector (MPCC), GPU coma corrector, Explore Scientific and TS Quatro. The details are summarized in the table below. I expect the question why didn’t I test TeleVue Paracorr. Well not mentioning that it’s quite expensive, therefore out of the budget for this exercise, it has been proven to be probably the best 2″ coma corrector on the market. Only disadvantage is that it increases the focal length by factor 1.15. So, you cannot go wrong with this corrector.
Camera
Probably the mostly used sensor for astrophotography is Kodak KAF 8300. It’s sufficiently large, it has sufficient resolution (8MP), and it’s available in mono or color version. I have the mono one, because I live in sub-urban area with relatively strong light pollution. Therefore narrow band filters are very useful. There are many manufactures producing astro-cameras with this sensor. I picked Moravian Instruments, because they have very good references.
Telescope
My main telescope used for astrophotography is ONTC 10” f4 Newtonian from Telescope Service. It has carbon fiber tube, which is very stiff and it has very low thermal expansion. The optical tube assembly (OTA) is equipped with 2” Feather touch focuser – probably the best 2” focuser on the market. In order to reach the focus, the primary mirror has to be shifted. For ASA reducer towards the secondary mirror, for Baader MPCC and GPU correctors was in the middle and for Explore Scientific and TS Quatro outwards from the secondary mirror.
Mount and polar alignment
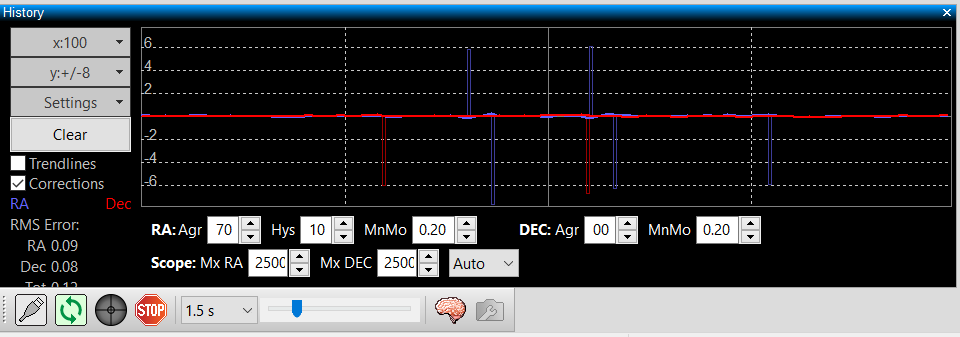
My primary equatorial mount for astrophotography is Gemini G53f with friction drive, which means no backlash. It’s excellent mount and I am very happy with it. In case of OTA or camera I can imagine an upgrade, but in case of mount I cannot think of anything better. It never let me down and number of bad pictures due to bad tracking or backlash is basically zero. Because every time I have to move the mount outside, I have to perform always polar alignment. I tried many methods, and ended up with PolMaster from QHYCCD. The advantage of this method compared to conventional polar finder is that the OTA and counter weights are assembled prior to polar alignment. The best way how to check the quality of the polar alignment is to autoguide and checks the corrections in declination axis. Here is a screengrab of the PHD II guiding performed by Orion Mini Autoguider. As you can see there are almost no correction in declination axis needed and correction in right ascension axis are even bigger. And yes, as I said I am very happy with Gemini mount.
Collimation
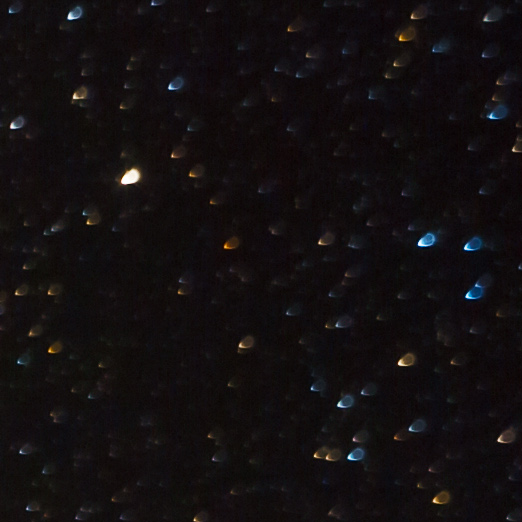
Collimation of the Newtonian telescope could be a separate topic and strongly influences the quality of the pictures. Therefore I tried to be as precise as possible. This means, for “rough” collimation I used Howie Glatter laser collimator with TuBlug. This is probably the best laser collimator one can buy. For the “fine” collimation I used CatsEyes auto collimators. Anyway only very small adjustments were needed between these methods.
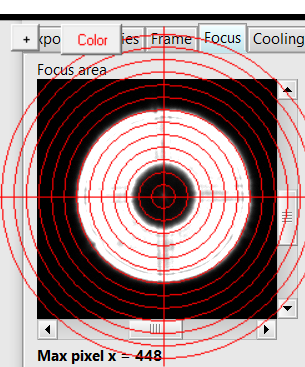
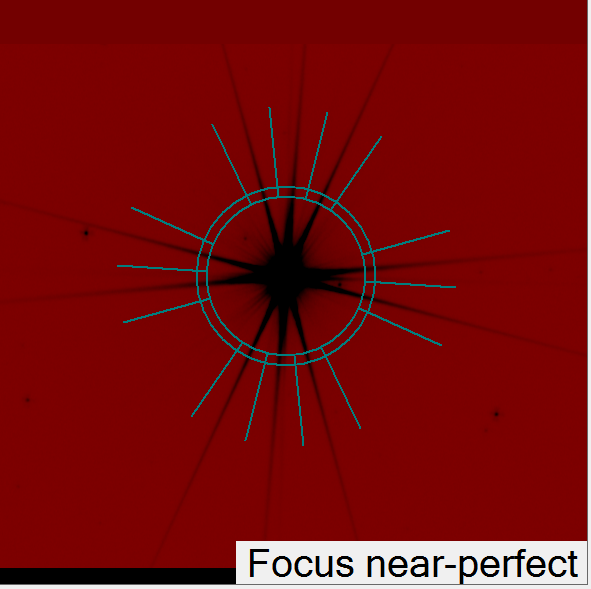
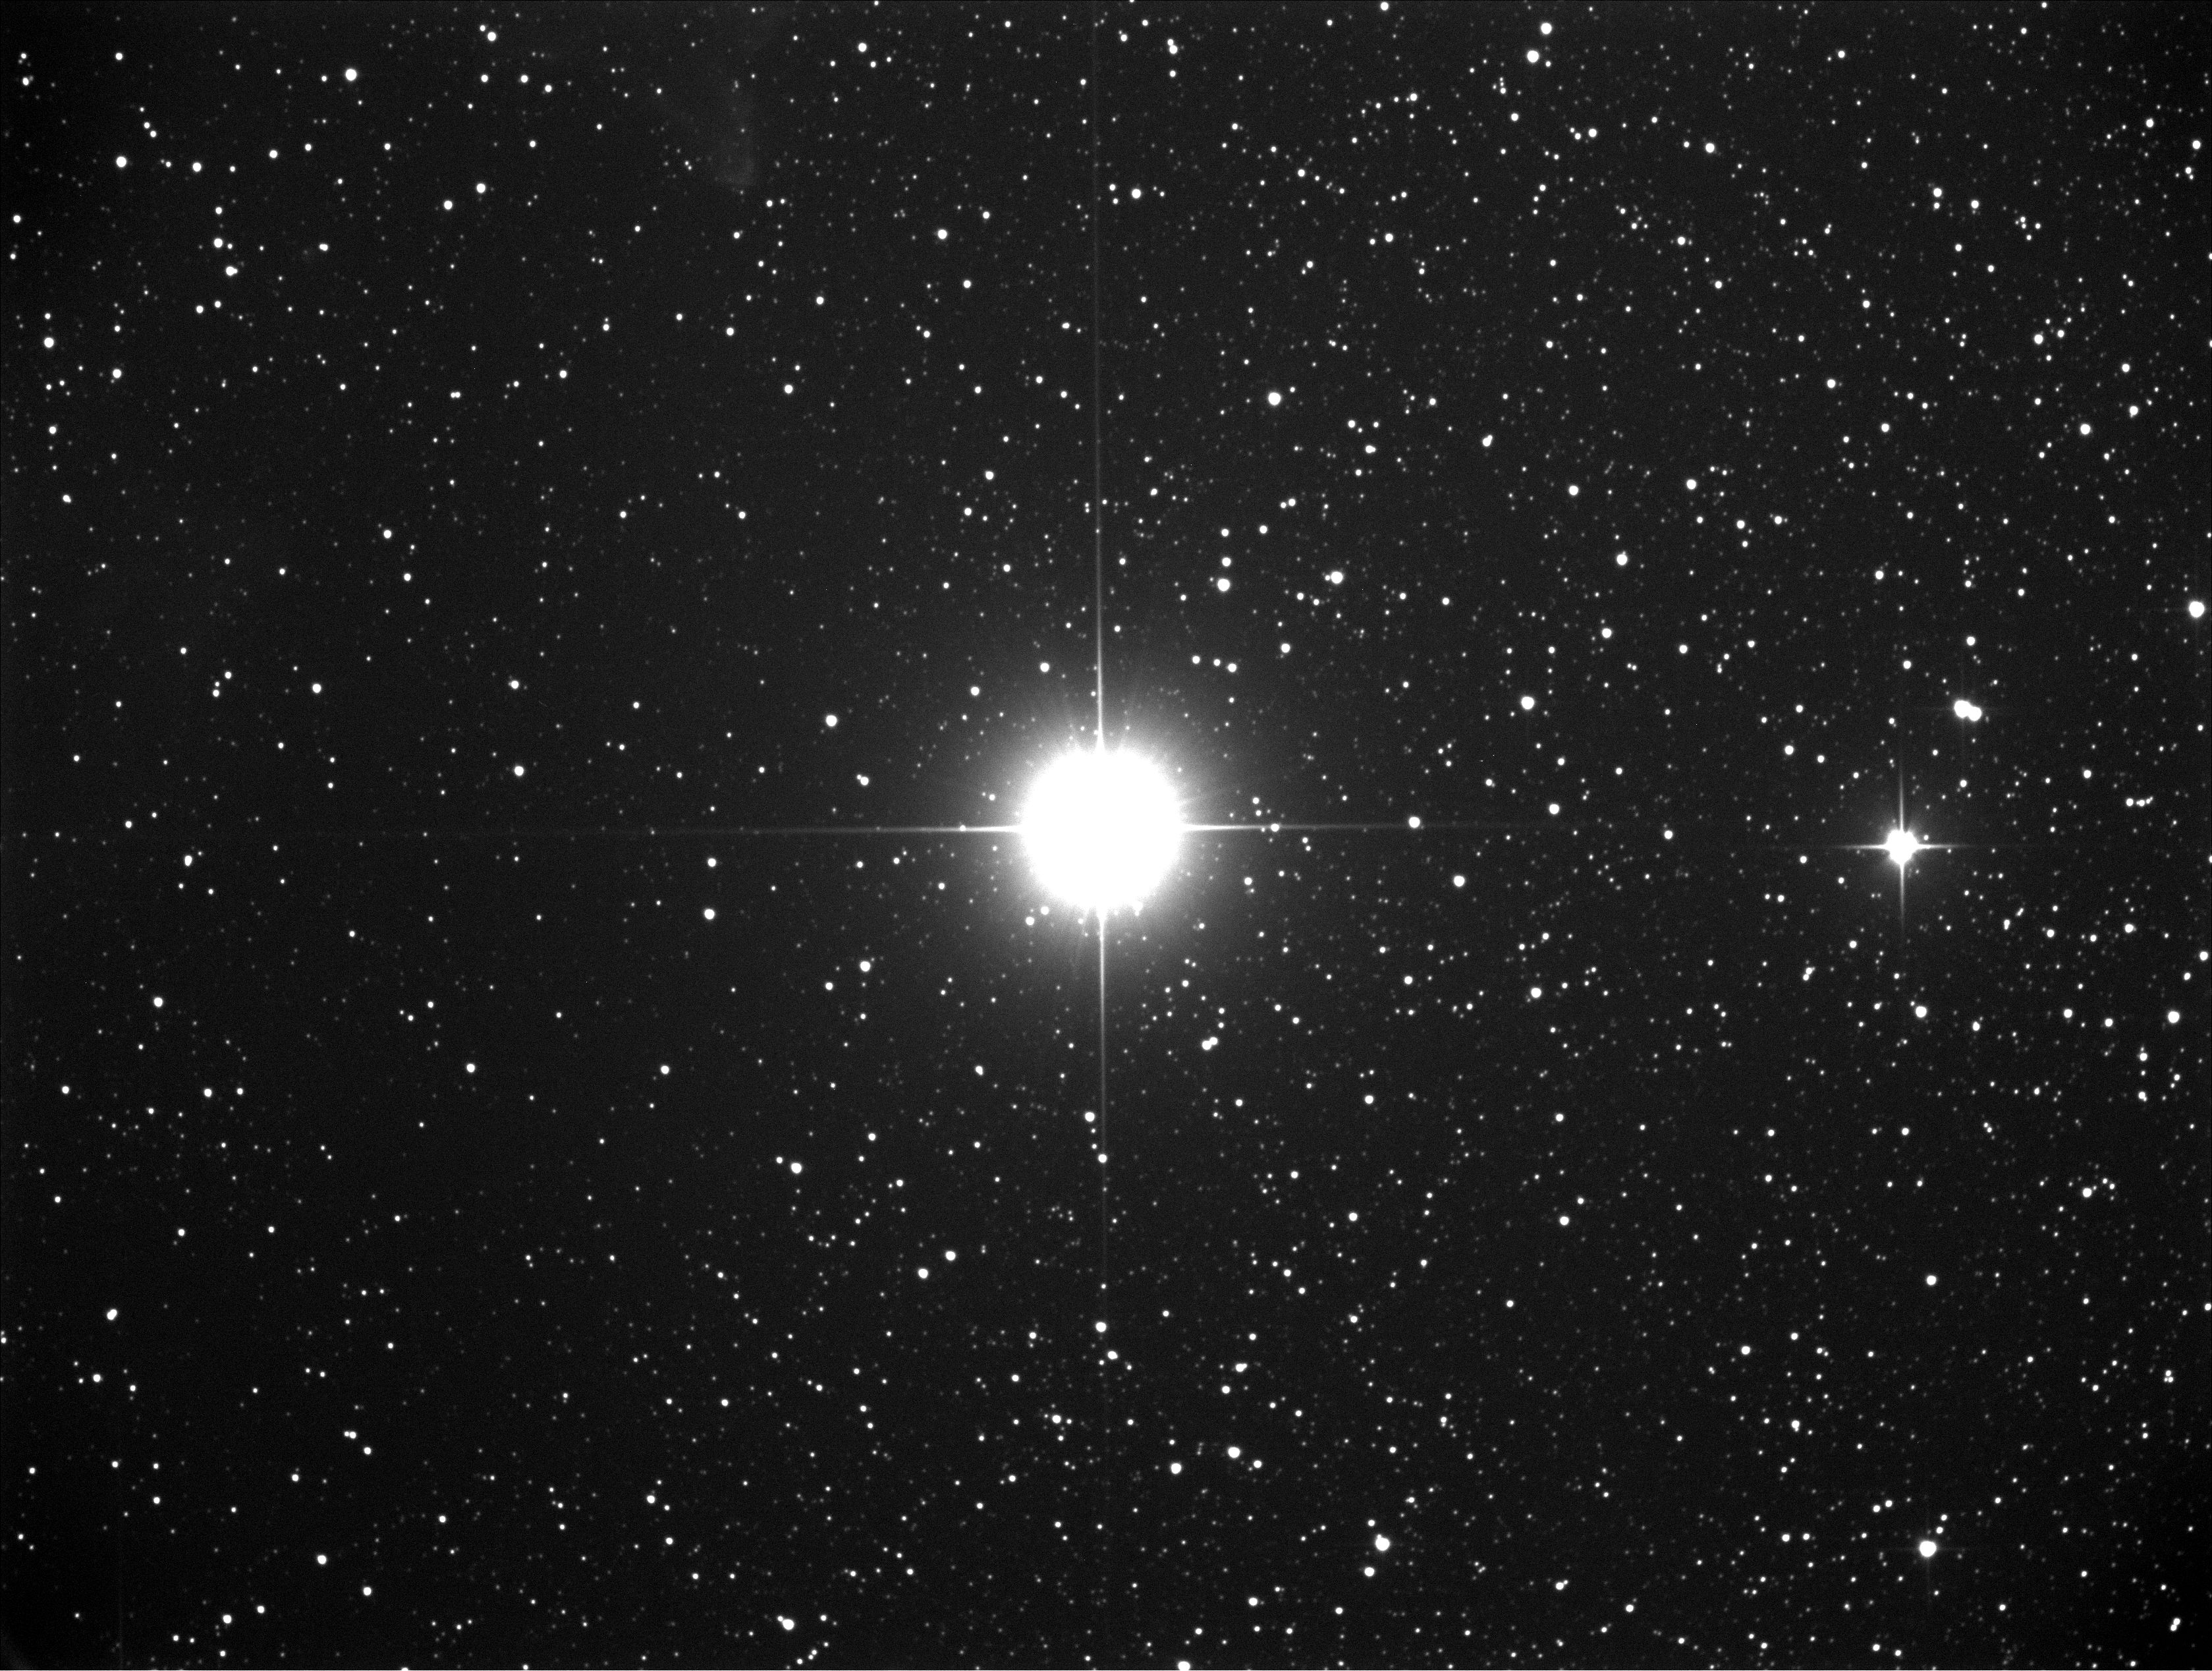
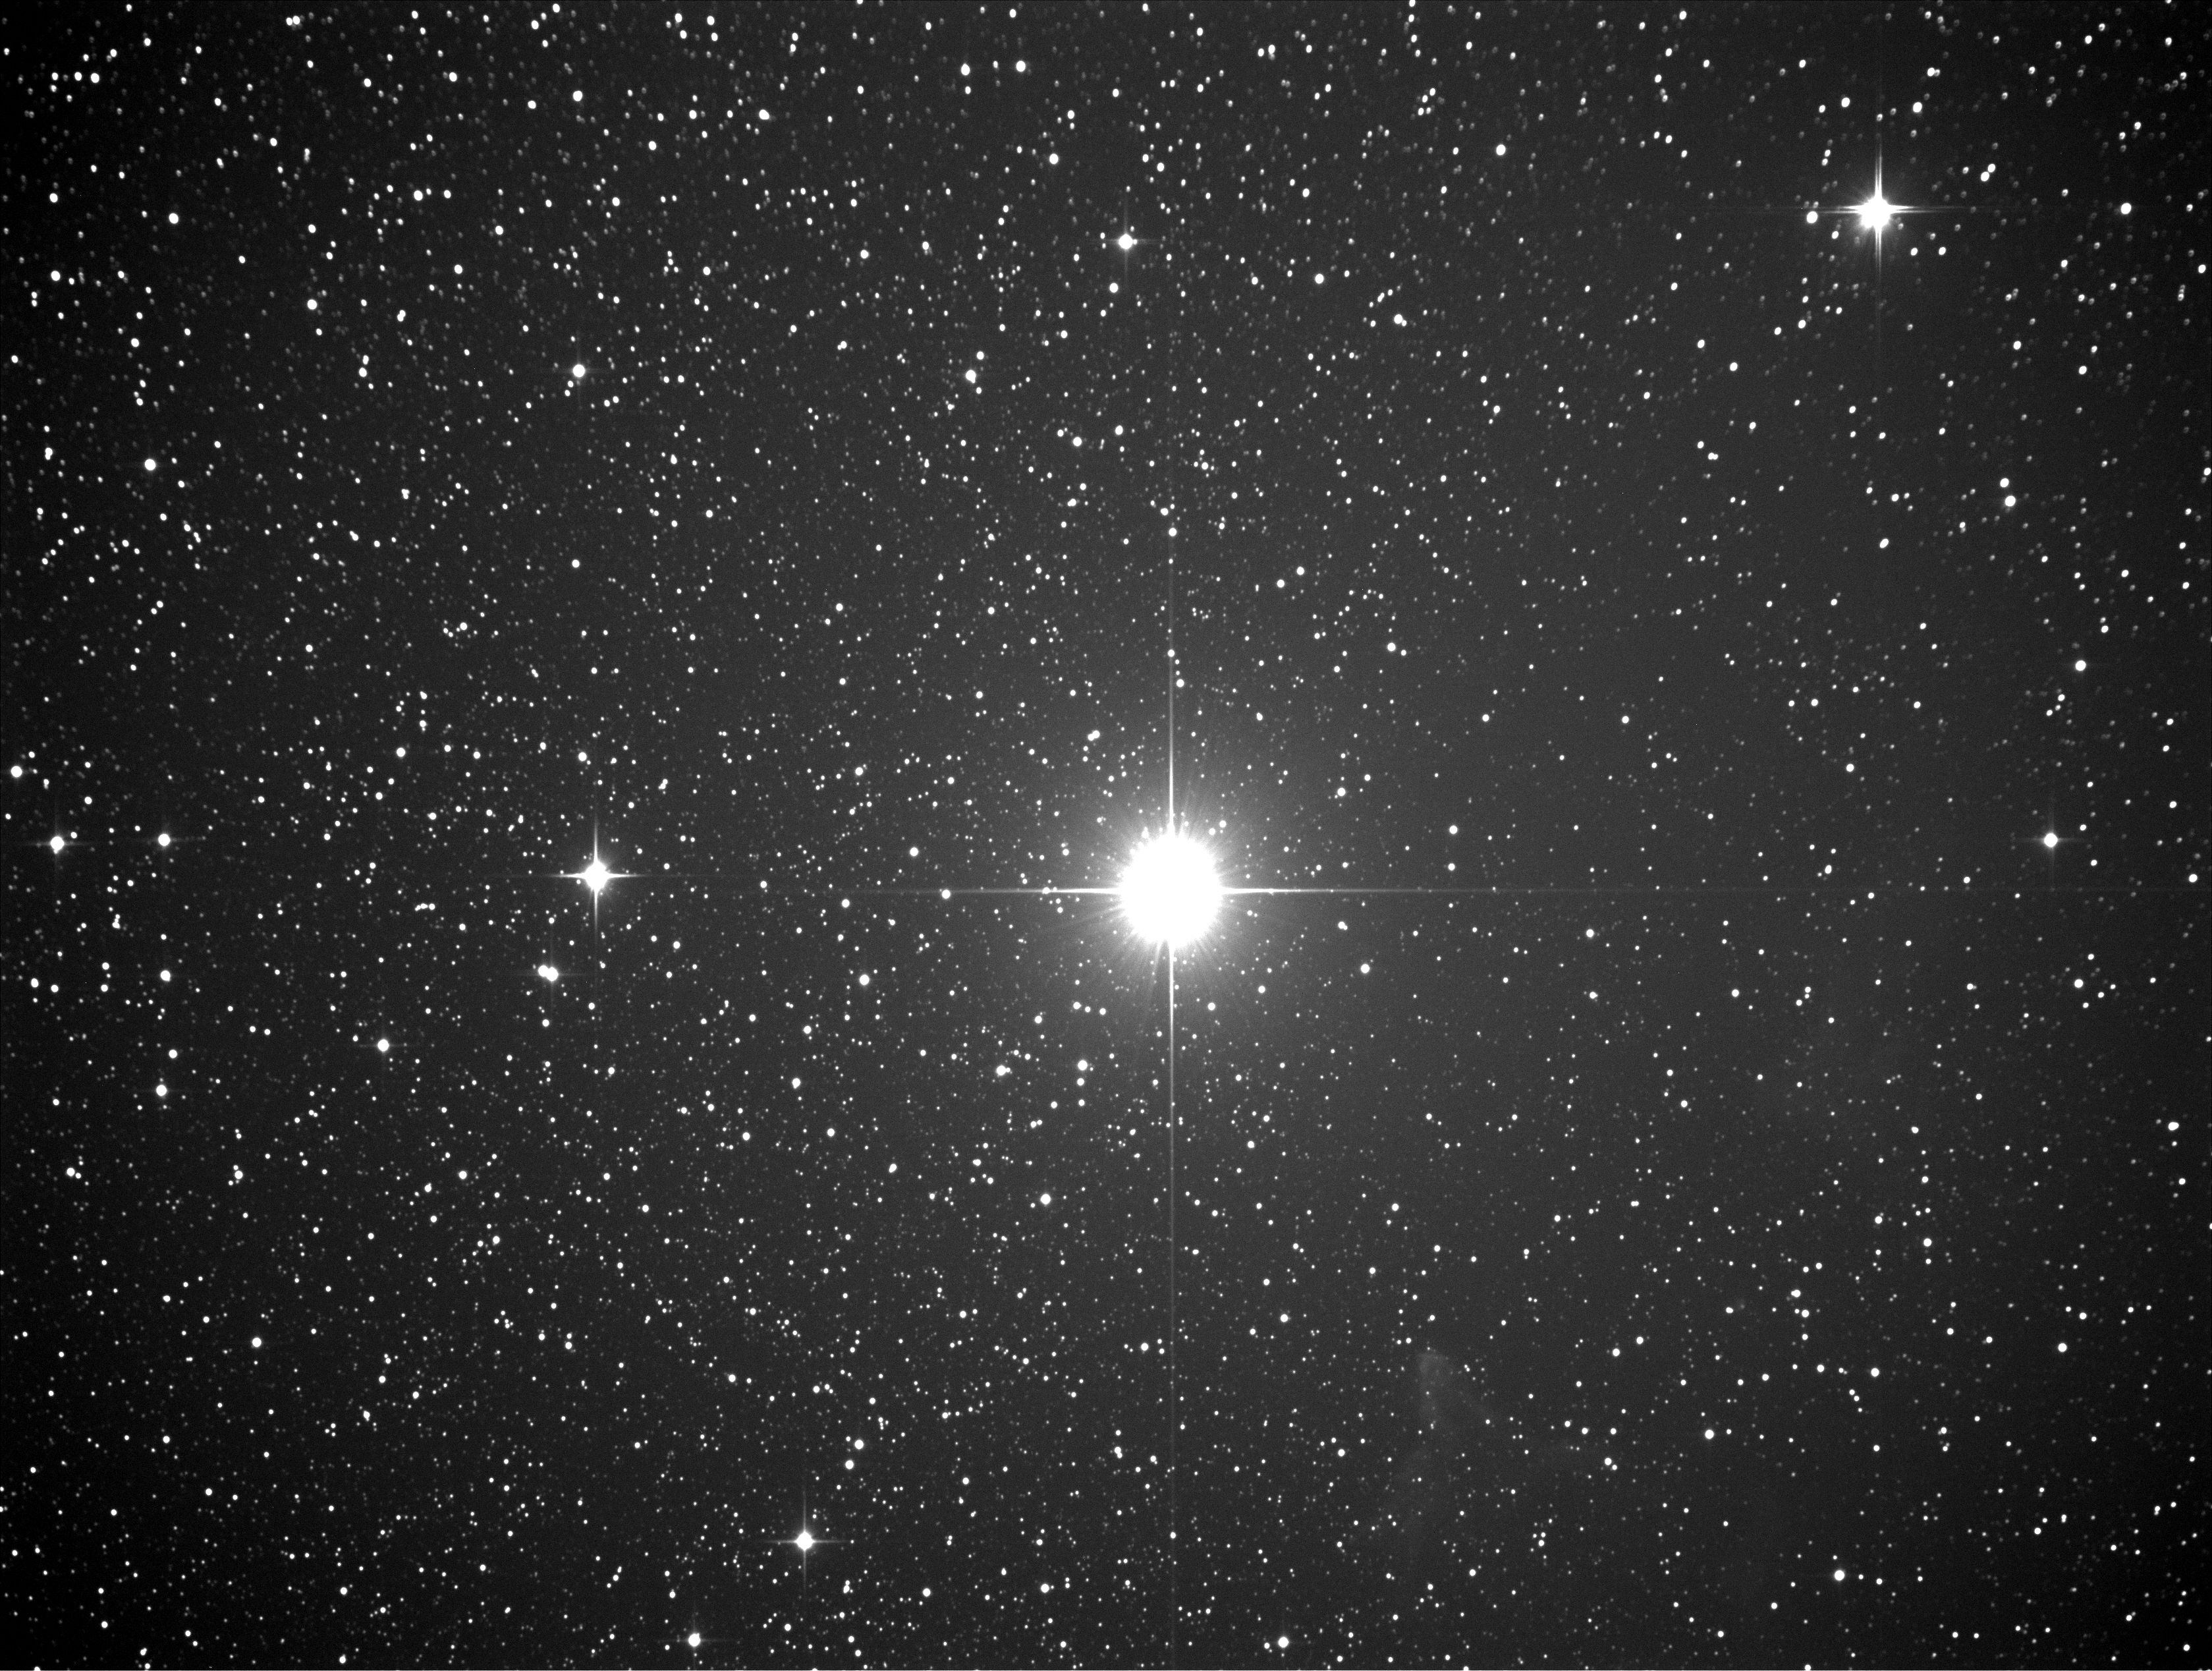
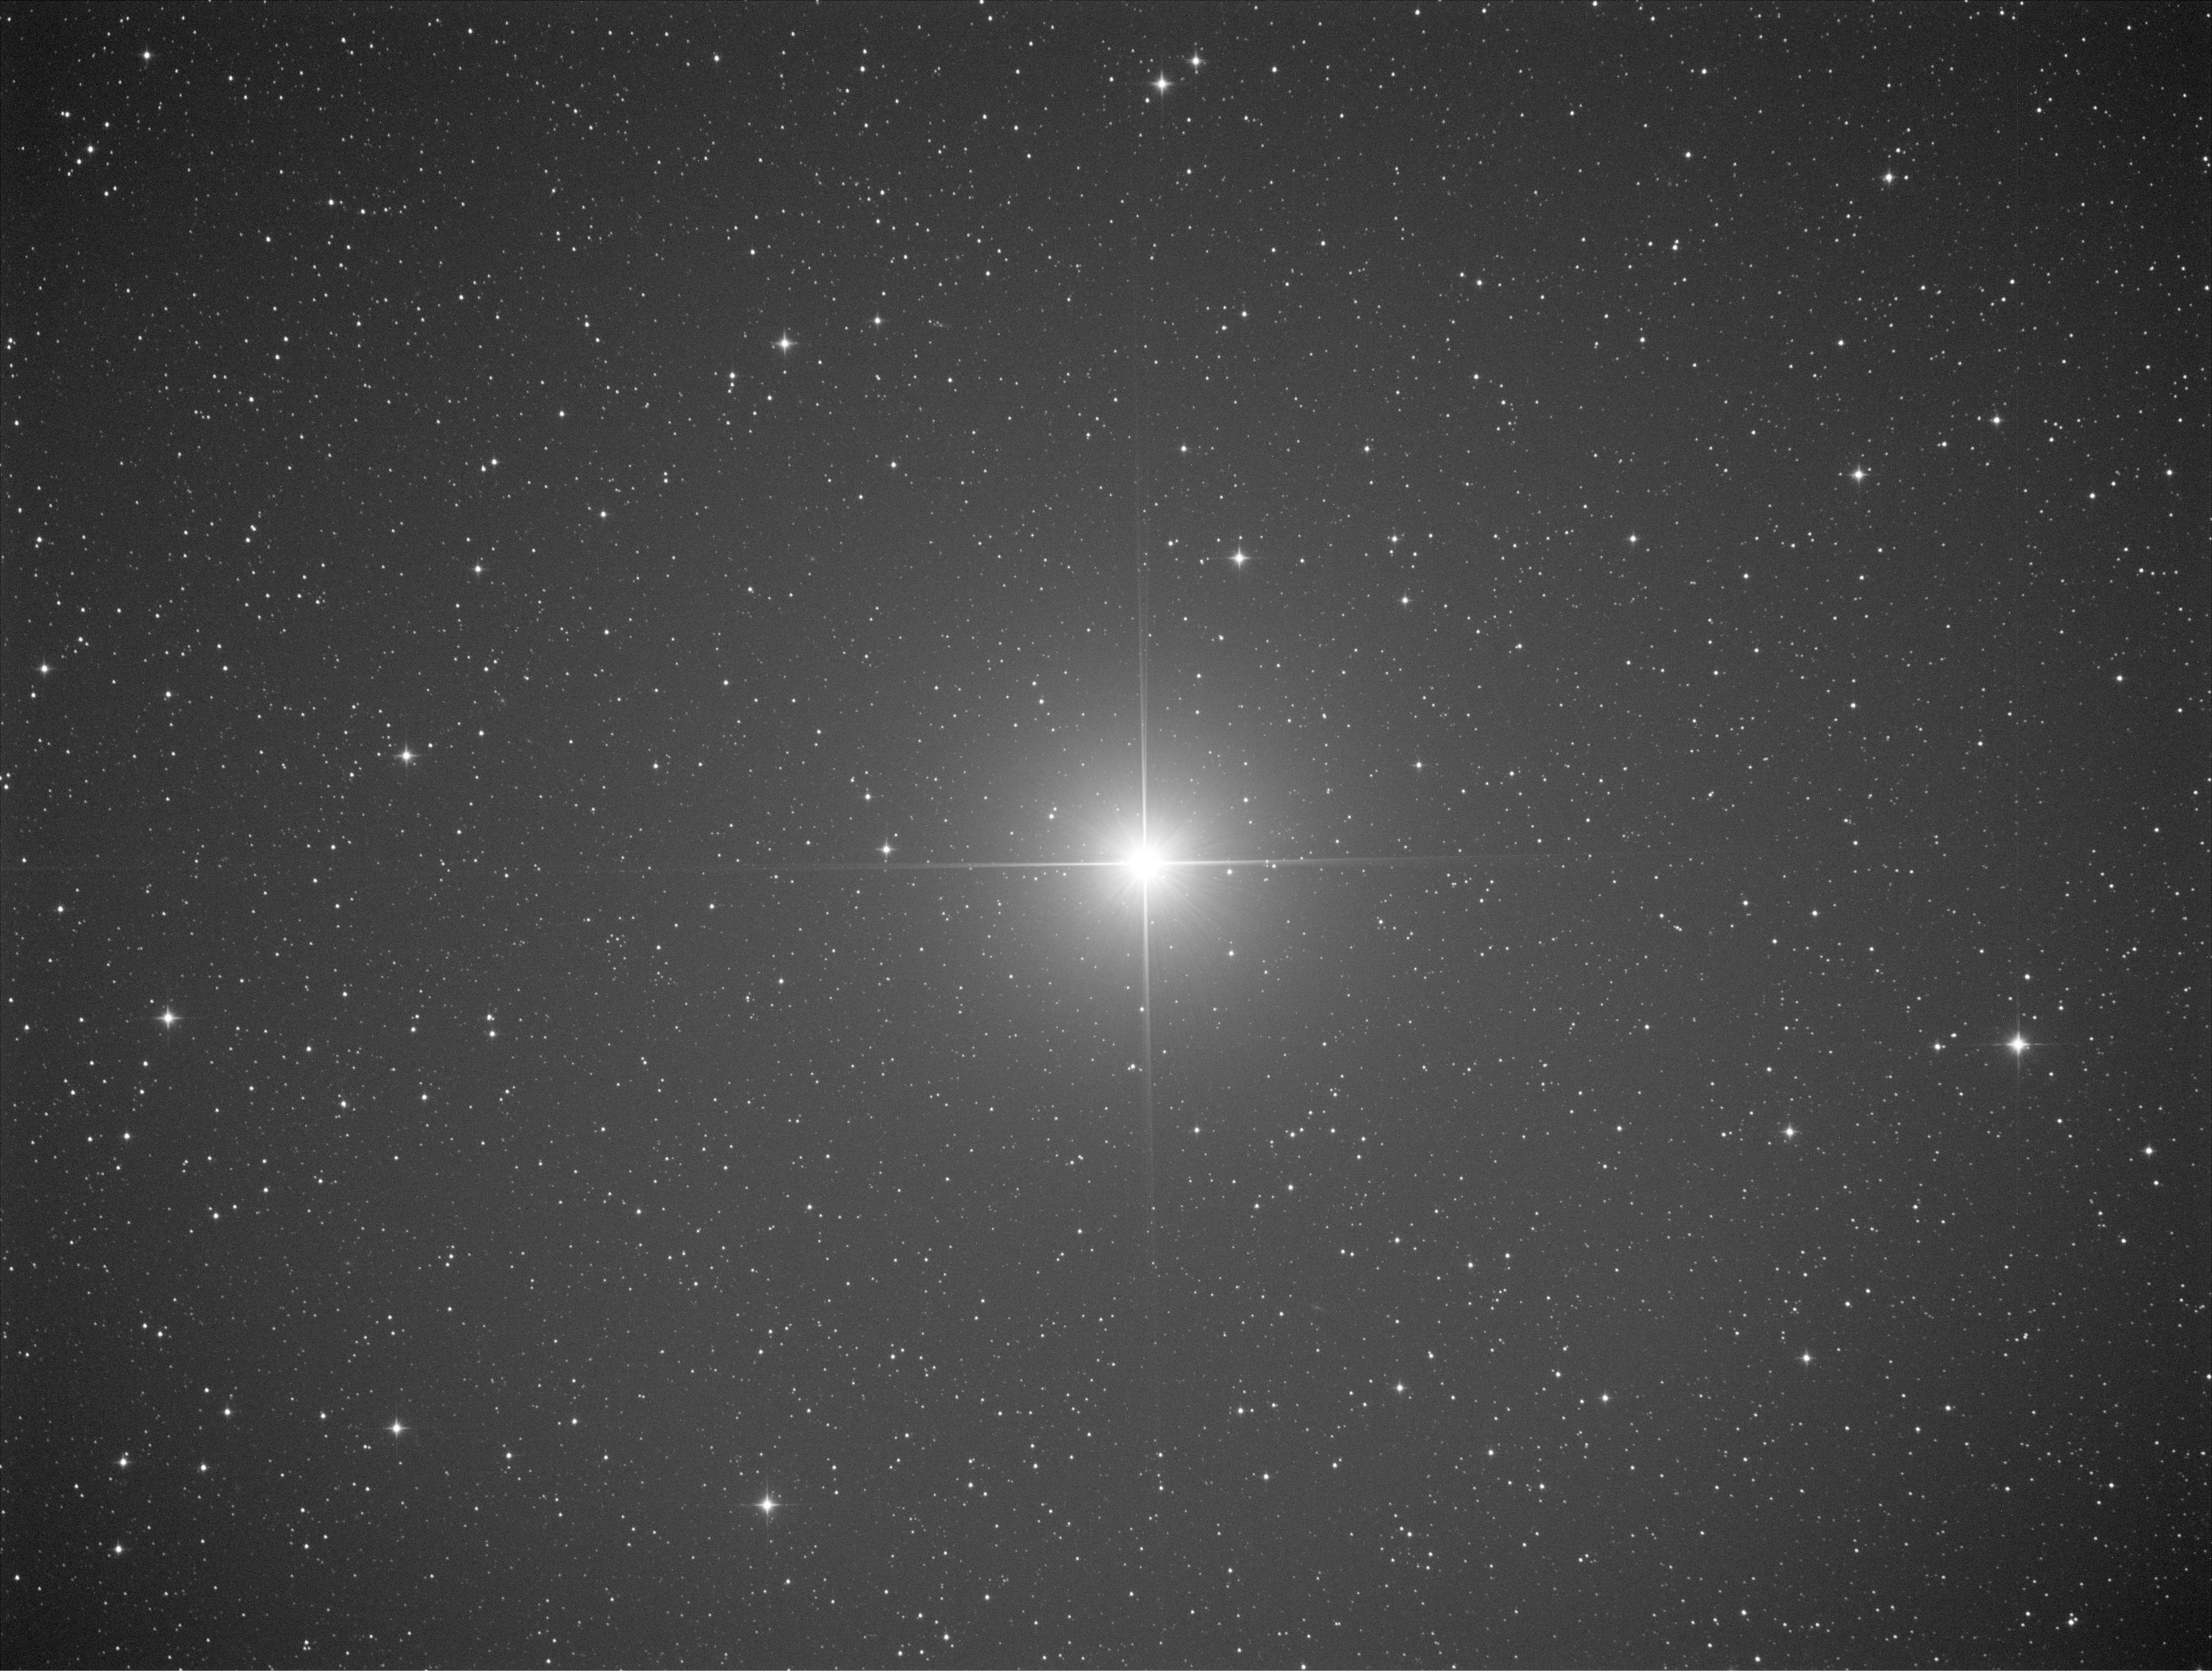
In order to confirm the precision of the collimation, the defocused star test was done prior every imagining session. Here is the picture of defocused star – I think the collimation is nearly perfect:
Focusing
Here again, I tried many methods – FWHM or Bahtinov mask, but I ended with Gold focus mask. This focusing technique is unique, because for the evaluation of the focus the special software is used, which tells you whether you should focus in or out and how good focus you achieved. It’s quite fast and very accurate method:
Testing
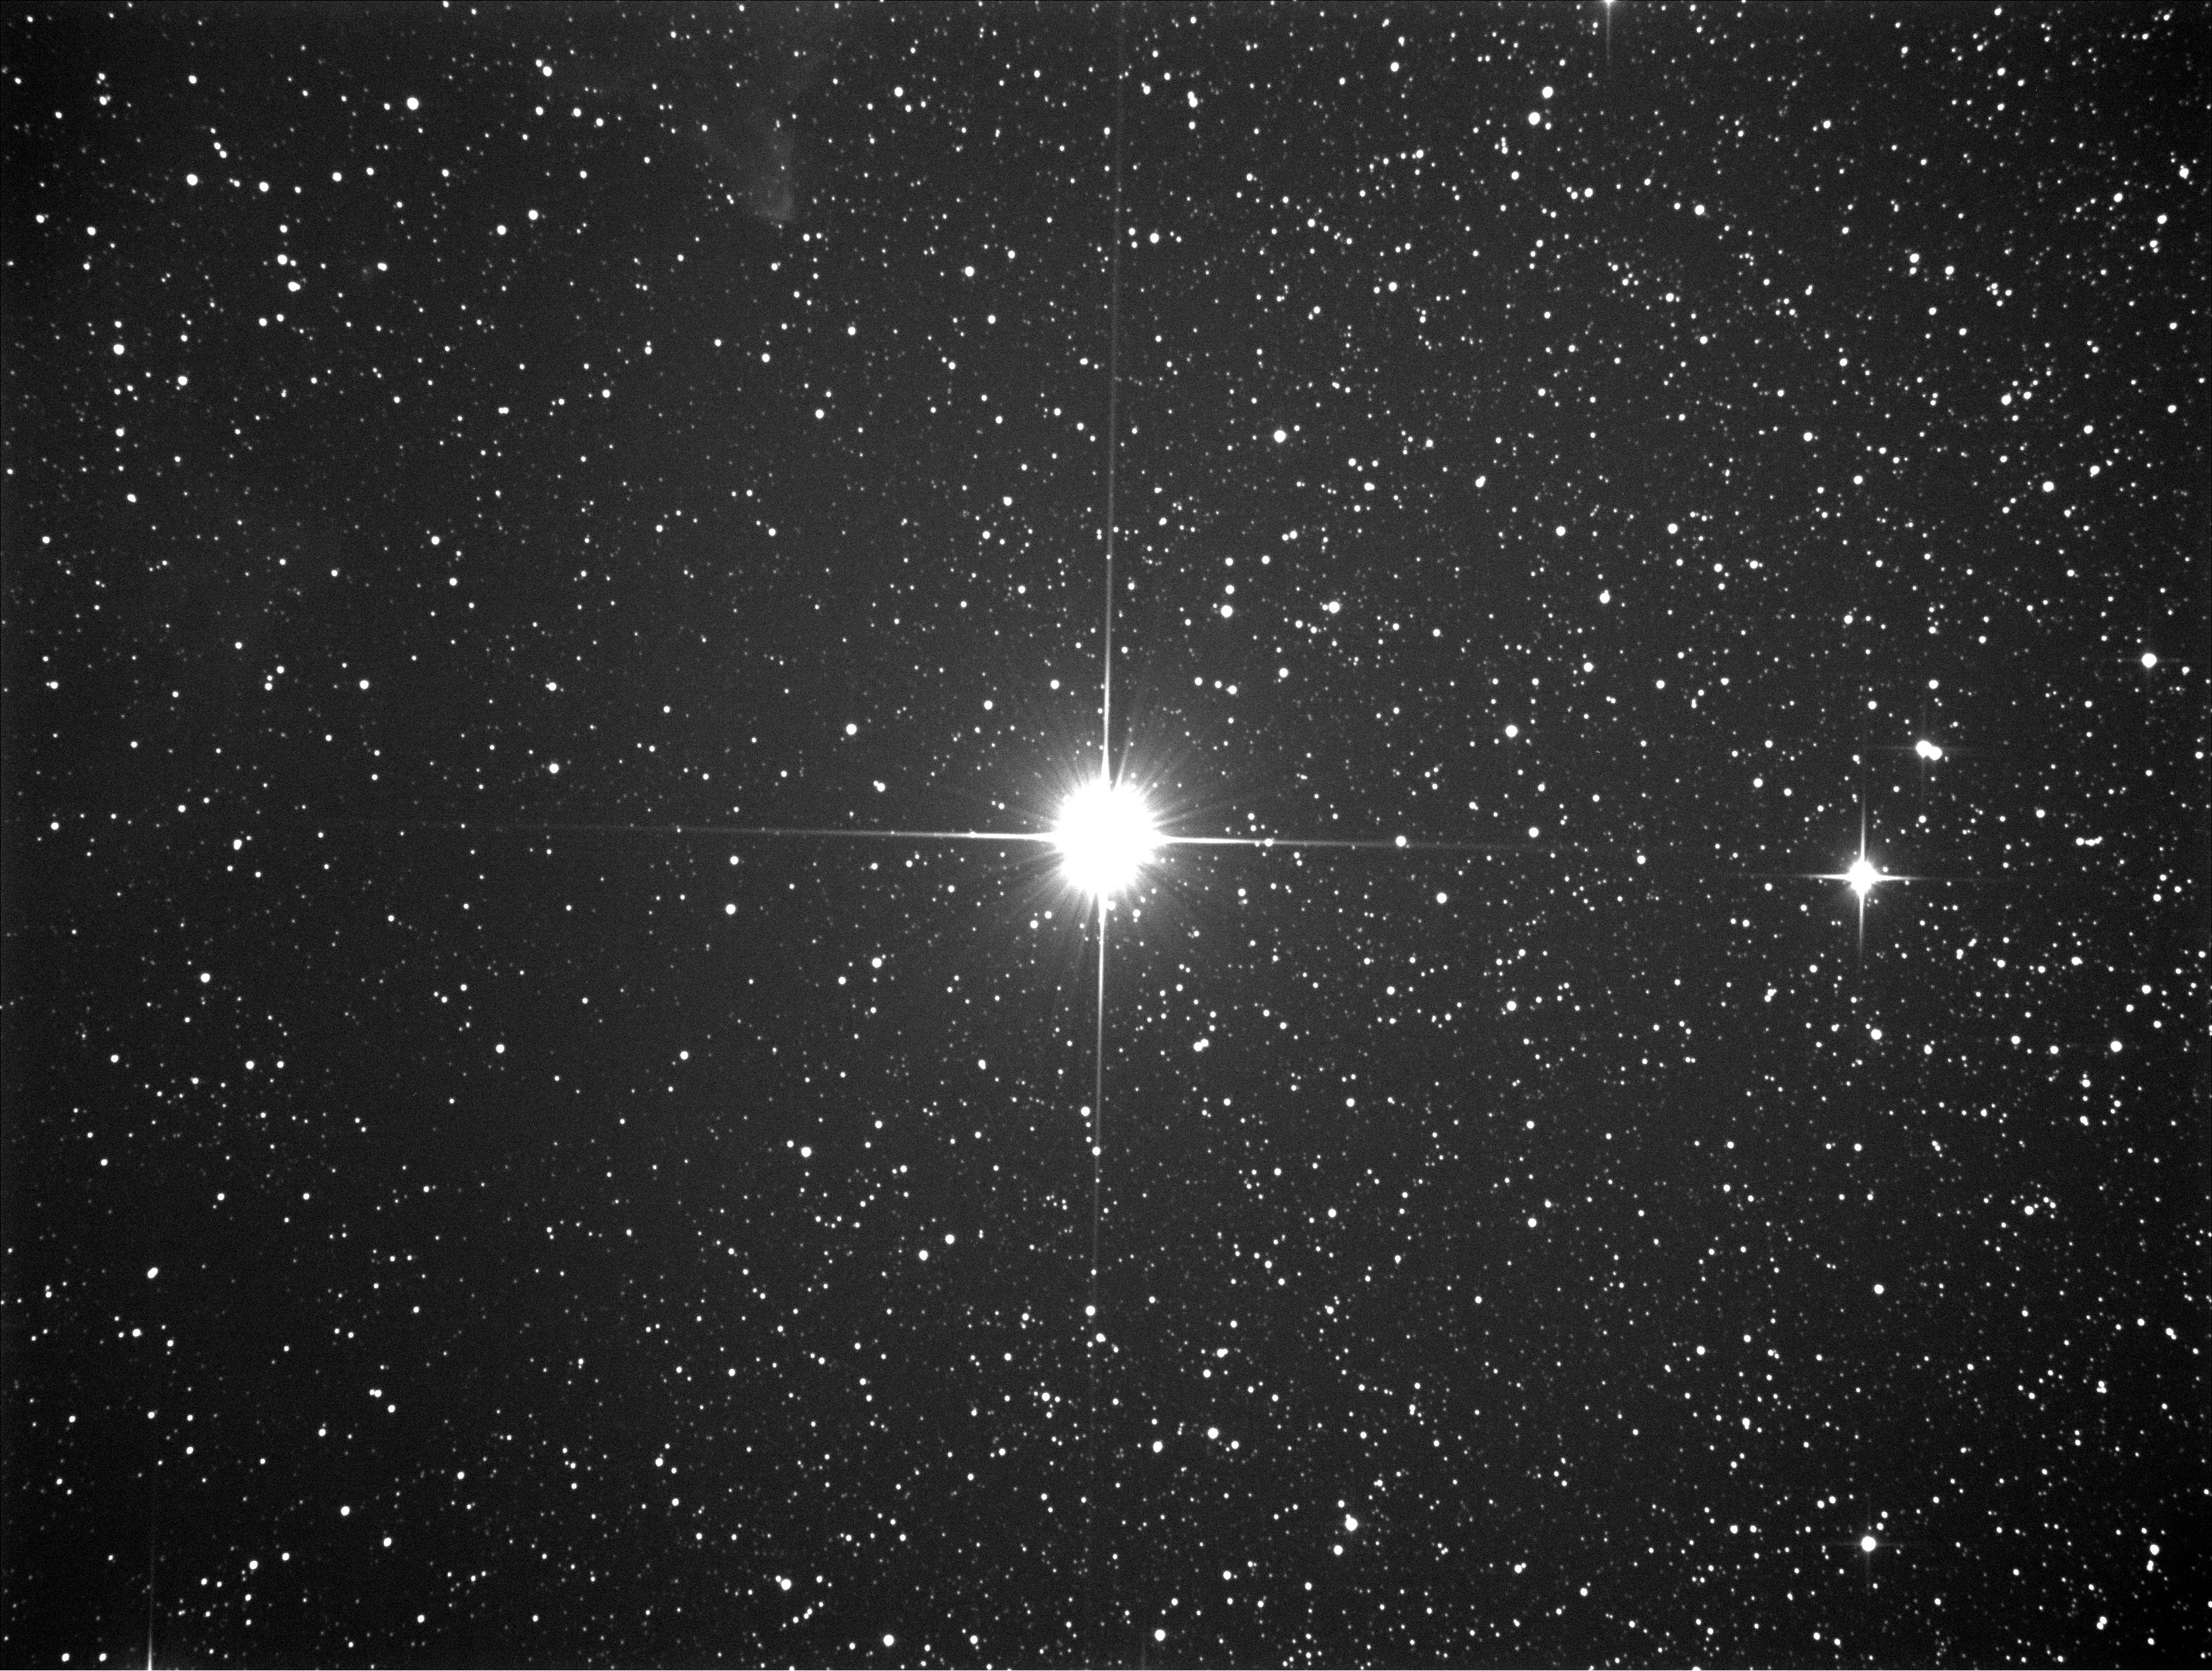
The telescope was always properly collimated and tempered for 2 hours prior imaging session and camera’s sensor was cooled down to -30 °C. For the comparison is best to choose the area of the sky where are many stars. Therefore I chose constellation Cassiopeia. The bright star Cassiopeia Gama was always centered in the middle of the sensor, first defocused in order to check the collimation and then focused with gold focus mask. Autoguiding was switched on and 3 pictures on L filter with exposure time 120 s were taken for each corrector. Since it’s necessary to shift the primary mirror for different correctors I had to split imaging sessions every time I had to shift the mirror. This is mainly caused by the fact that I cannot shift the mirror outside in the dark, but I had to move the telescope inside, which means I get a lot of dew on the primary mirror and temperation is gone. Therefore I used one night for tensing the ASA corrector, second one for MPCC and GPU, and third one for Explore Scientific. The pictures were taken by SIPS software in linear form (.fits) and post-processed by Pixinsight. Bias and Dark were subtracted from the picture and 1% of highlights and shadows were clipped by histogram transformation.
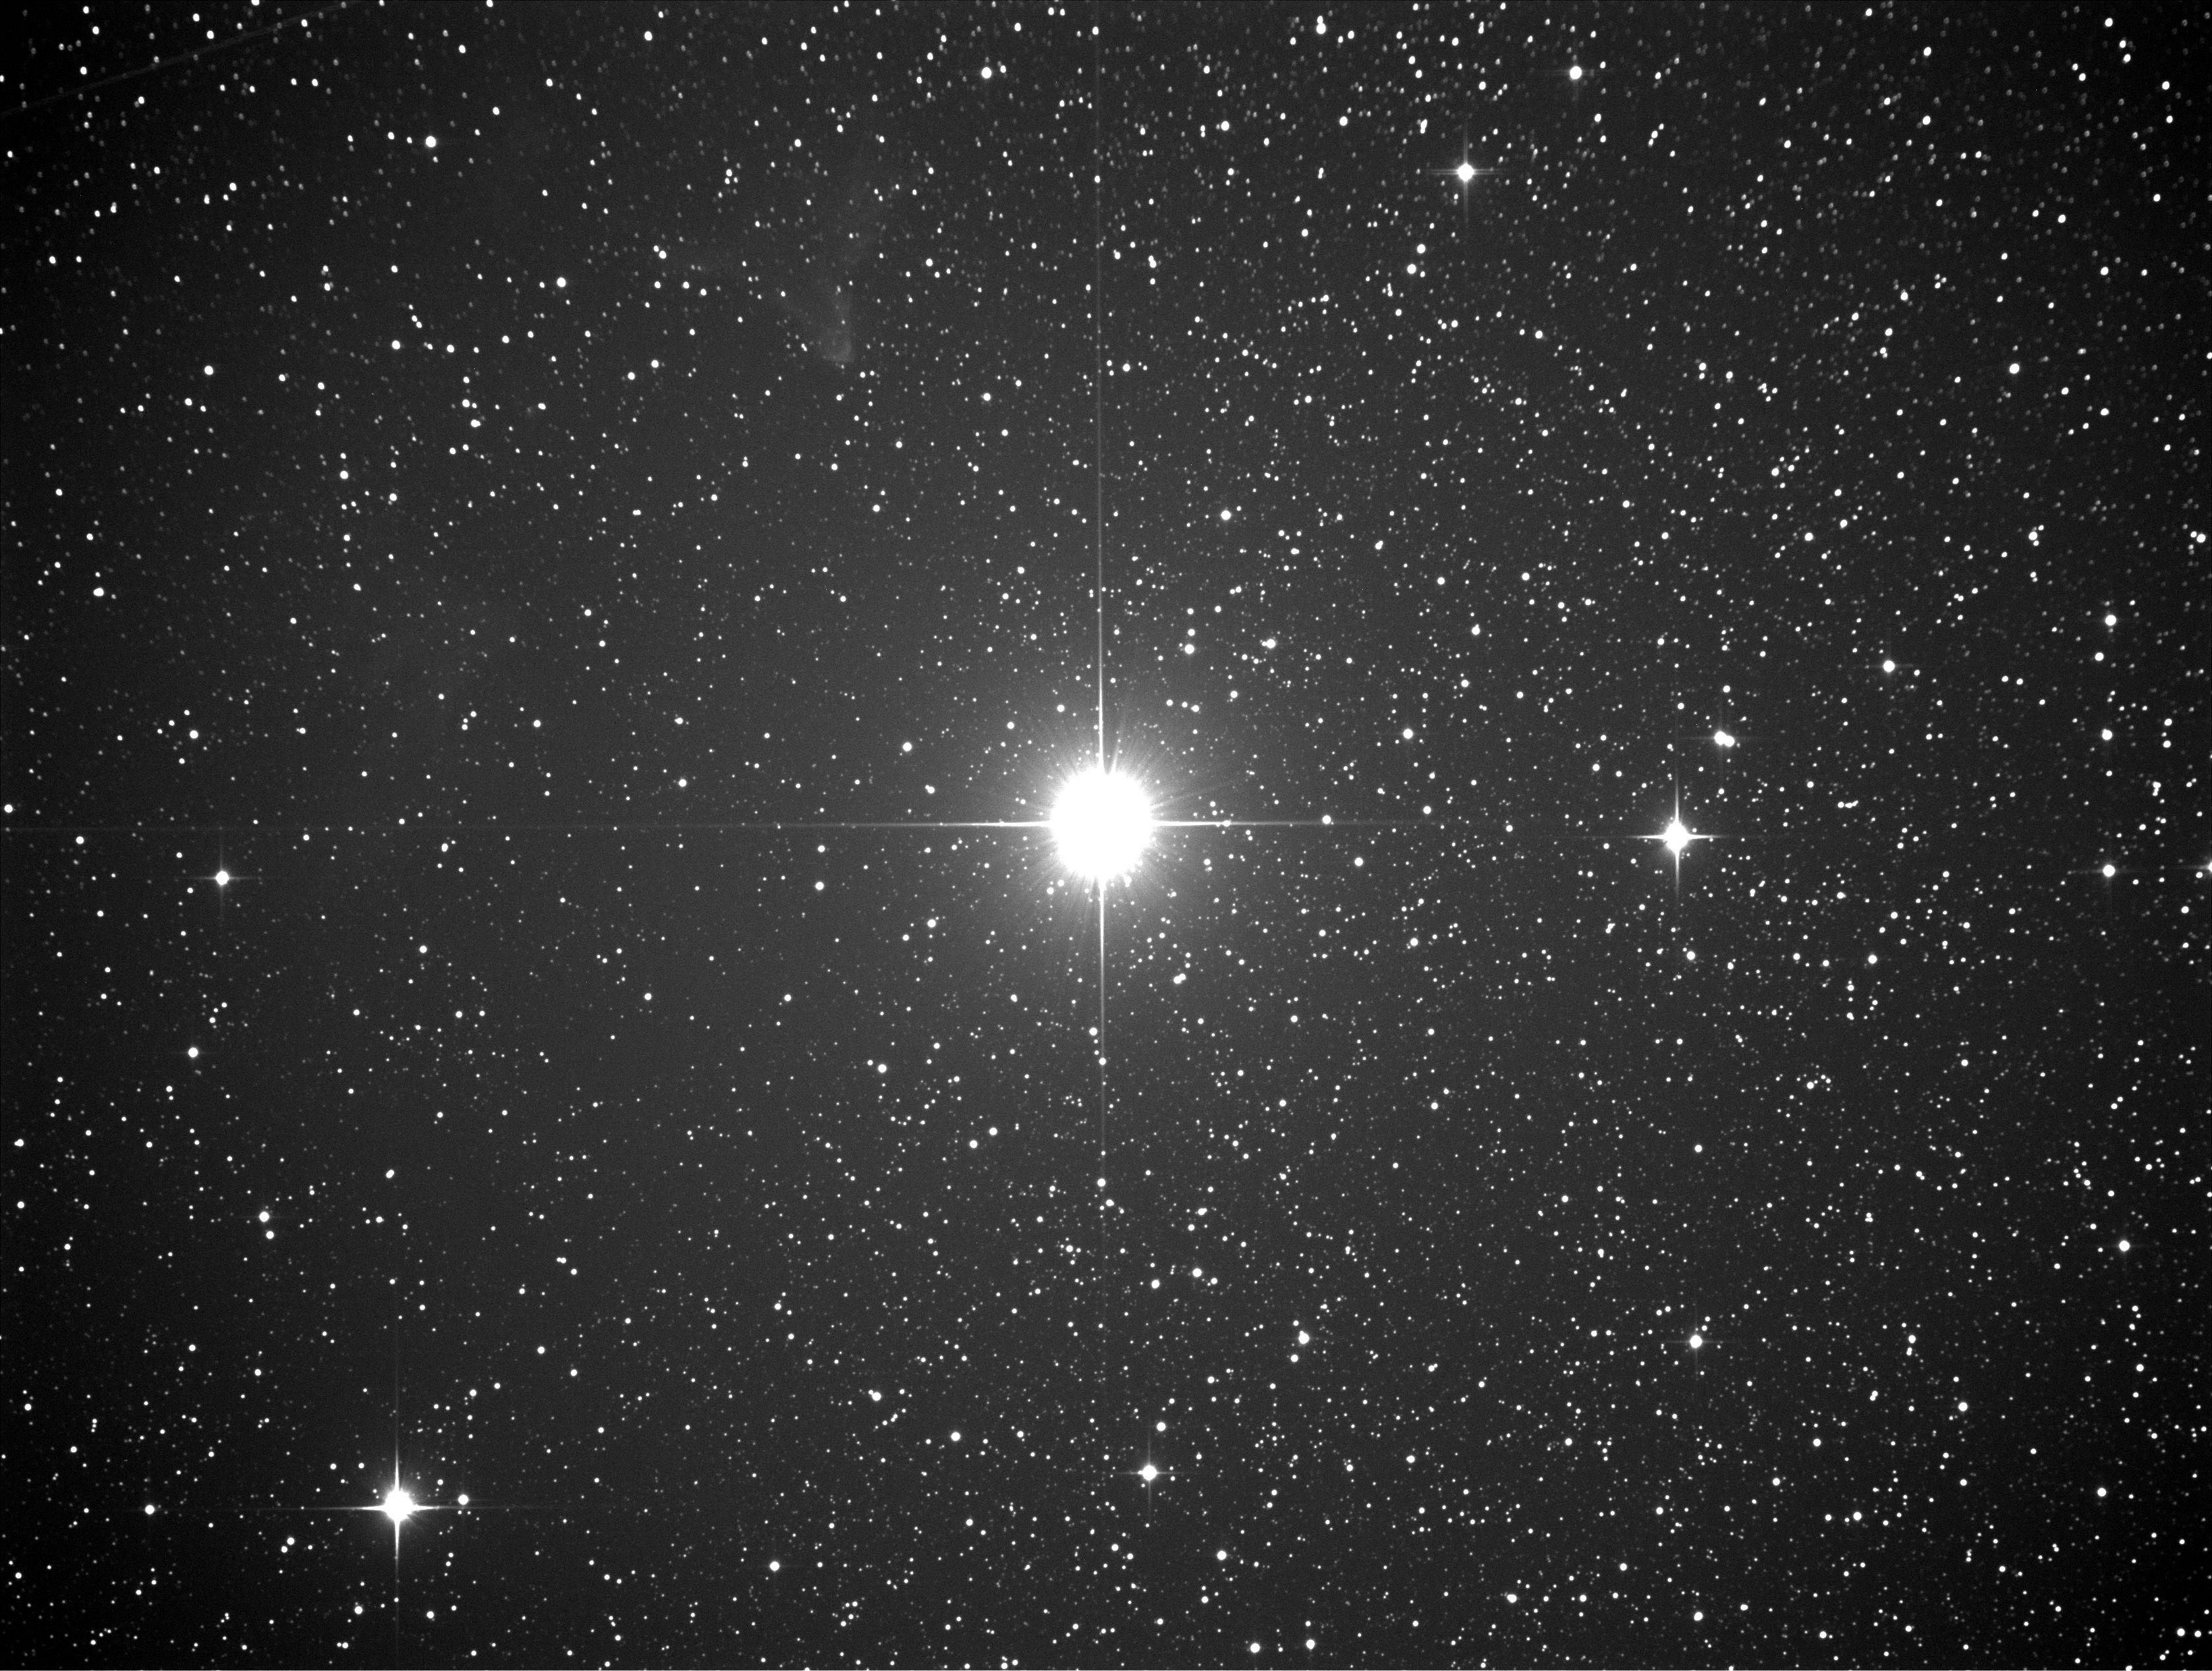
So, let’s have a look at the real pictures. First without the corrector:
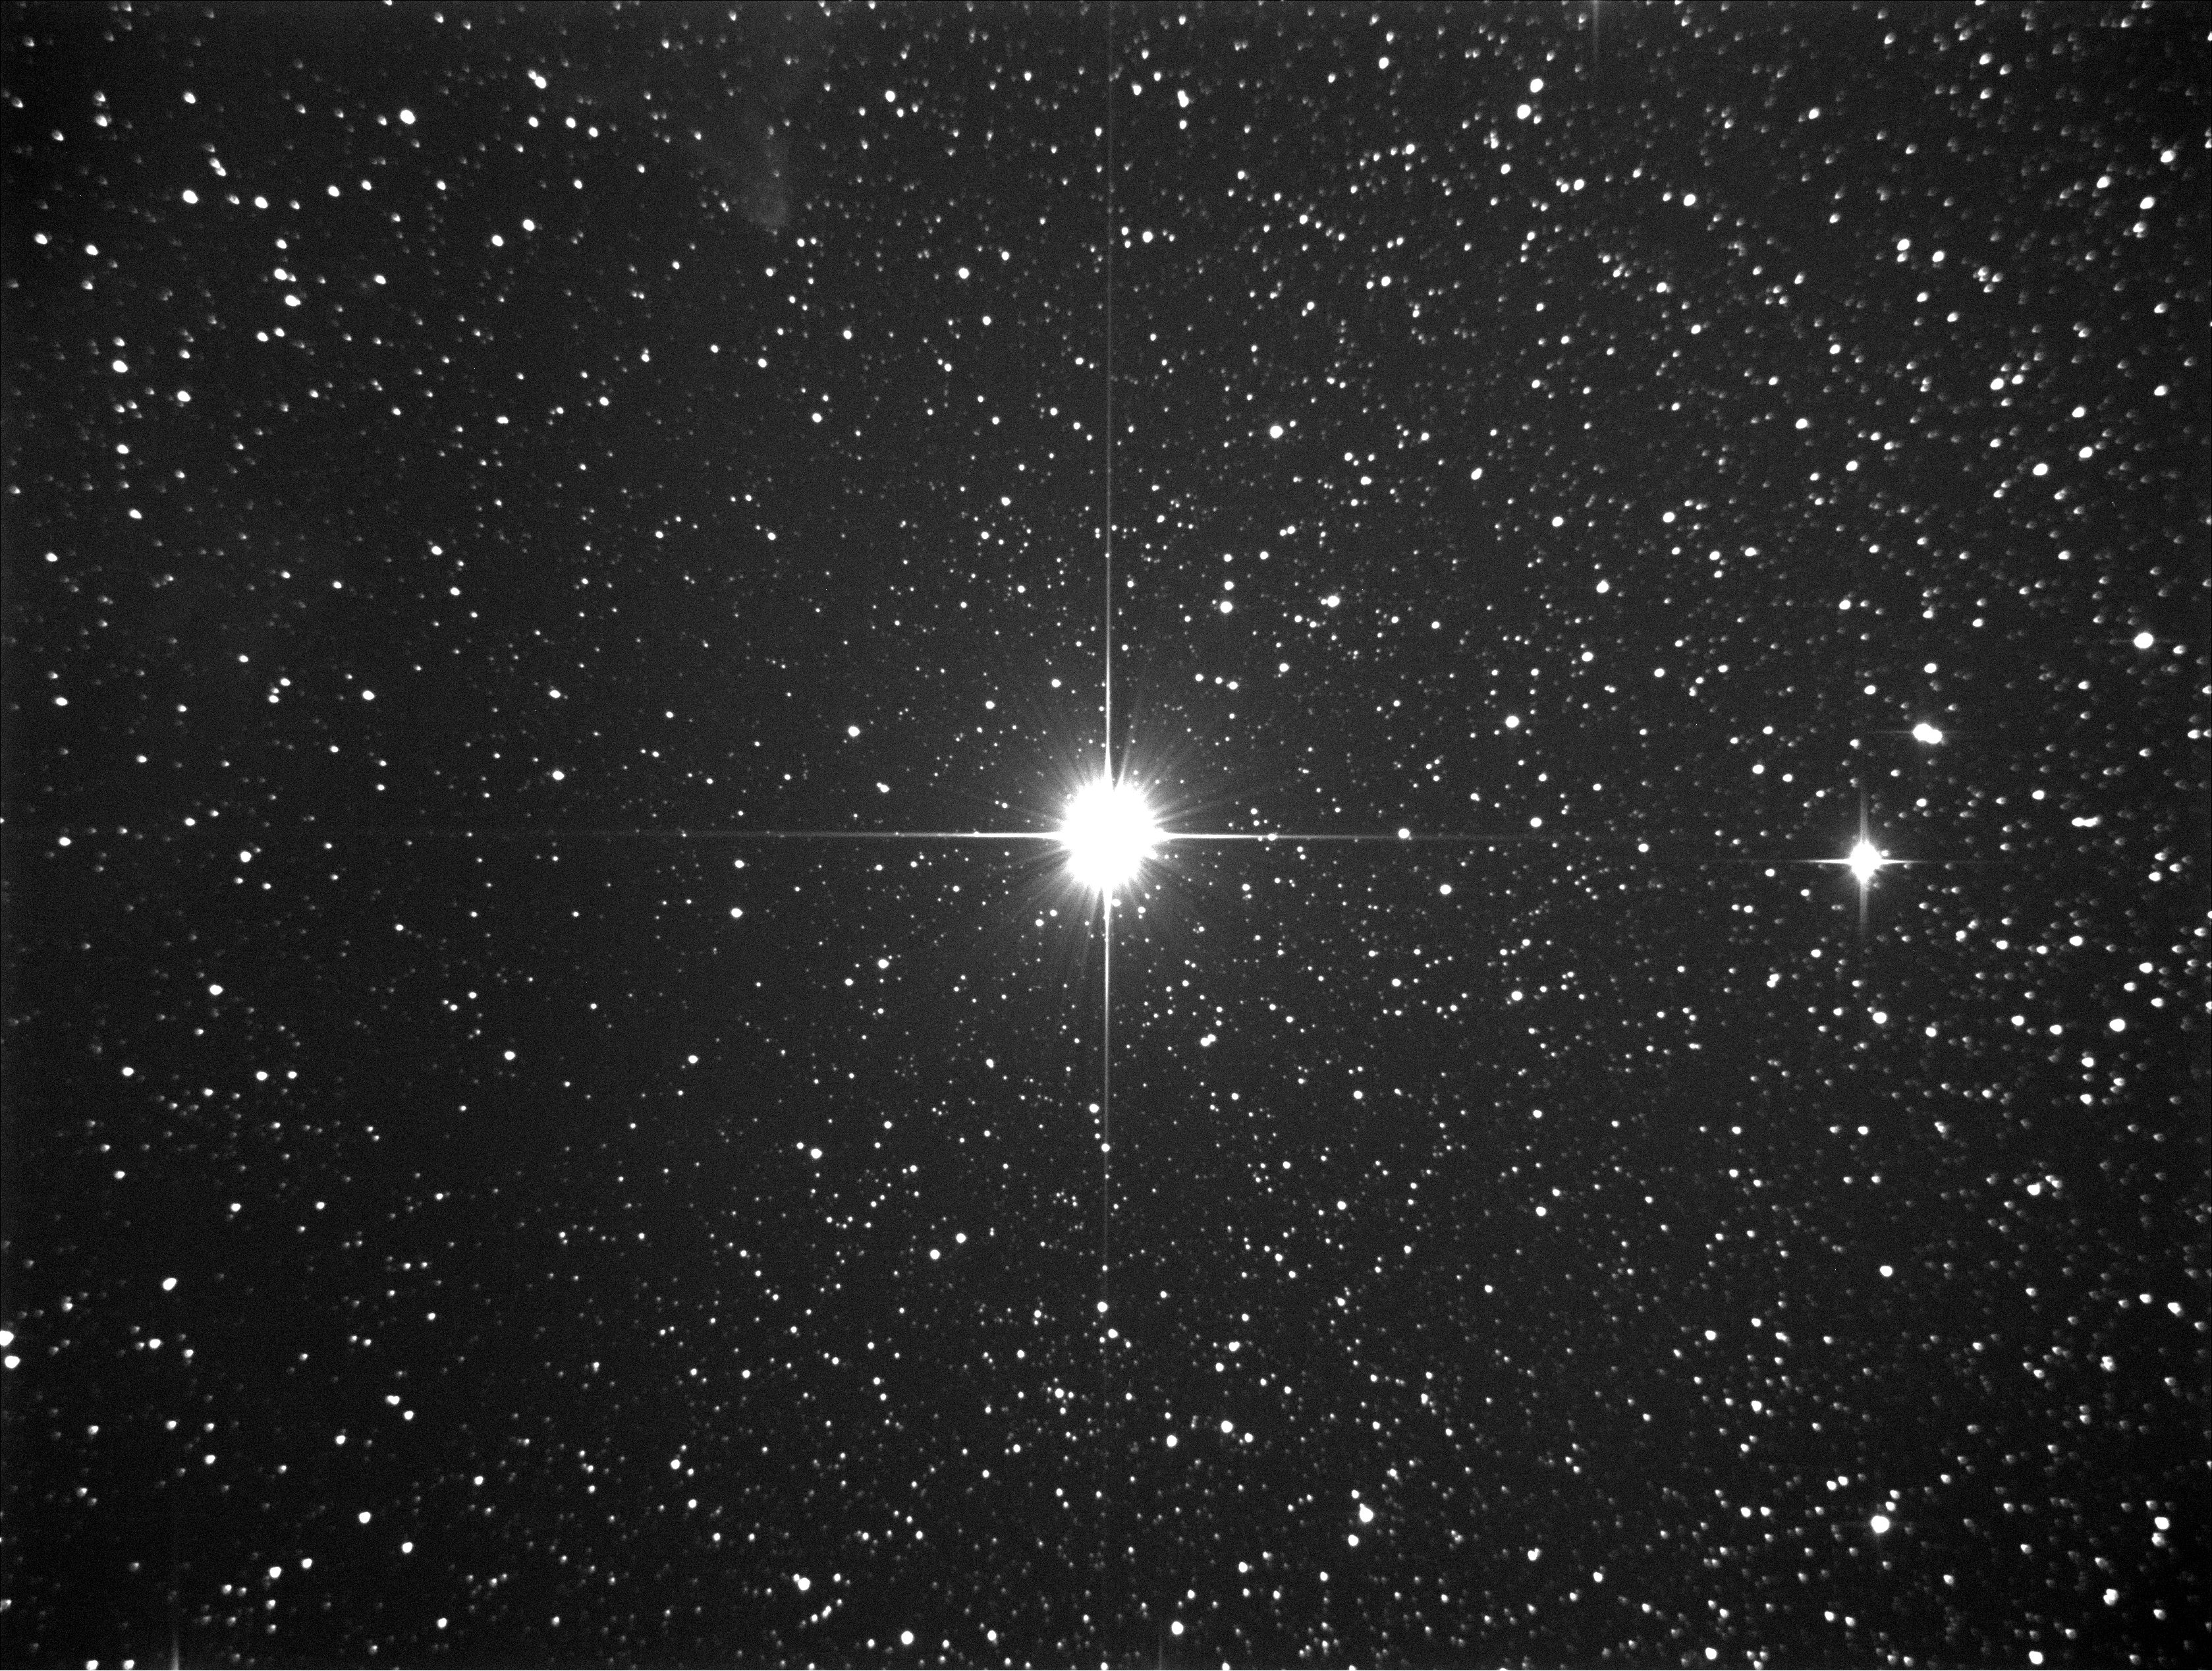
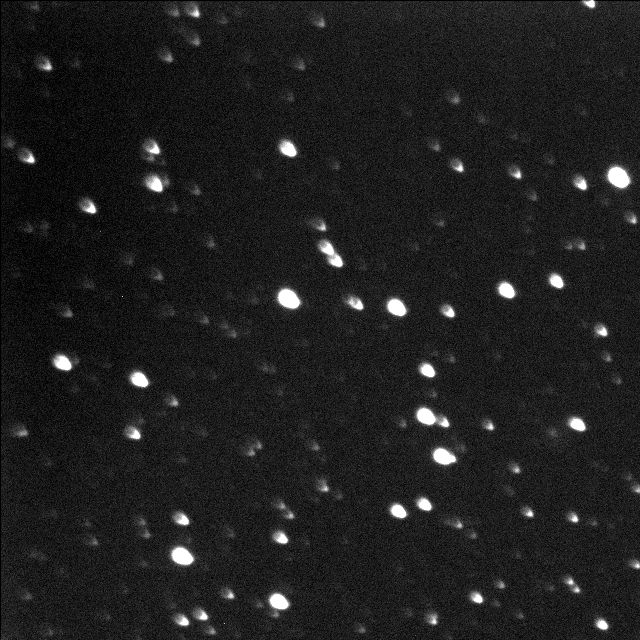
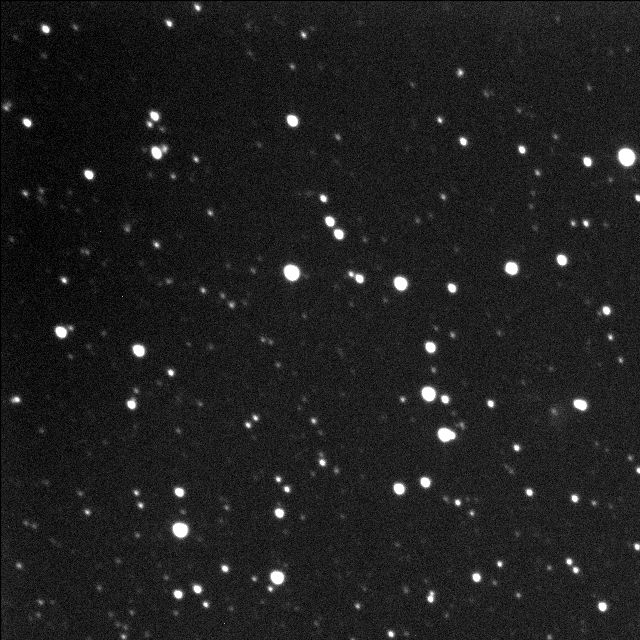
As you can see the coma is present in every corner, whereas in the center the stars are still quite round.
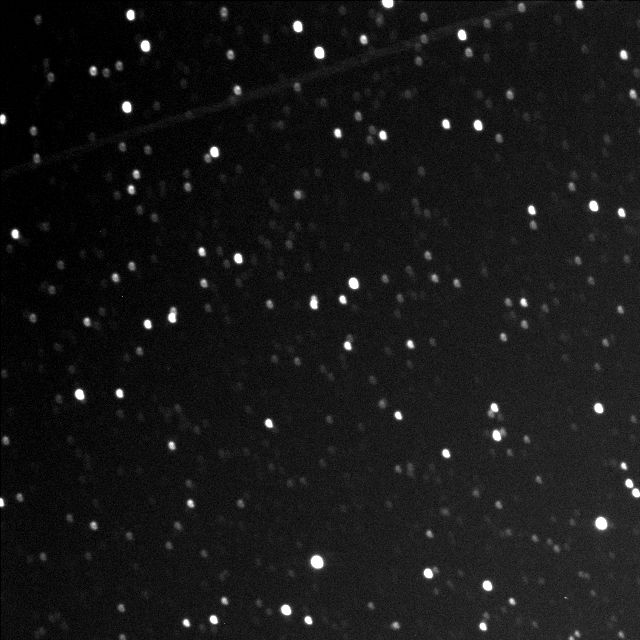
Upper left corner – no corrector:
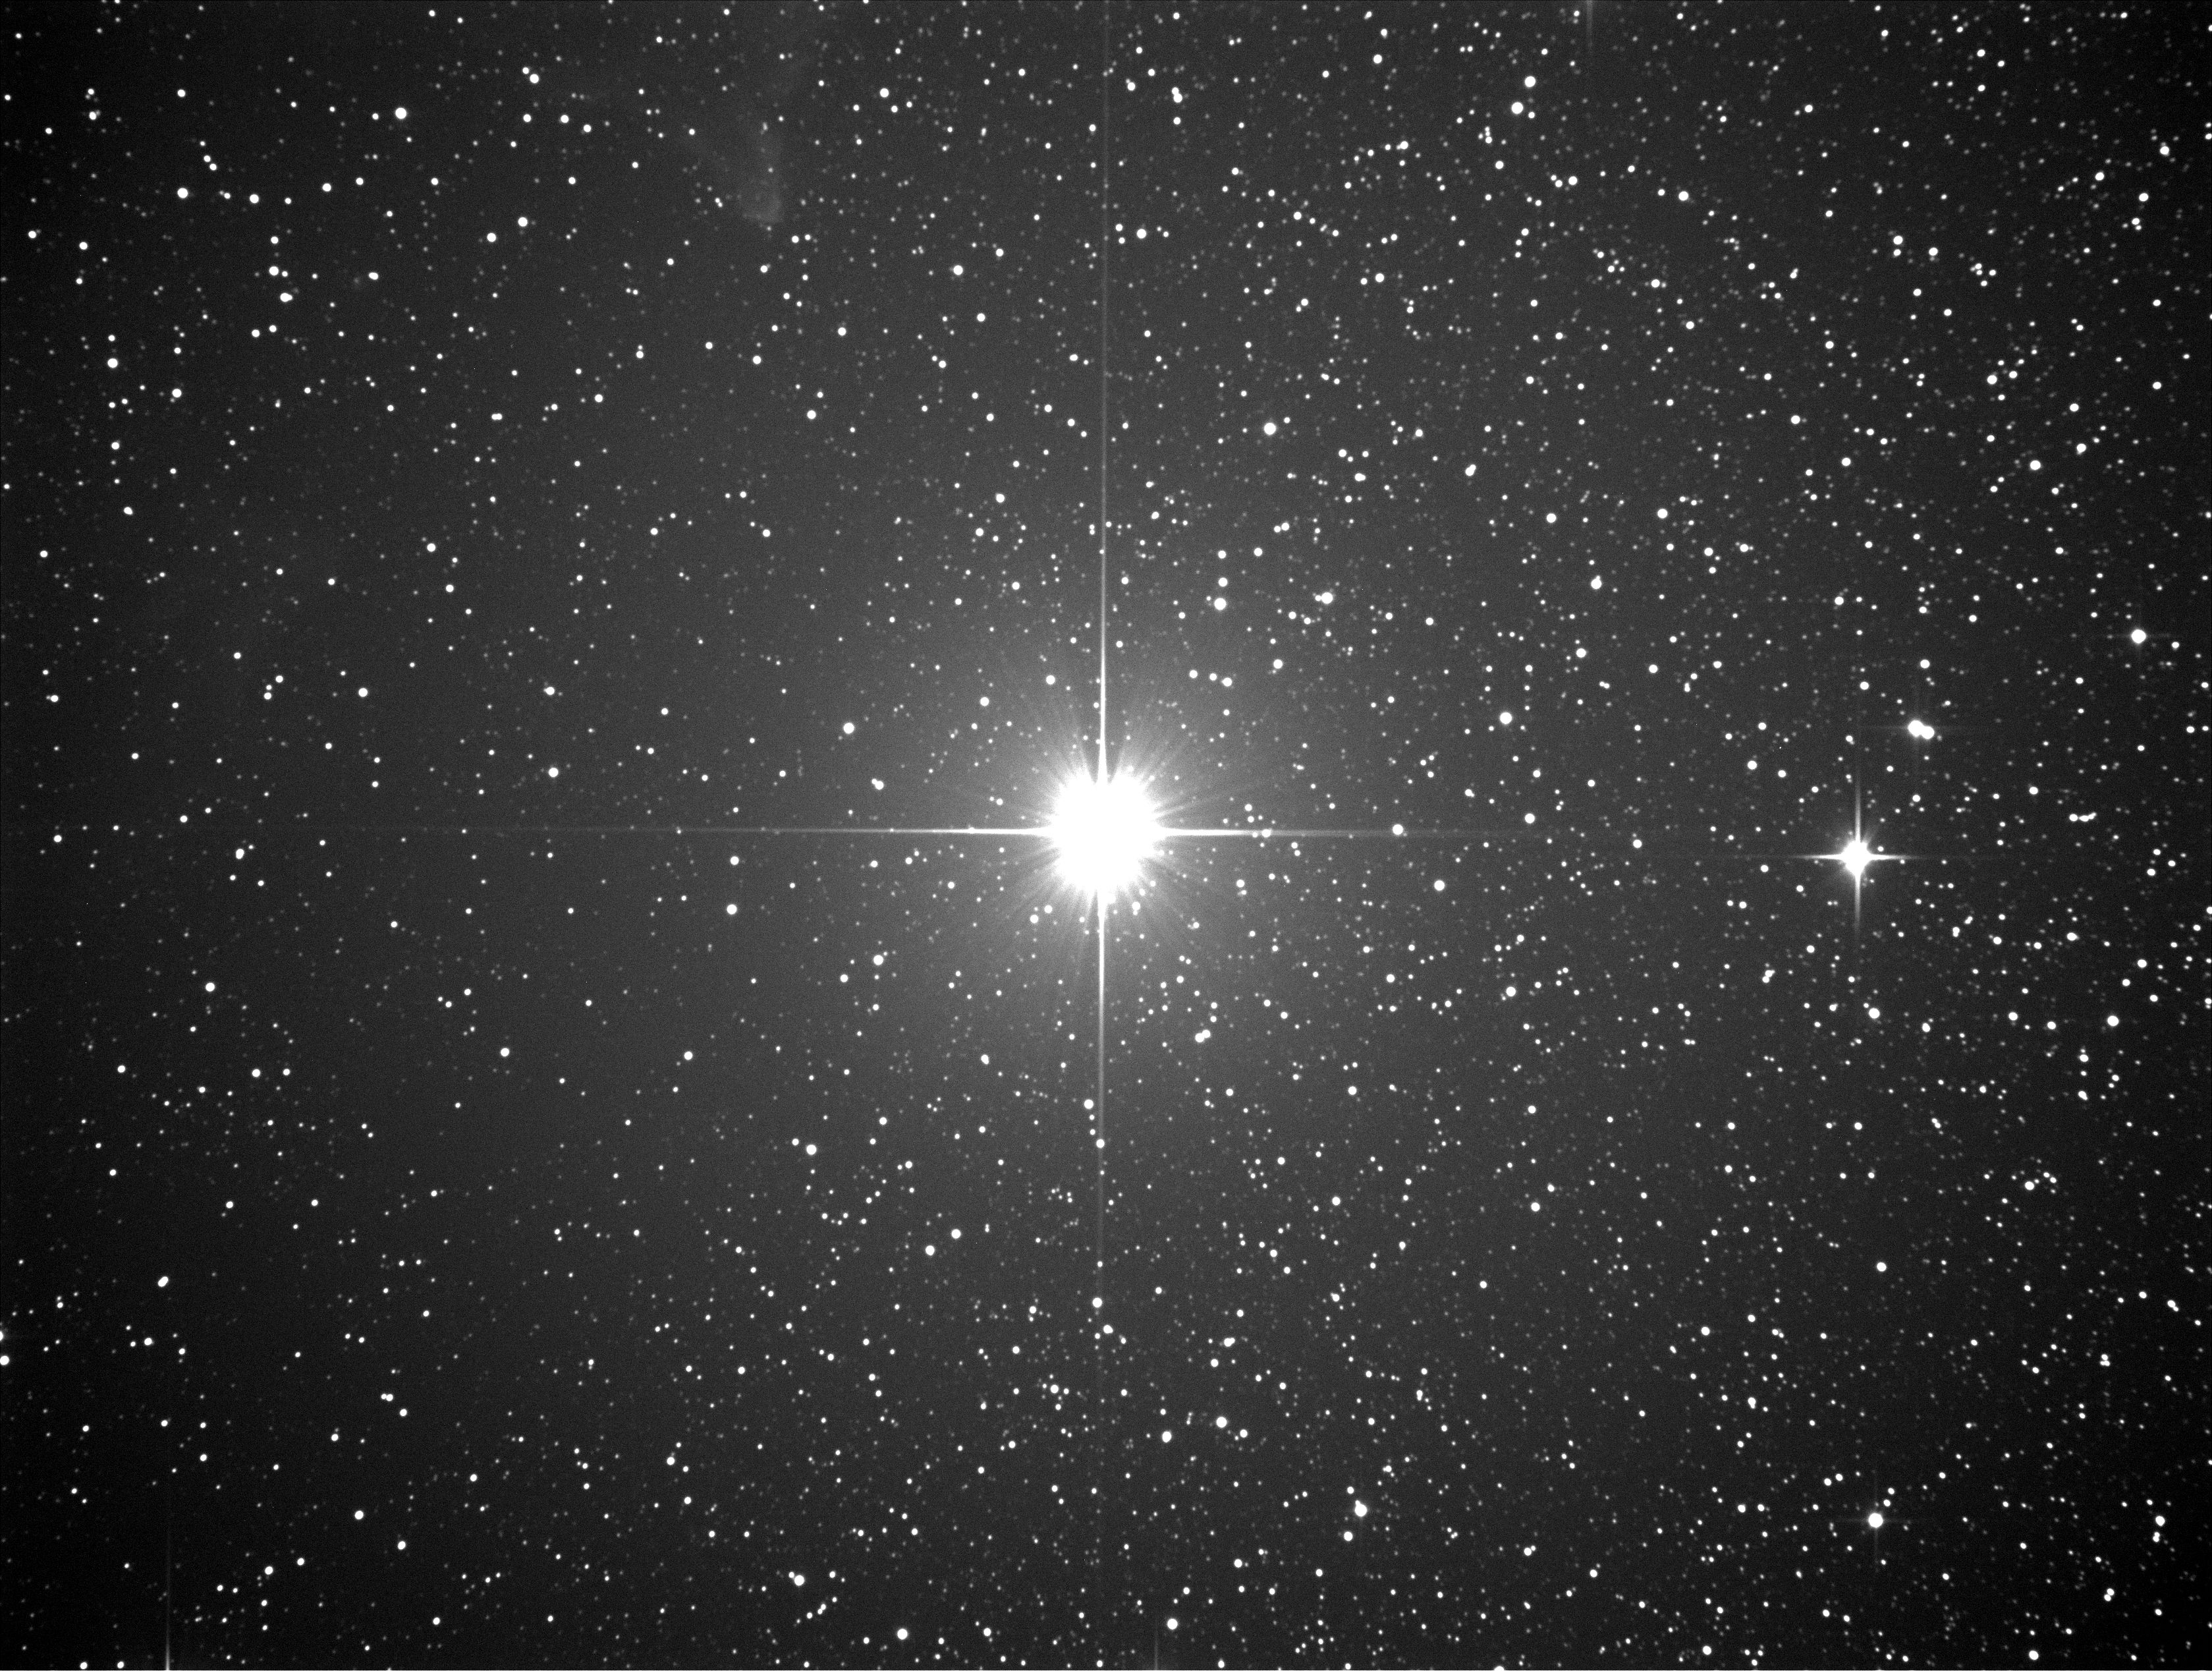
GPU coma corrector:
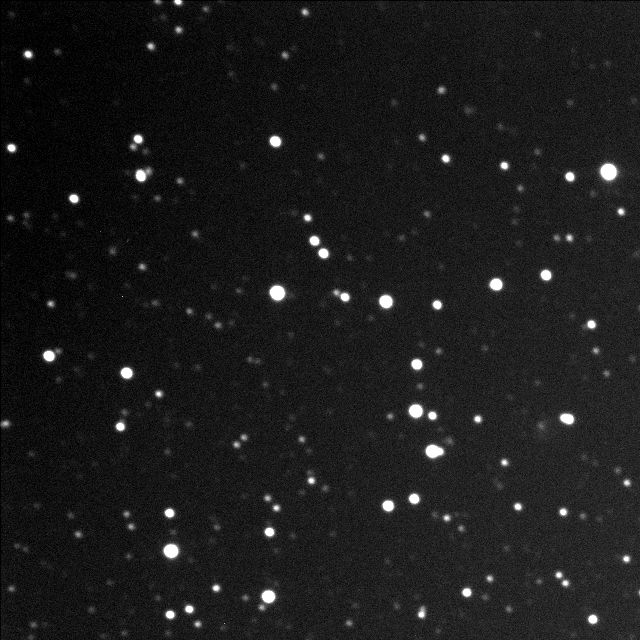
Upper left corner – GPU coma corrector:
Baader MPCC:
Upper left corner – Baader MPCC:
TS quatro:
Upper left corner – TS quatro:
Explore Scientific:
Upper left corner – Explore Scientific:
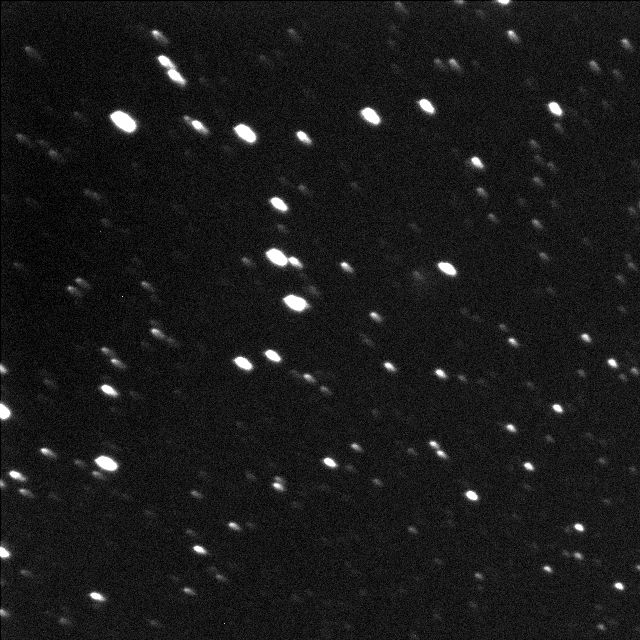
ASA reducer:
Upper left corner – ASA reducer:
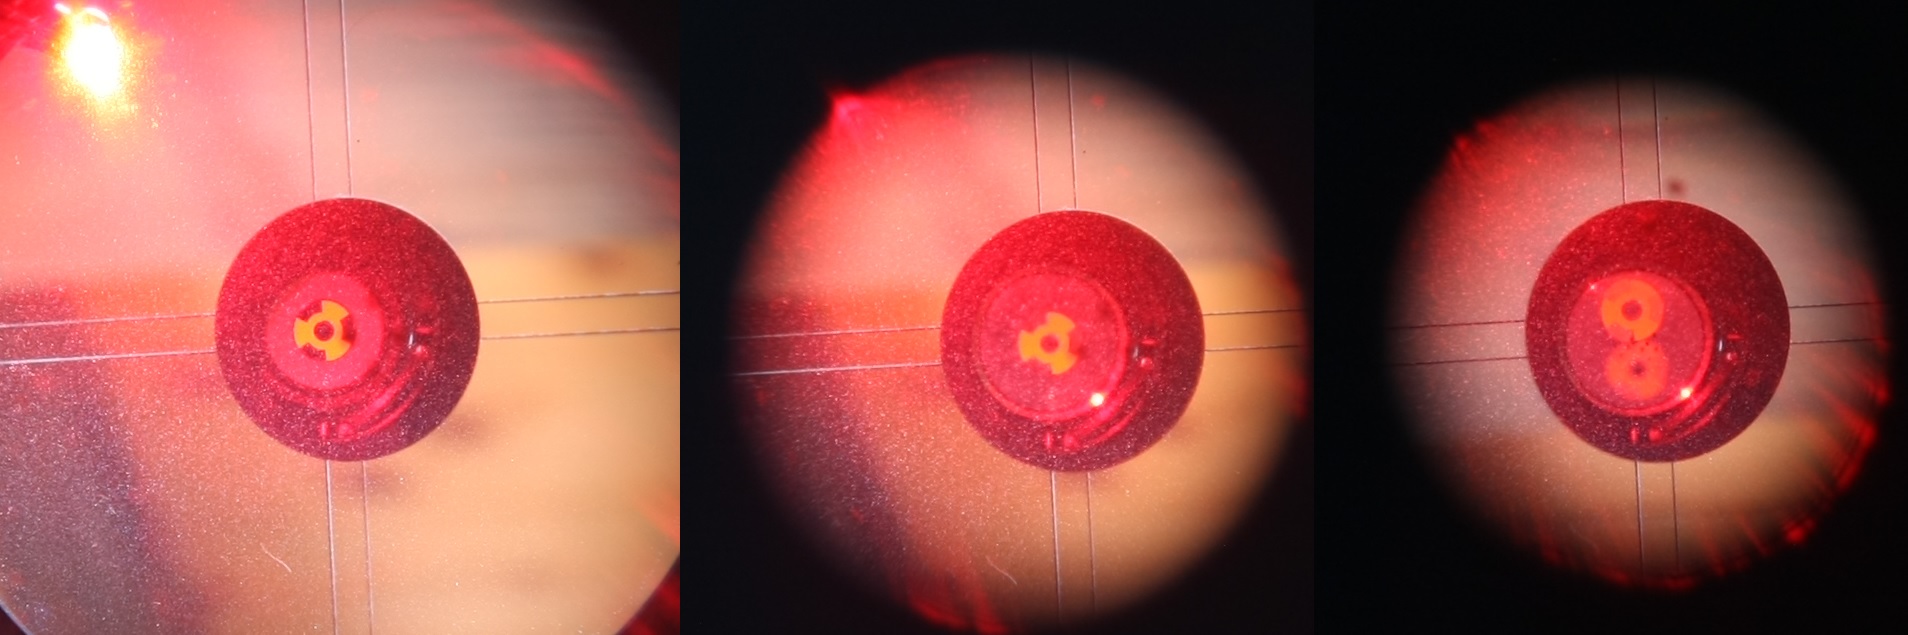
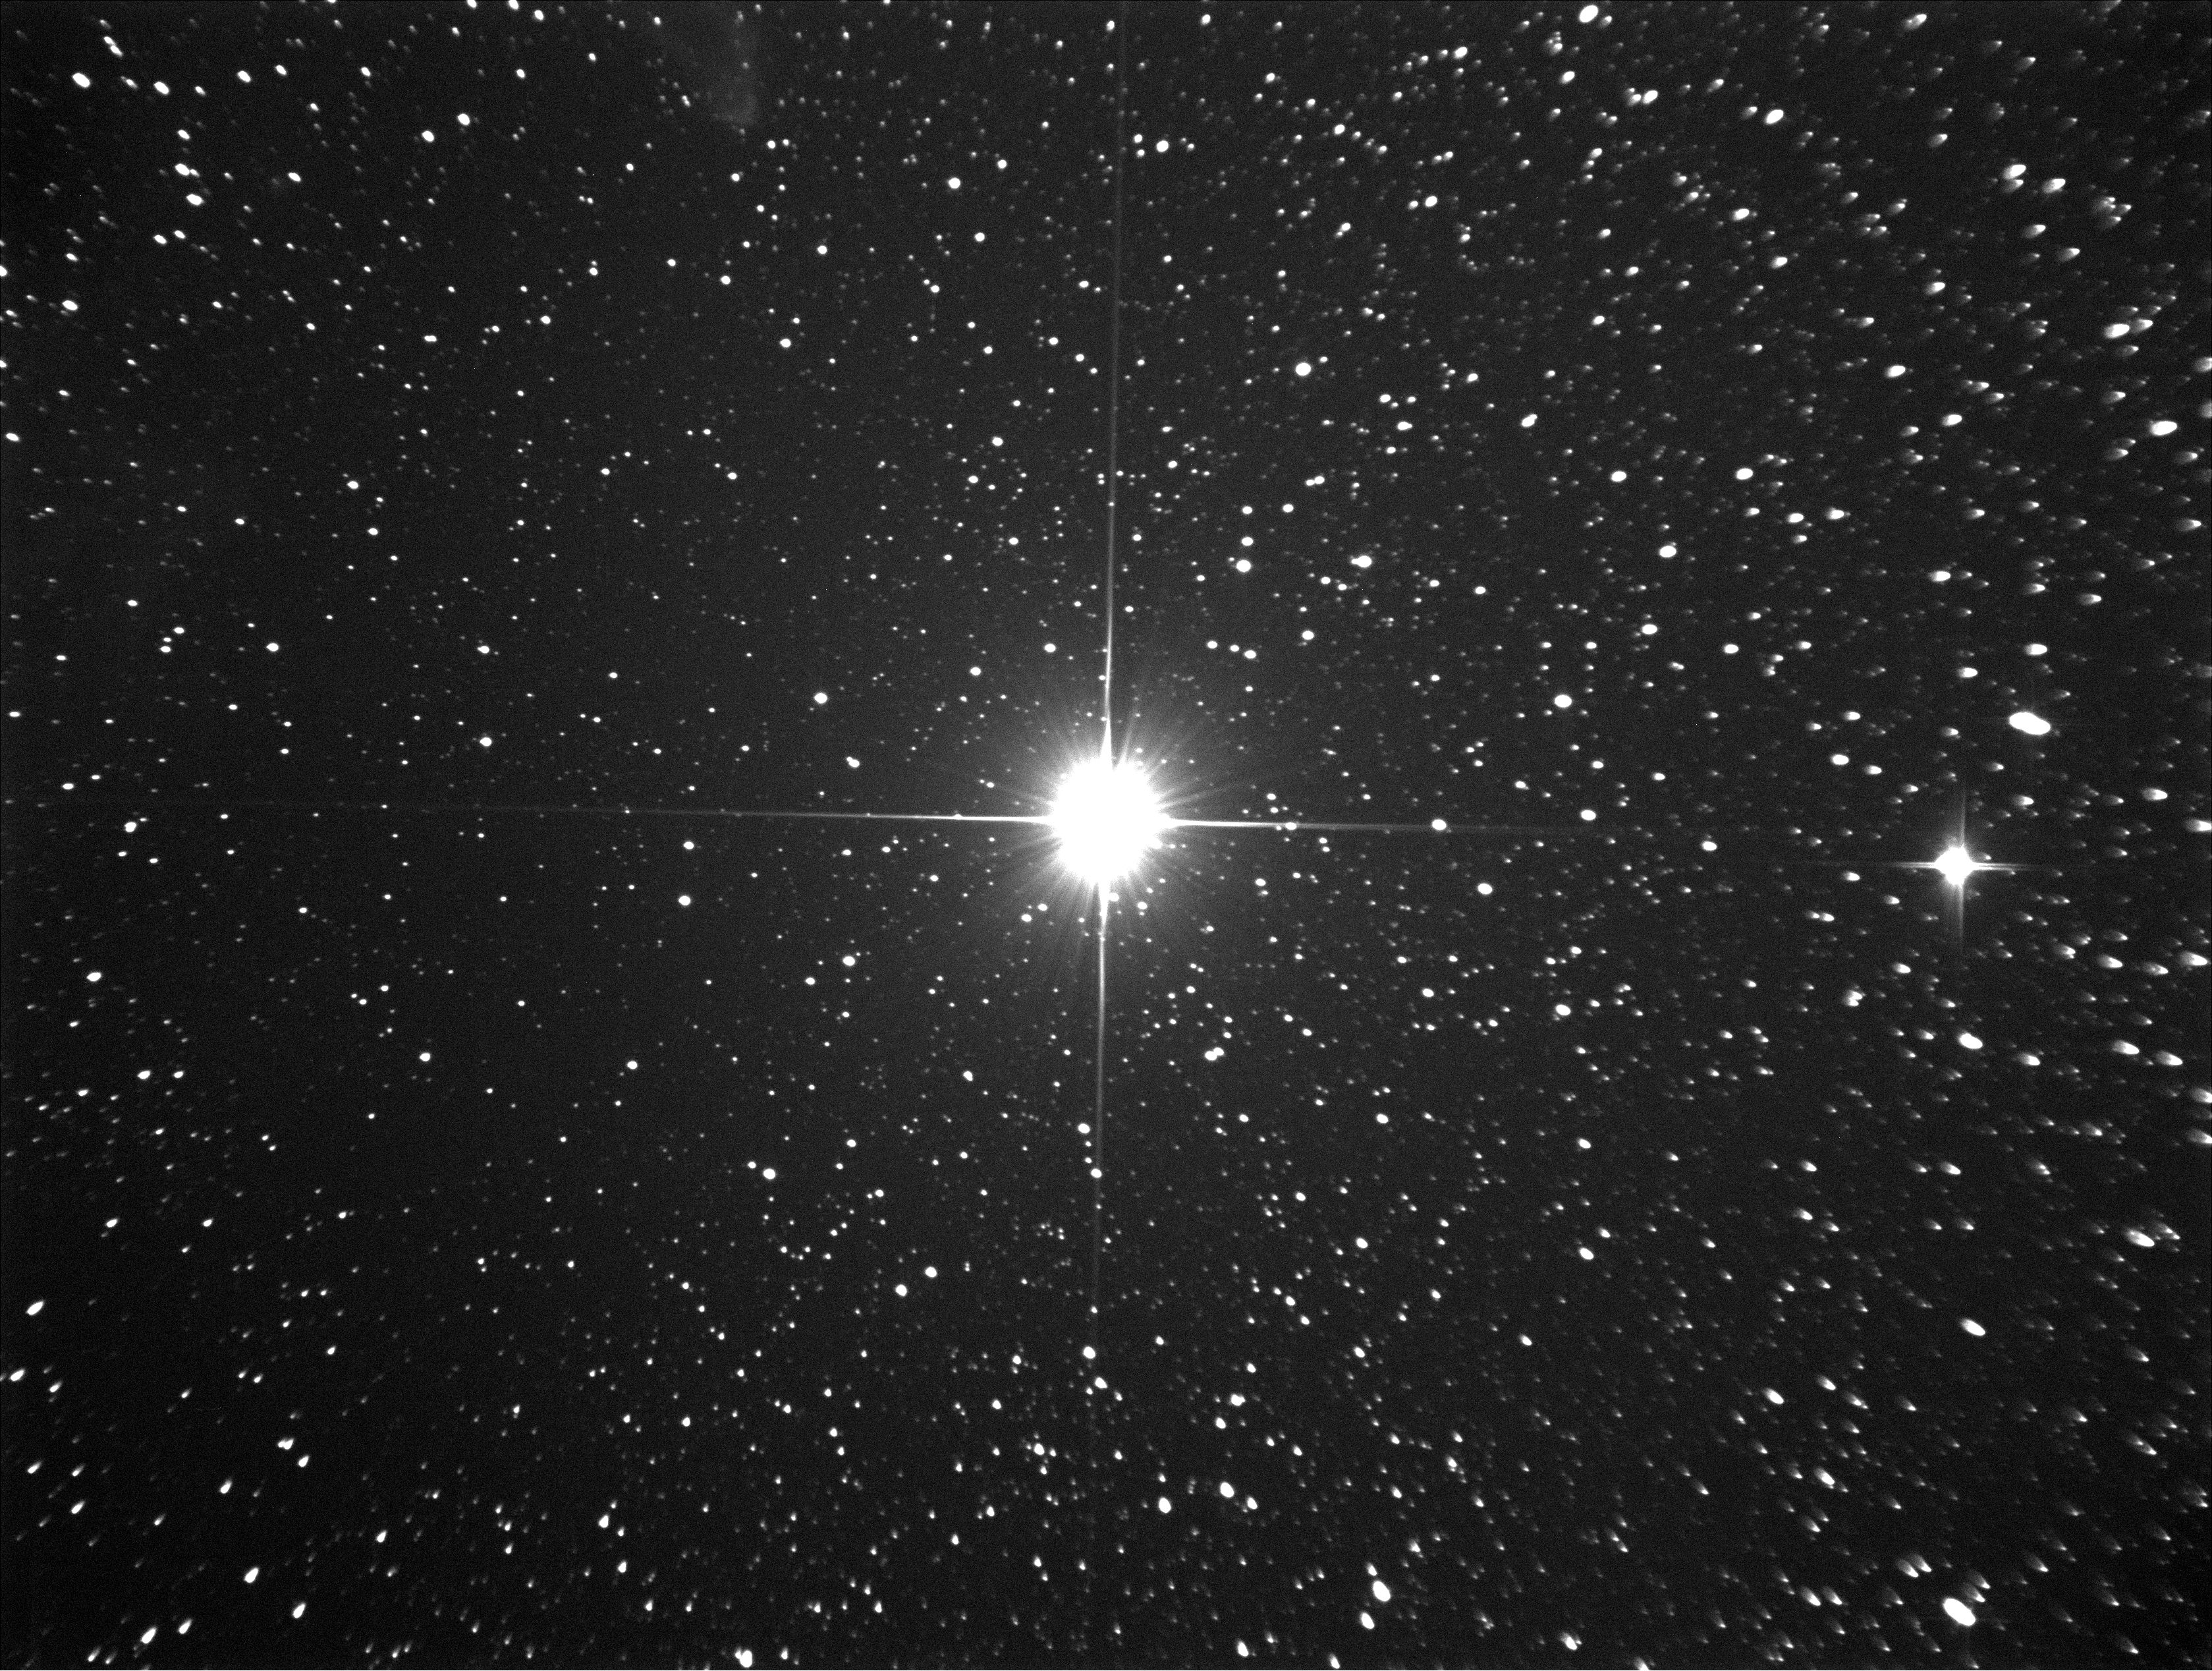
Well and the winner is… Subjectively I would say that the best star shapes has Explore Scientific CC. The stars are circular in every corner, but it’s obvious that the focal length was increased. Second best subjective rating reached GPU. Only in upper right corner has slightly oval stars. Third best (still subjective) CC is Baader. The stars are slightly oval in every corner, but it’s nothing dramatic. Compared to uncorrected pictures the coma was nearly suppressed. On the other hand TS quarto CC performs very badly. I would say that the stars are more deformed than in case without the corrector. The comets are flying outwards the center. One could say that it’s not coma corrector, but coma creator 🙂 And yes, I didn’t forget to use 15 mm spacer between the camera and the corrector, because back focal distance is 70 mm and not 55 mm as for every other CC. With ASA reducer it’s quite tricky. Bottom 2/3 of the picture looks great. However, upper 1/3 of the picture is out of focus. The upper bright star has double diffraction spikes. This is caused by the double spider wanes and it implies that the picture is out of focus. How this could be? Collimation is perfect, so it must either be something between the corrector and sensor or between the corrector and primary mirror. In order to disprove the first variant I rotated the camera by 180° and I got this:
Basically the same outcome – the upper 1/3 of the picture is not focused. Very bright star in the upper right corner has double diffraction spikes, which is the indication of defocus. This means there must be something with the mirrors. I realized that another source of problems could be misalignment of the secondary mirror with the focuser. There is one instrument, which can detect this problem easily and it is Spheretec 2” Concenter eyepiece. It is basically Chesire tube with transparent plate with circular markings. It works like standard film container Chesire – primary mirror must be covered and it is better to place white paper underneath the secondary. My mirror was slightly out of center, but it was nothing dramatic, so I corrected it and here is the view through the focuser:

Unfortunately it didn’t help:
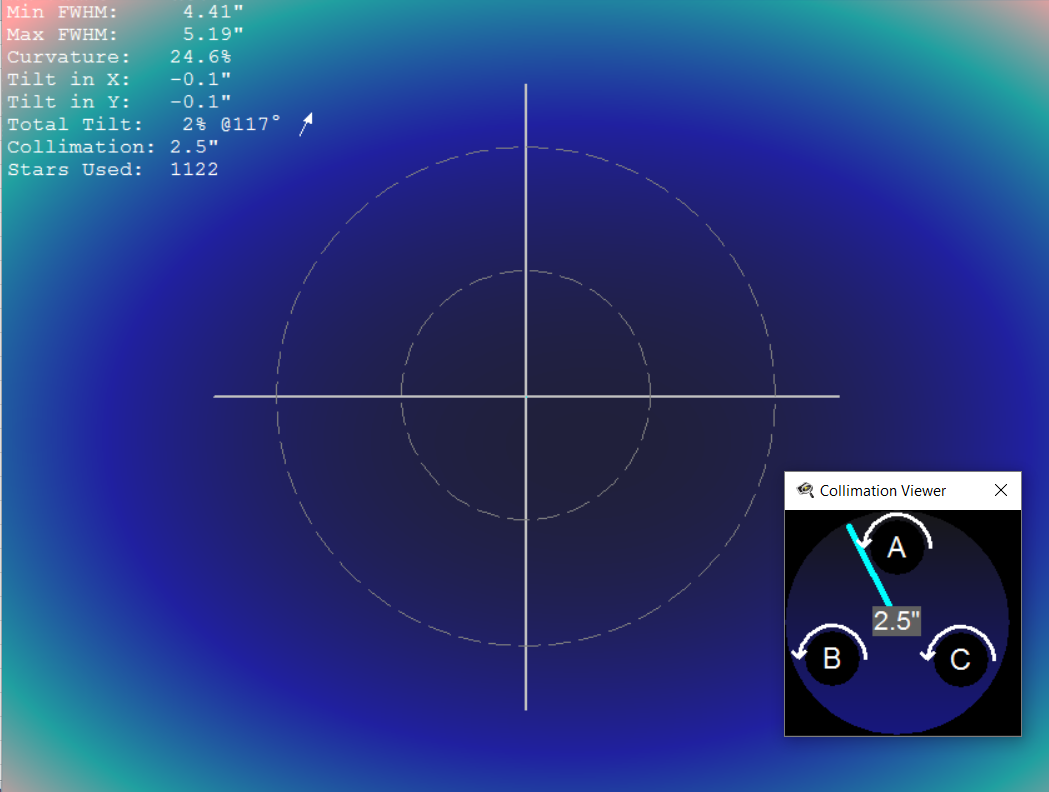
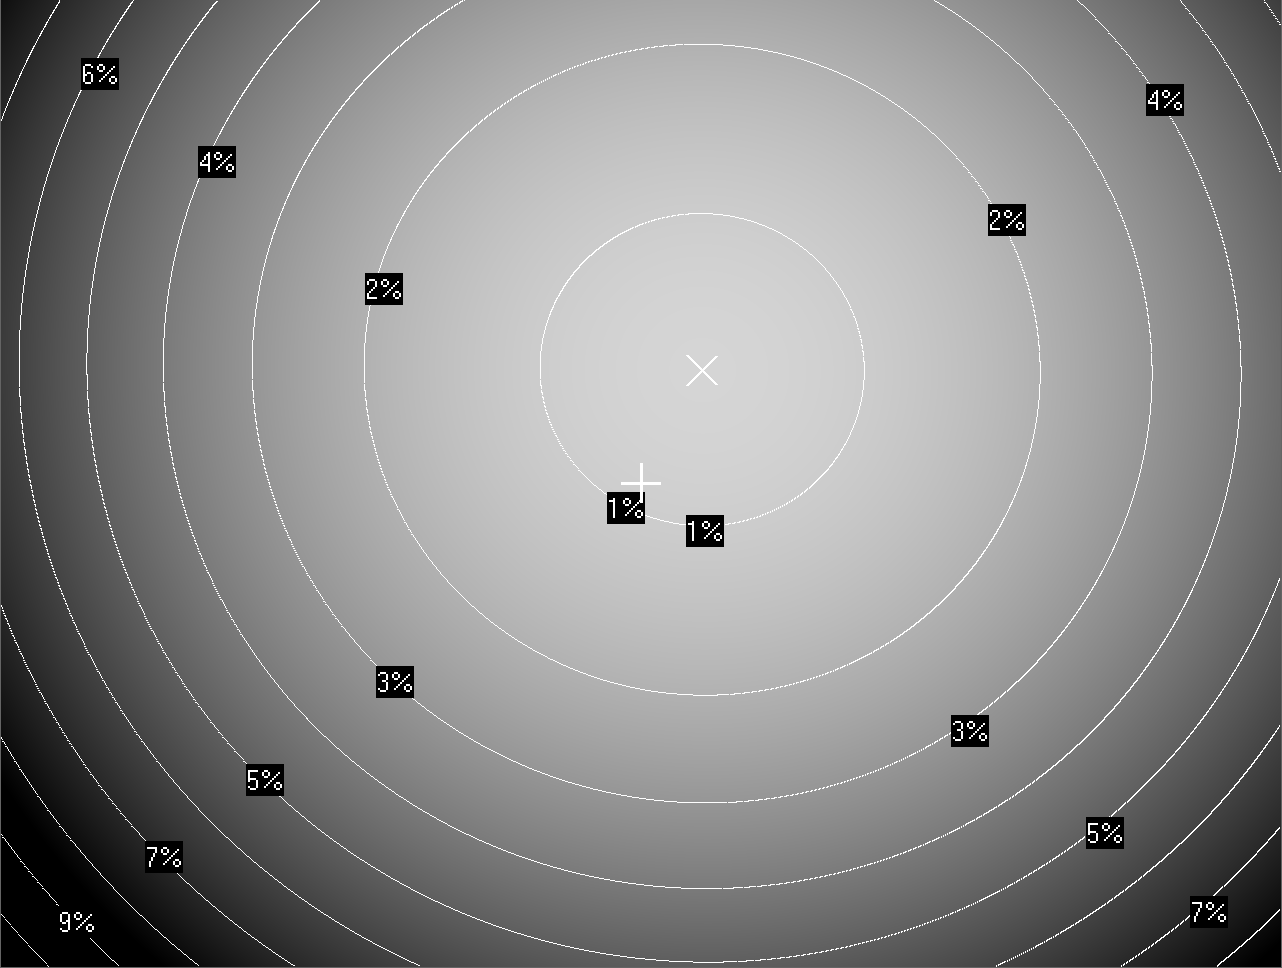
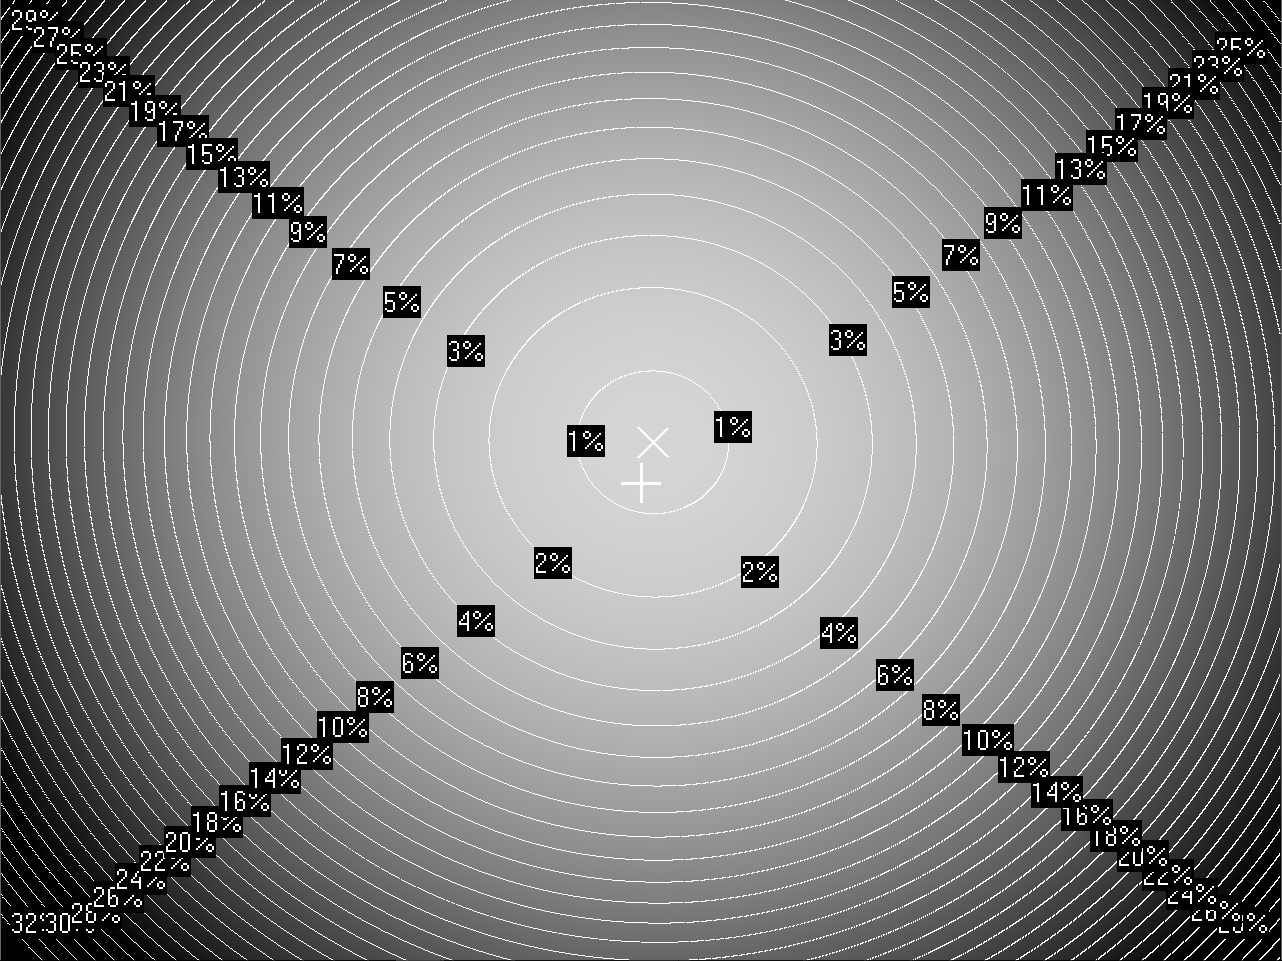
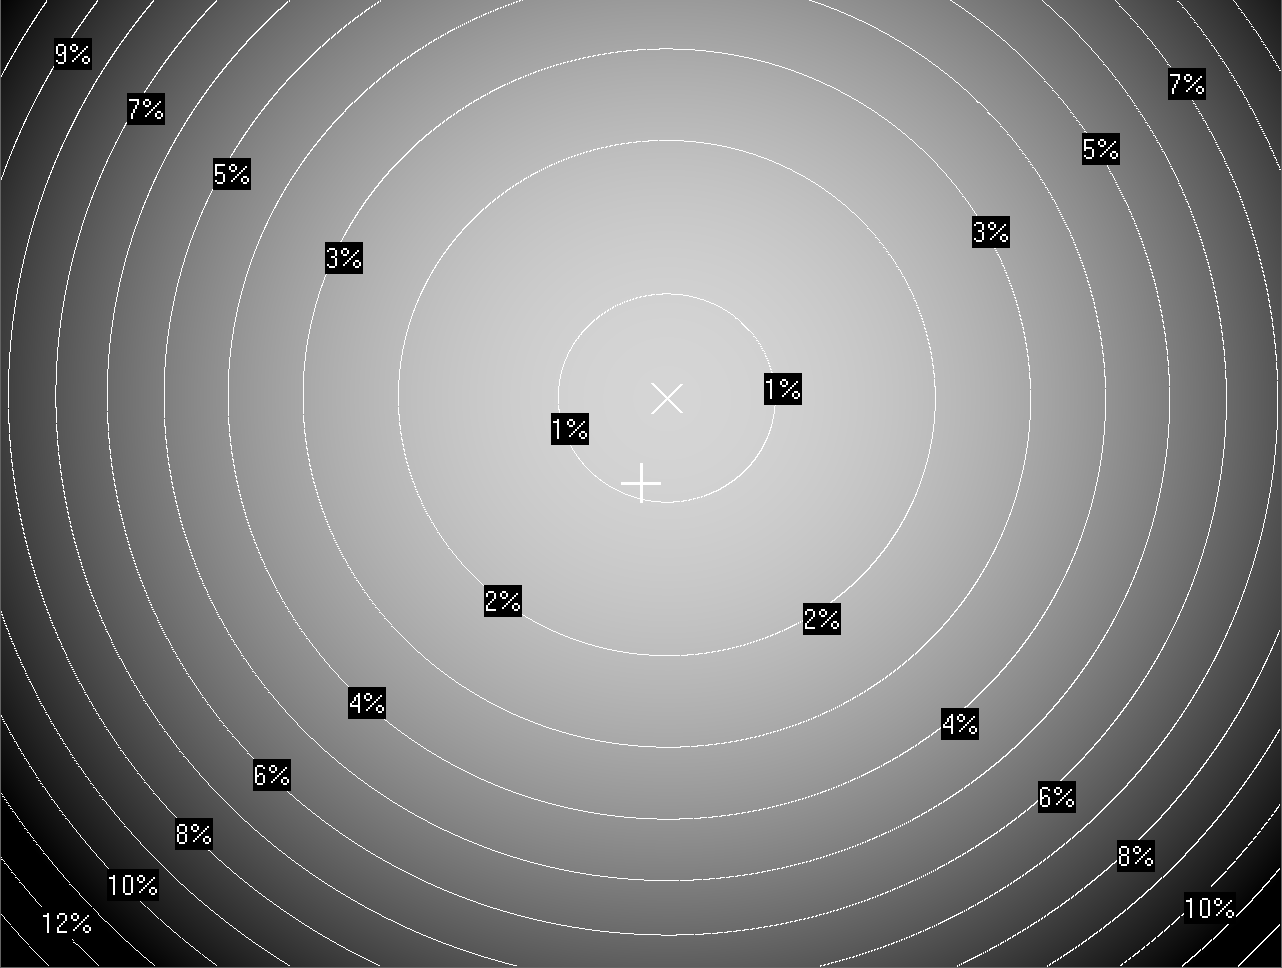
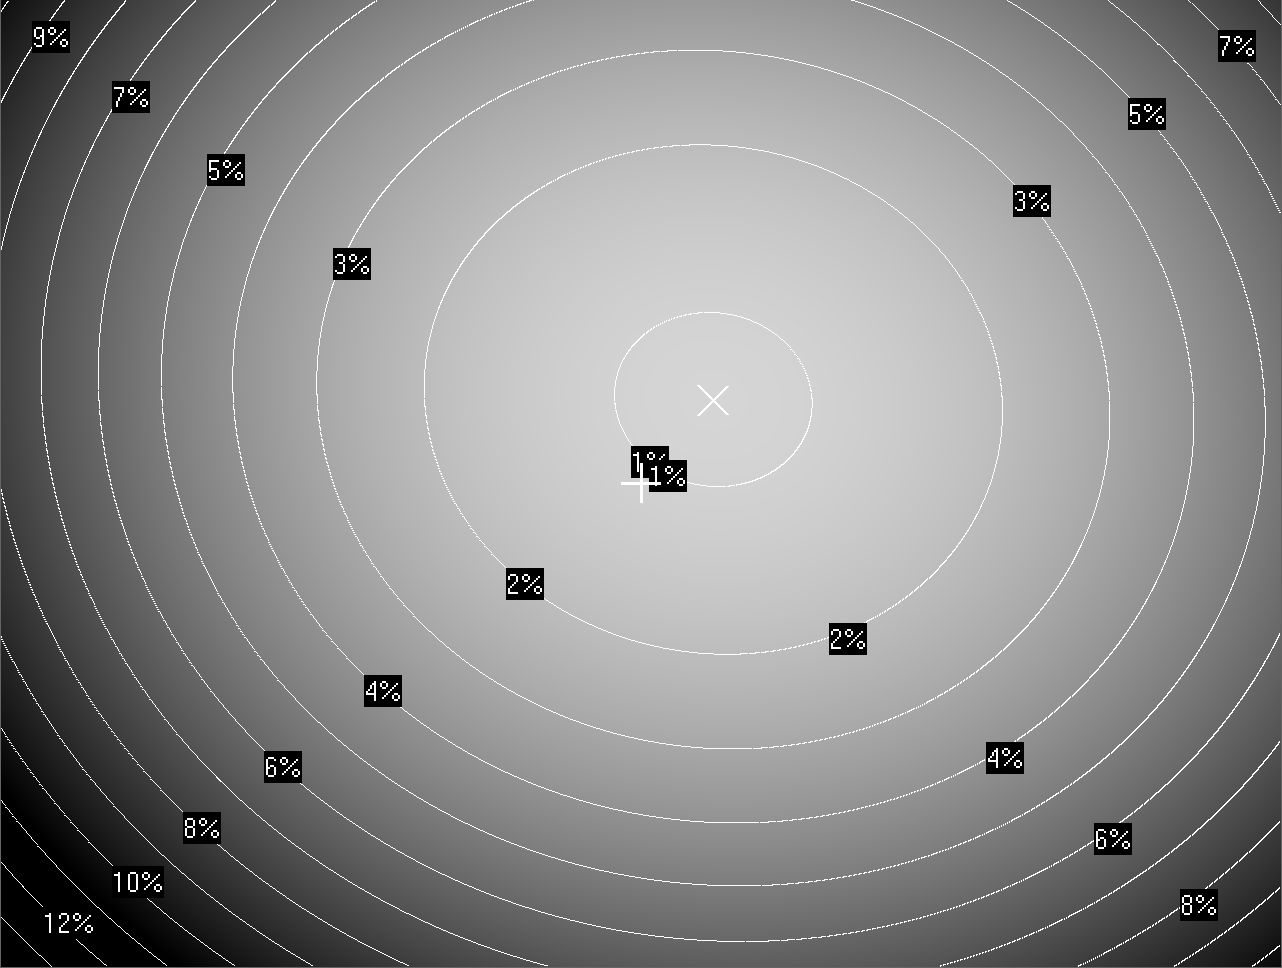
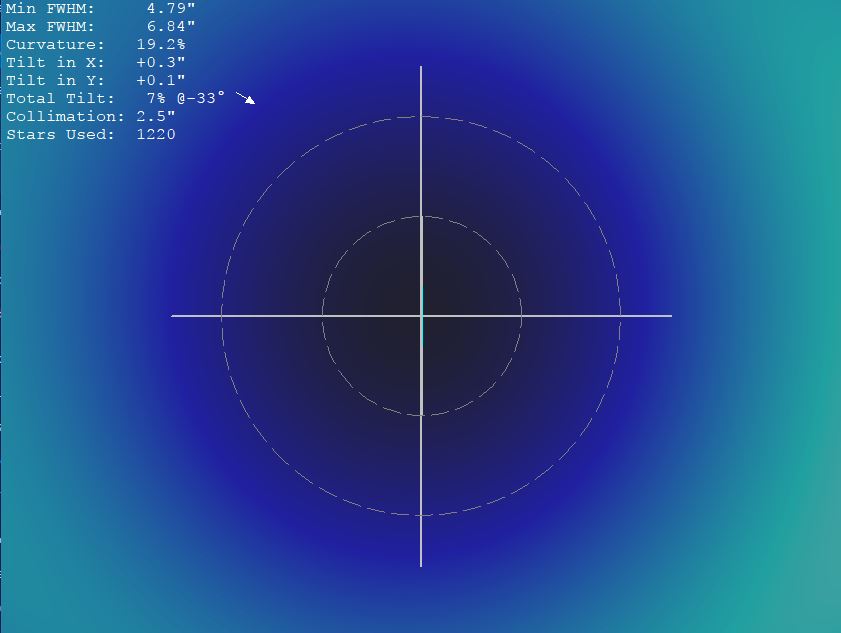
CCD inspector
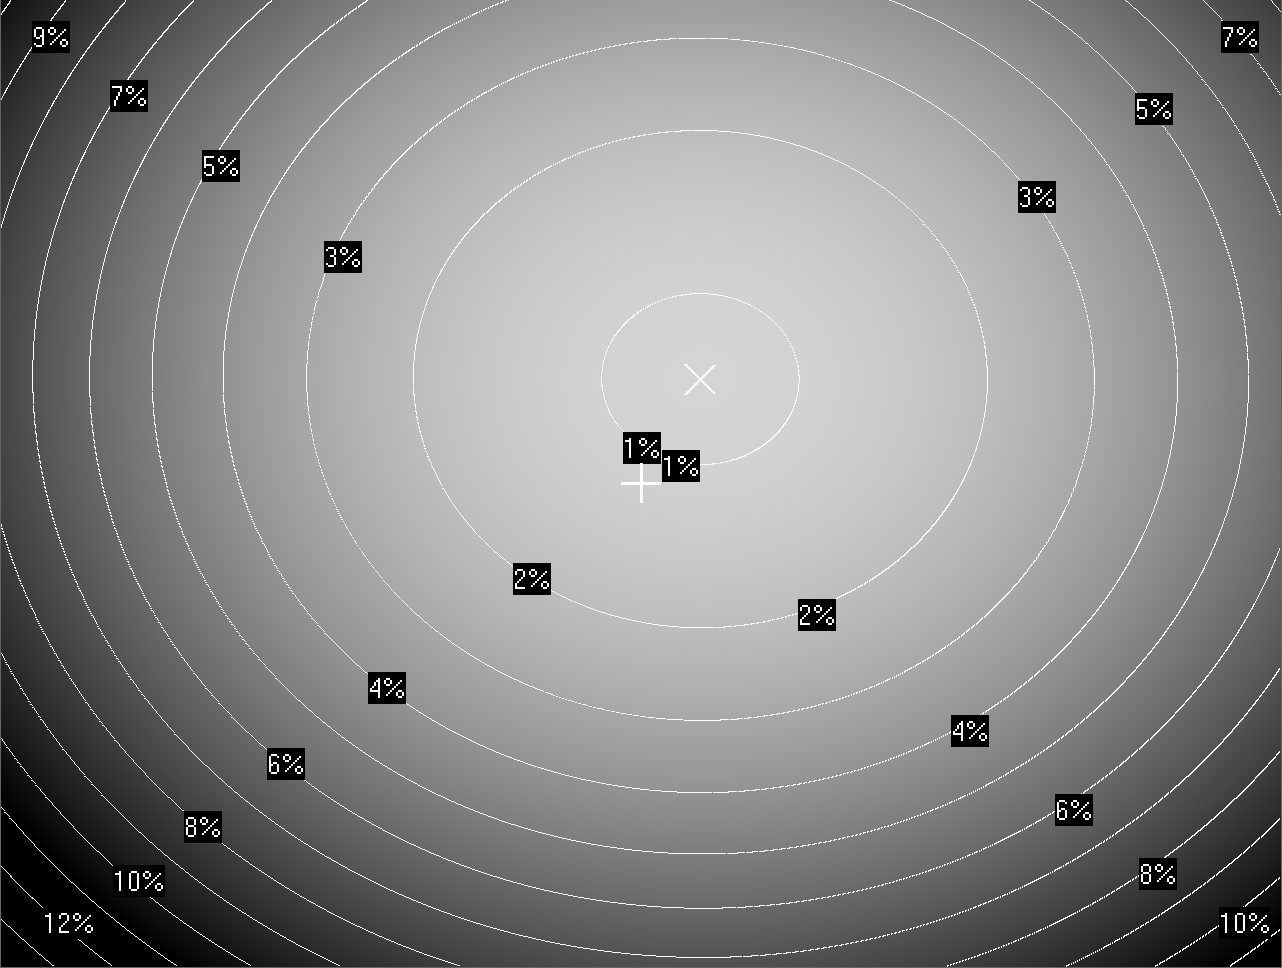
Non-subjective analysis of the picture quality can be done by CCD Inspector. 2D curvature map provides the information about the collimation and the tilt of the sensor. So let’s have a look:
No corrector:
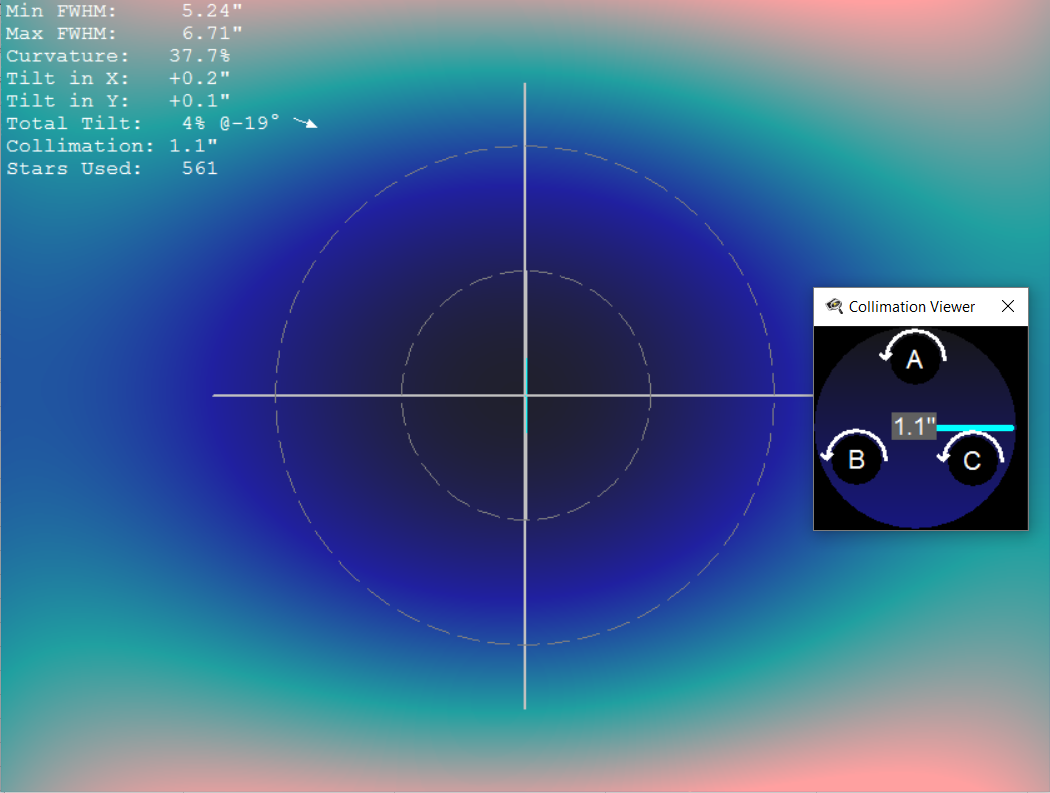
GPU coma corrector:
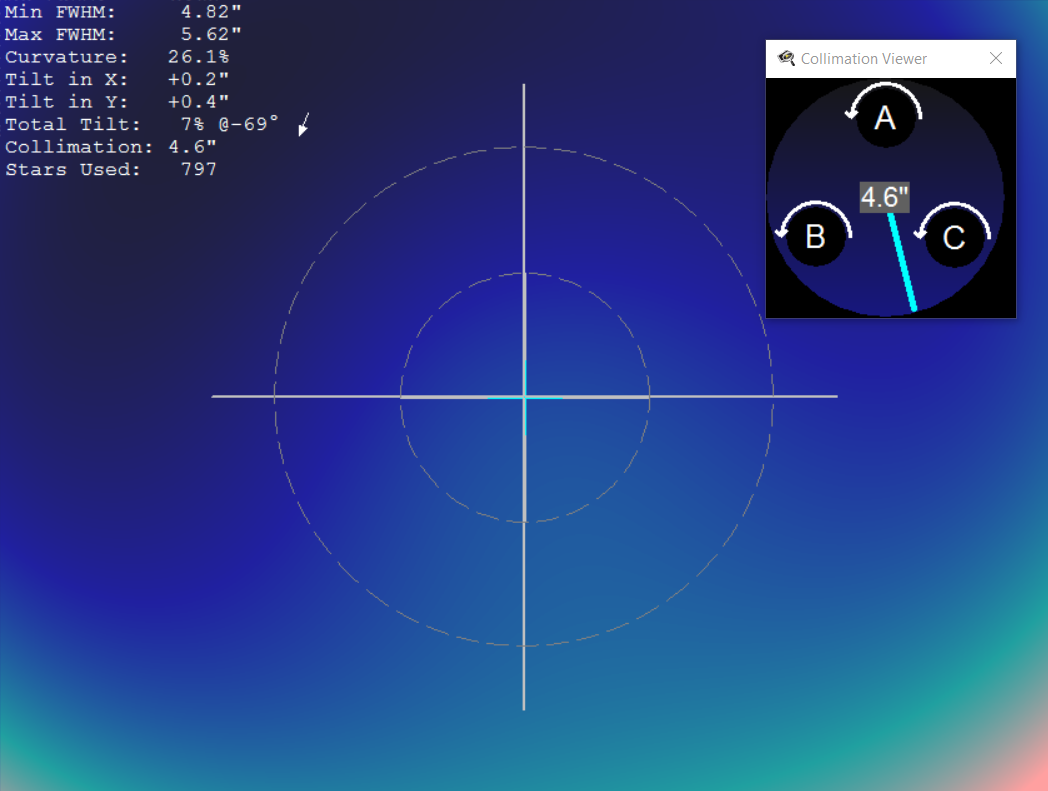
Baader MPCC:
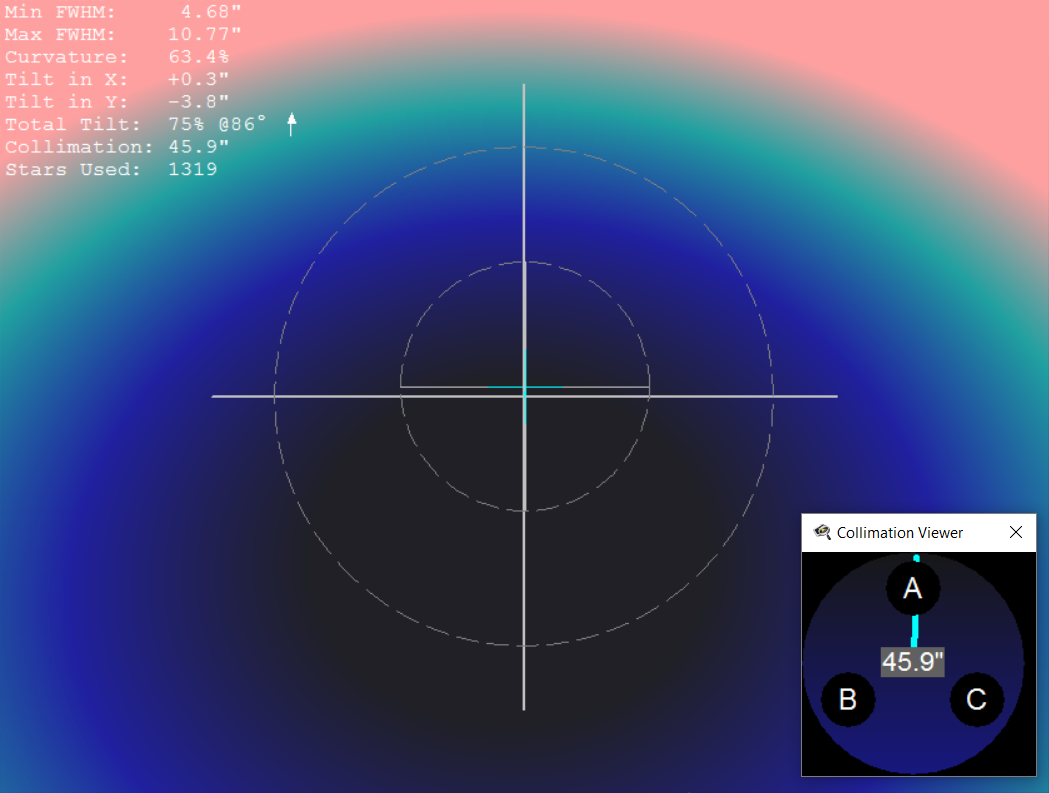
TS quatro:
Explore Scientific:
ASA reducer:
Well, it’s quite interesting that CCD inspector cannot detect very bad stars in case of TS quatro corrector. Moreover there are quite big difference in collimation between GPU and MPCC, but in reality, I just removed the camera from the focuser, changed the corrector and placed the camera back. Probably this could be caused by the tilt during fastening the corrector in the focuser. ASA corrector has higher FWHM in the upper part of the picture compared to no corrected picture – this is very disappointing.
Vignetting
Another very useful feature of CCD inspector.
No corrector:
GPU coma corrector:
Baader MPCC:
TS quatro:
Explore Scientific:
ASA reducer:

The lowest vignetting occurs logically without any corrector, but in case of Baader MPCC, TS Quatro and Explore scientific the vignetting was not increased significantly. On the other hand GPU and ASA are vignetting strongly.
Conclusions
If you are meticulous person just like me, get Explore Scientific cc. It has pin point stars in every corner and very acceptable vignetting. Only disadvantage is slightly increased focal length. If you want to avoid that and keep the original focal length get GPU cc. This corrector has two disadvantages: it’s long (100 mm), so it may stick out of the focuser inside the OTA and block some light and it has quite big vignetting – flat field is a must. If you are on budget, get Baader MPCC. Advantages: cheap, short, low vignetting. Disadvantages: the stars are bit oval in the corners. TS quarto cc was not correcting the coma at all, therefore not recommended. ASA reducer was a big disappointment. Even though this was the most expensive corrector in the test, I was not able to get it working properly and 1/3 of the picture was defocused. The problem is most probably caused by the tilt; however none of the other tested coma corrector suffers from the tilt. Anyway, I will get the tilting mechanism and try to make it working, so stay tuned. Initially it supposed to be a comparison of several coma correctors, but it turned into “how can I make ASA reducer working”.
Update on 31.10.2017
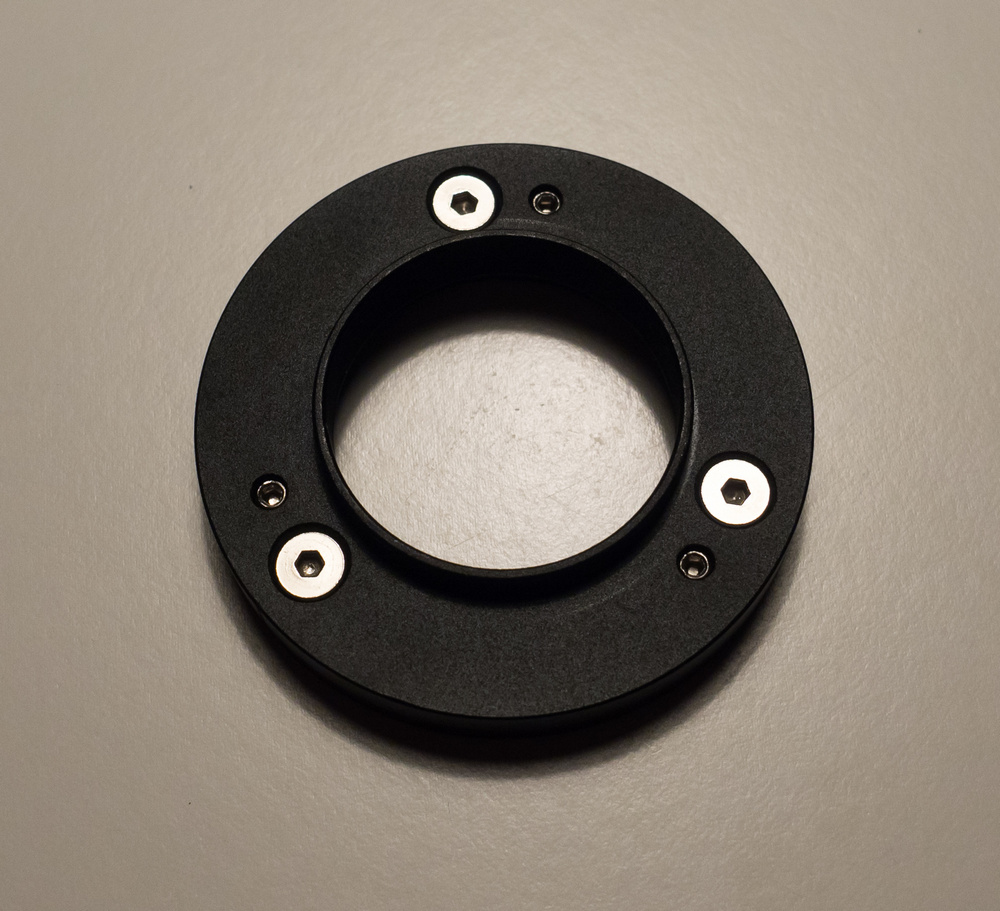
As I promised, I continue with my effort to make ASA reducer working. Well, the last option is the tilt between the corrector and the sensor. So, I got myself a tilter from TS:
This one is completely useless for me, because it has male T-thread and simultaneously the adjusting screws on camera side. If you screw it on the camera, the push-pull screws are completely blocked by the filter wheel. If you have a filter wheel, don’t buy this tilter!
Another tilter can be purchased from ZWO. This one has the male T-thread, which can be screwed off and screwed on the other side. This is exactly what I need. In the end it looks like this:
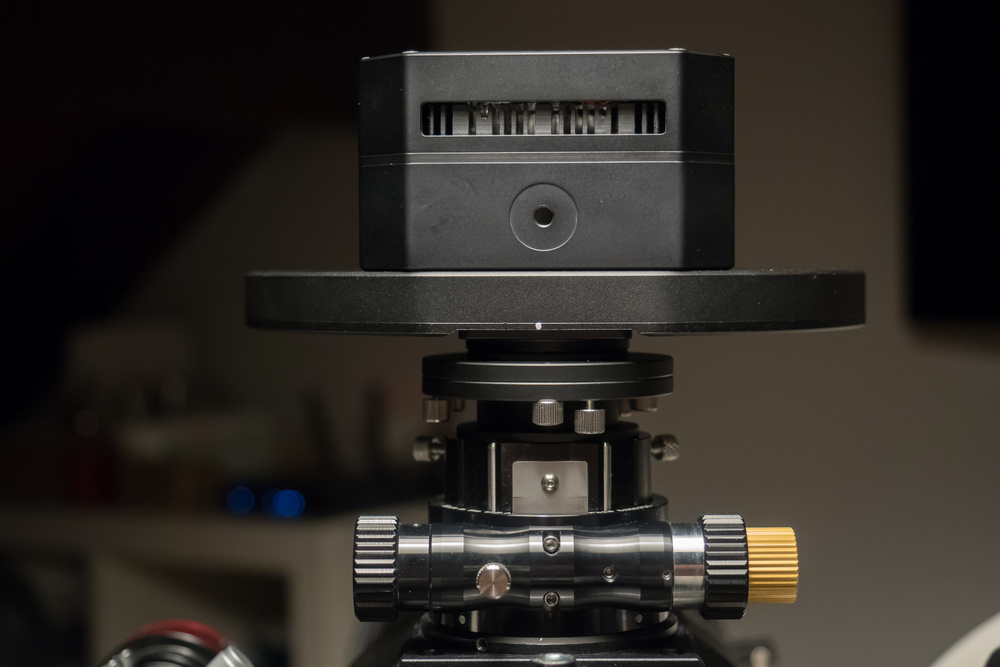
Back focal distance (BFD) should be 55 mm for ASA reducer. Somewhere I found that the corrected diameter can be increased if this distance is reduced by 1 – 3 mm. My BFD is: distance from the chip to the surface of the filter wheel 33.5 mm, I changed T-thread adapter to shorter one, which has 7.5 mm, tilter has 11 mm + 2 mm male T-thread. This means 33.5+7.5+11+2=54 mm – perfect.
Let’s go to tilt some sensors
Based on analysis of the pictures by CCD inspector it was clear that I have to tilt the sensor along the axis, which is parallel to the wider side of the sensor, as it is illustrated on following sketch:
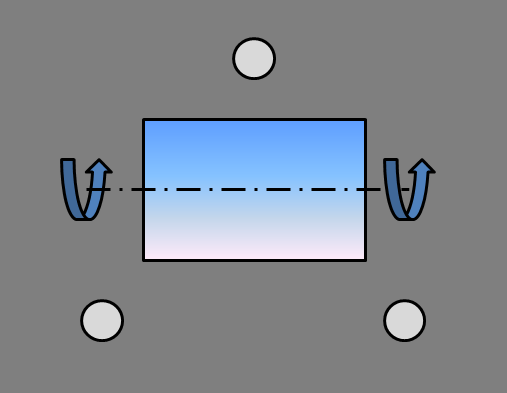
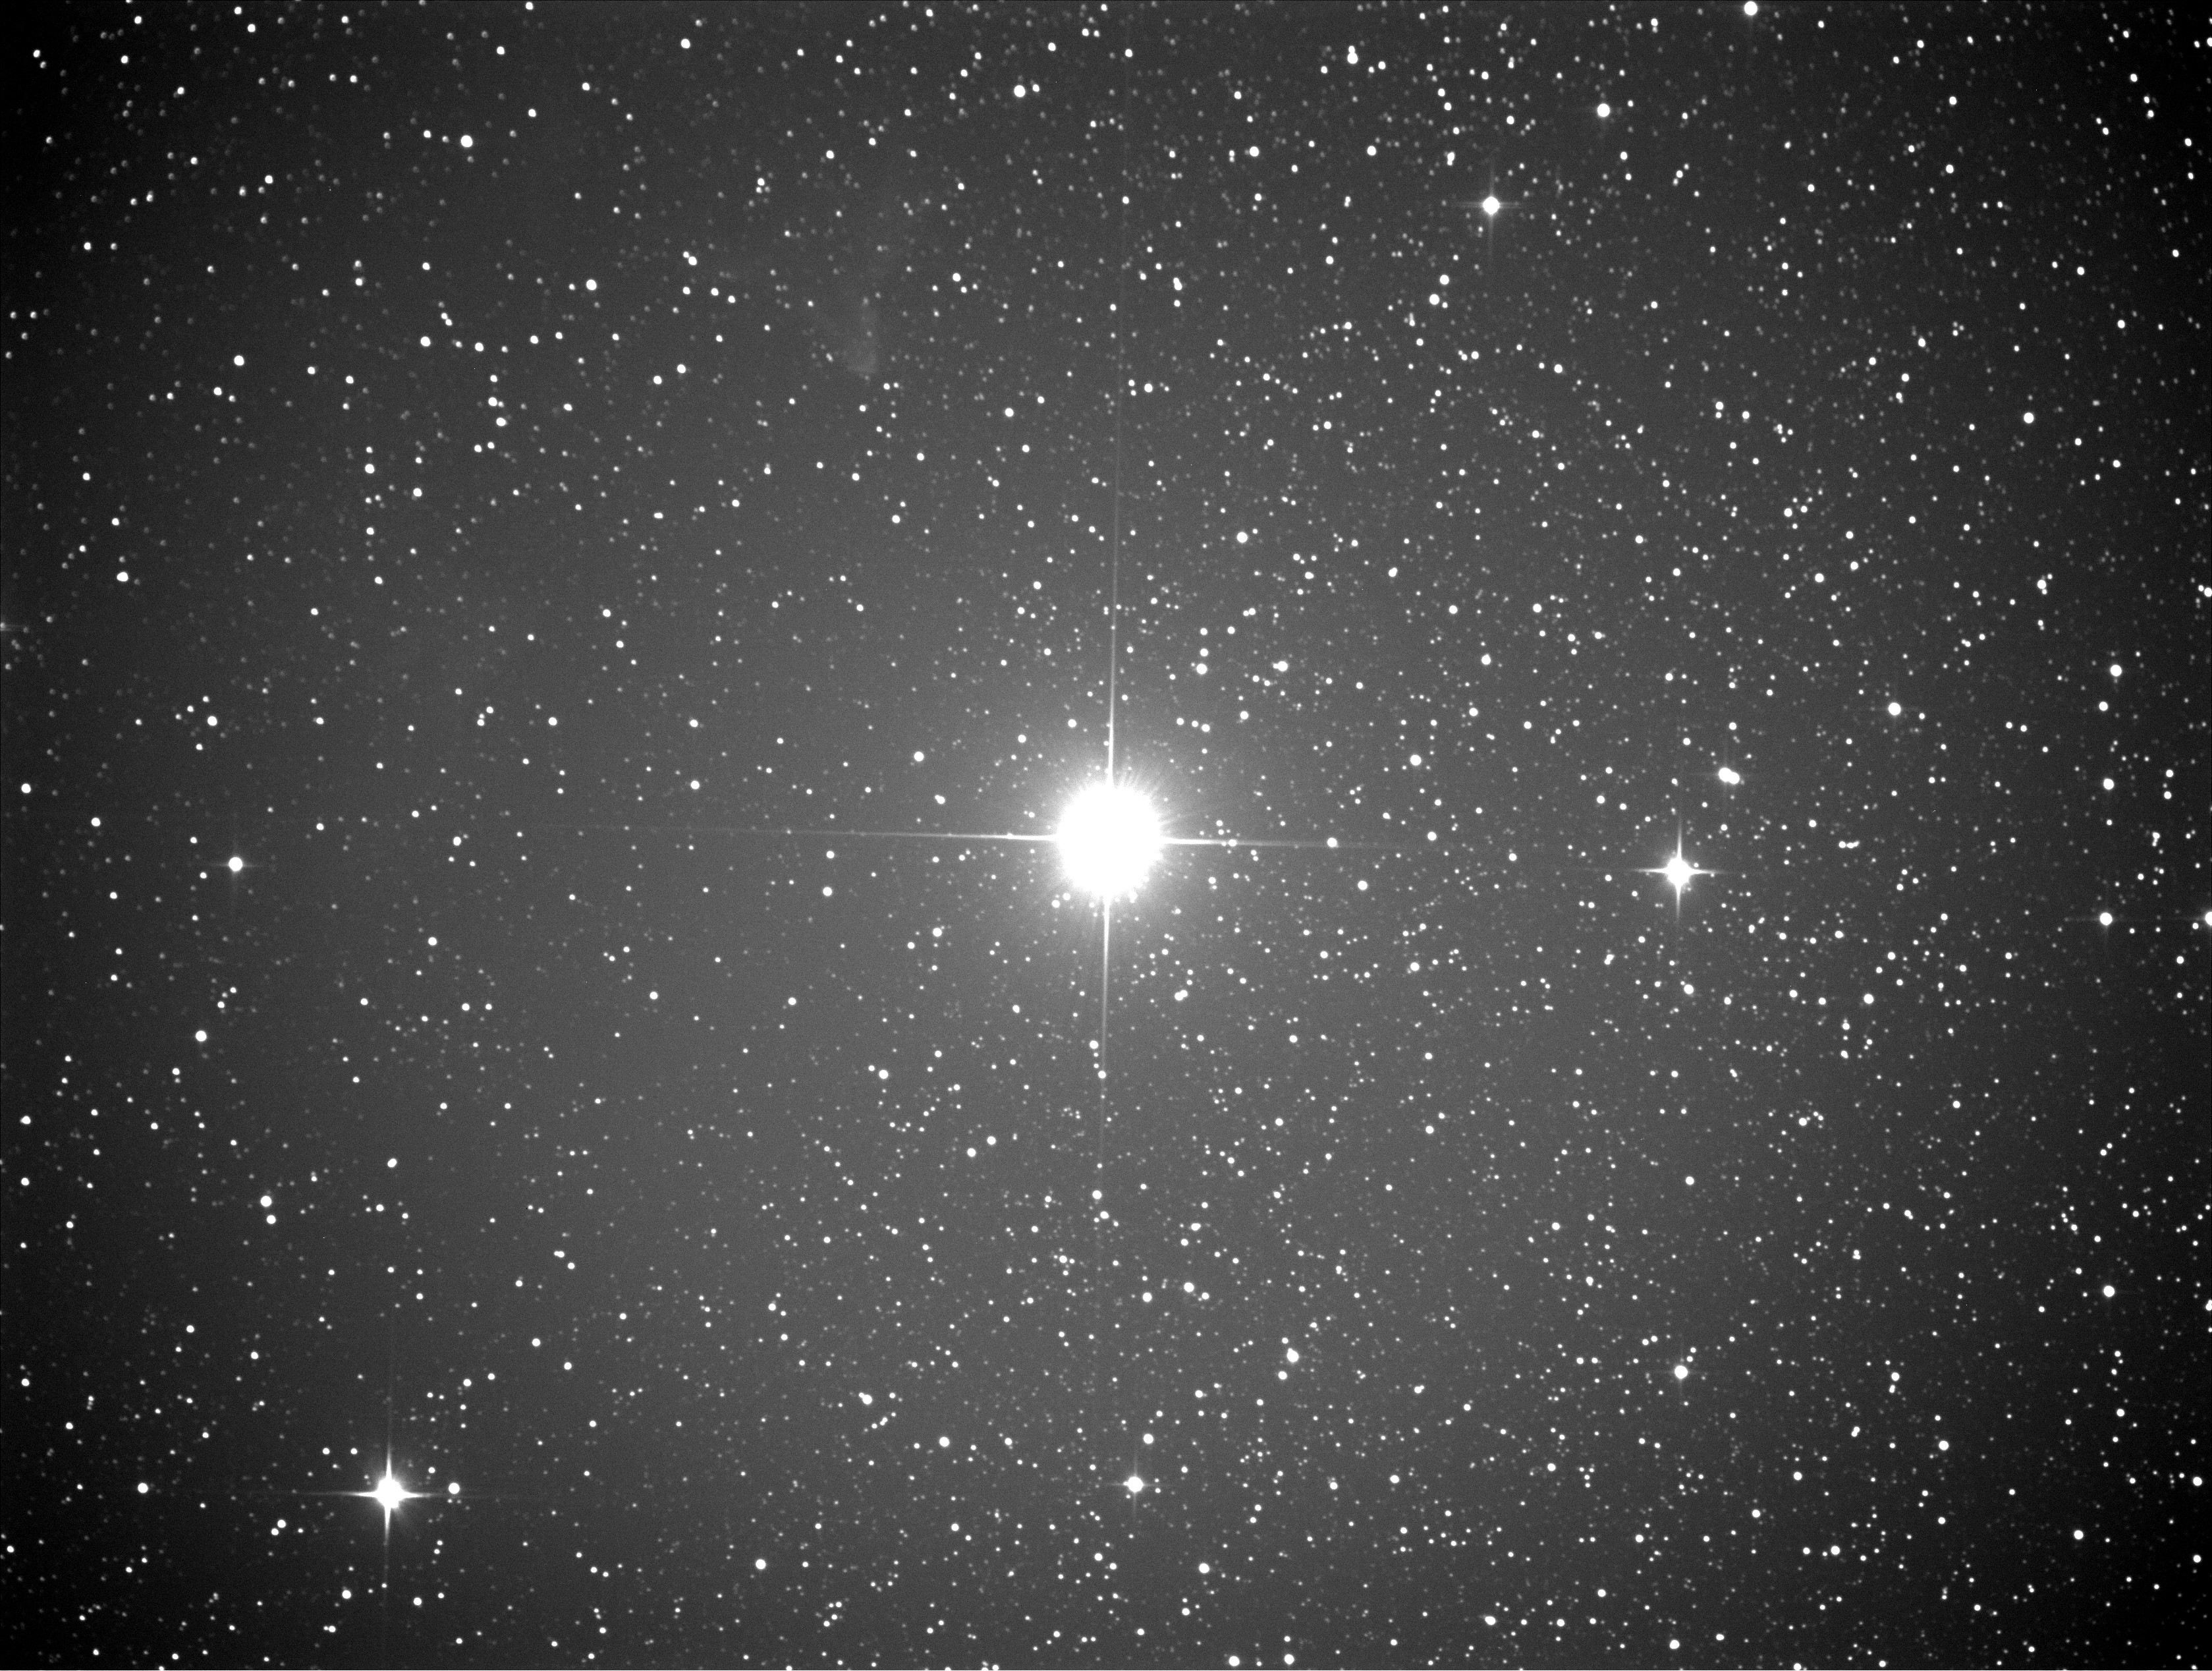
This means to turn the upper screw and leave bottom ones untouched or vice versa. I pointed the telescope to Vega and started carefully to adjust the screws. I made small marks on the screws, in order to know how much I turned. Initially, I turned two bottom screws by ¼ of a turn and refocused by gold focus mask:
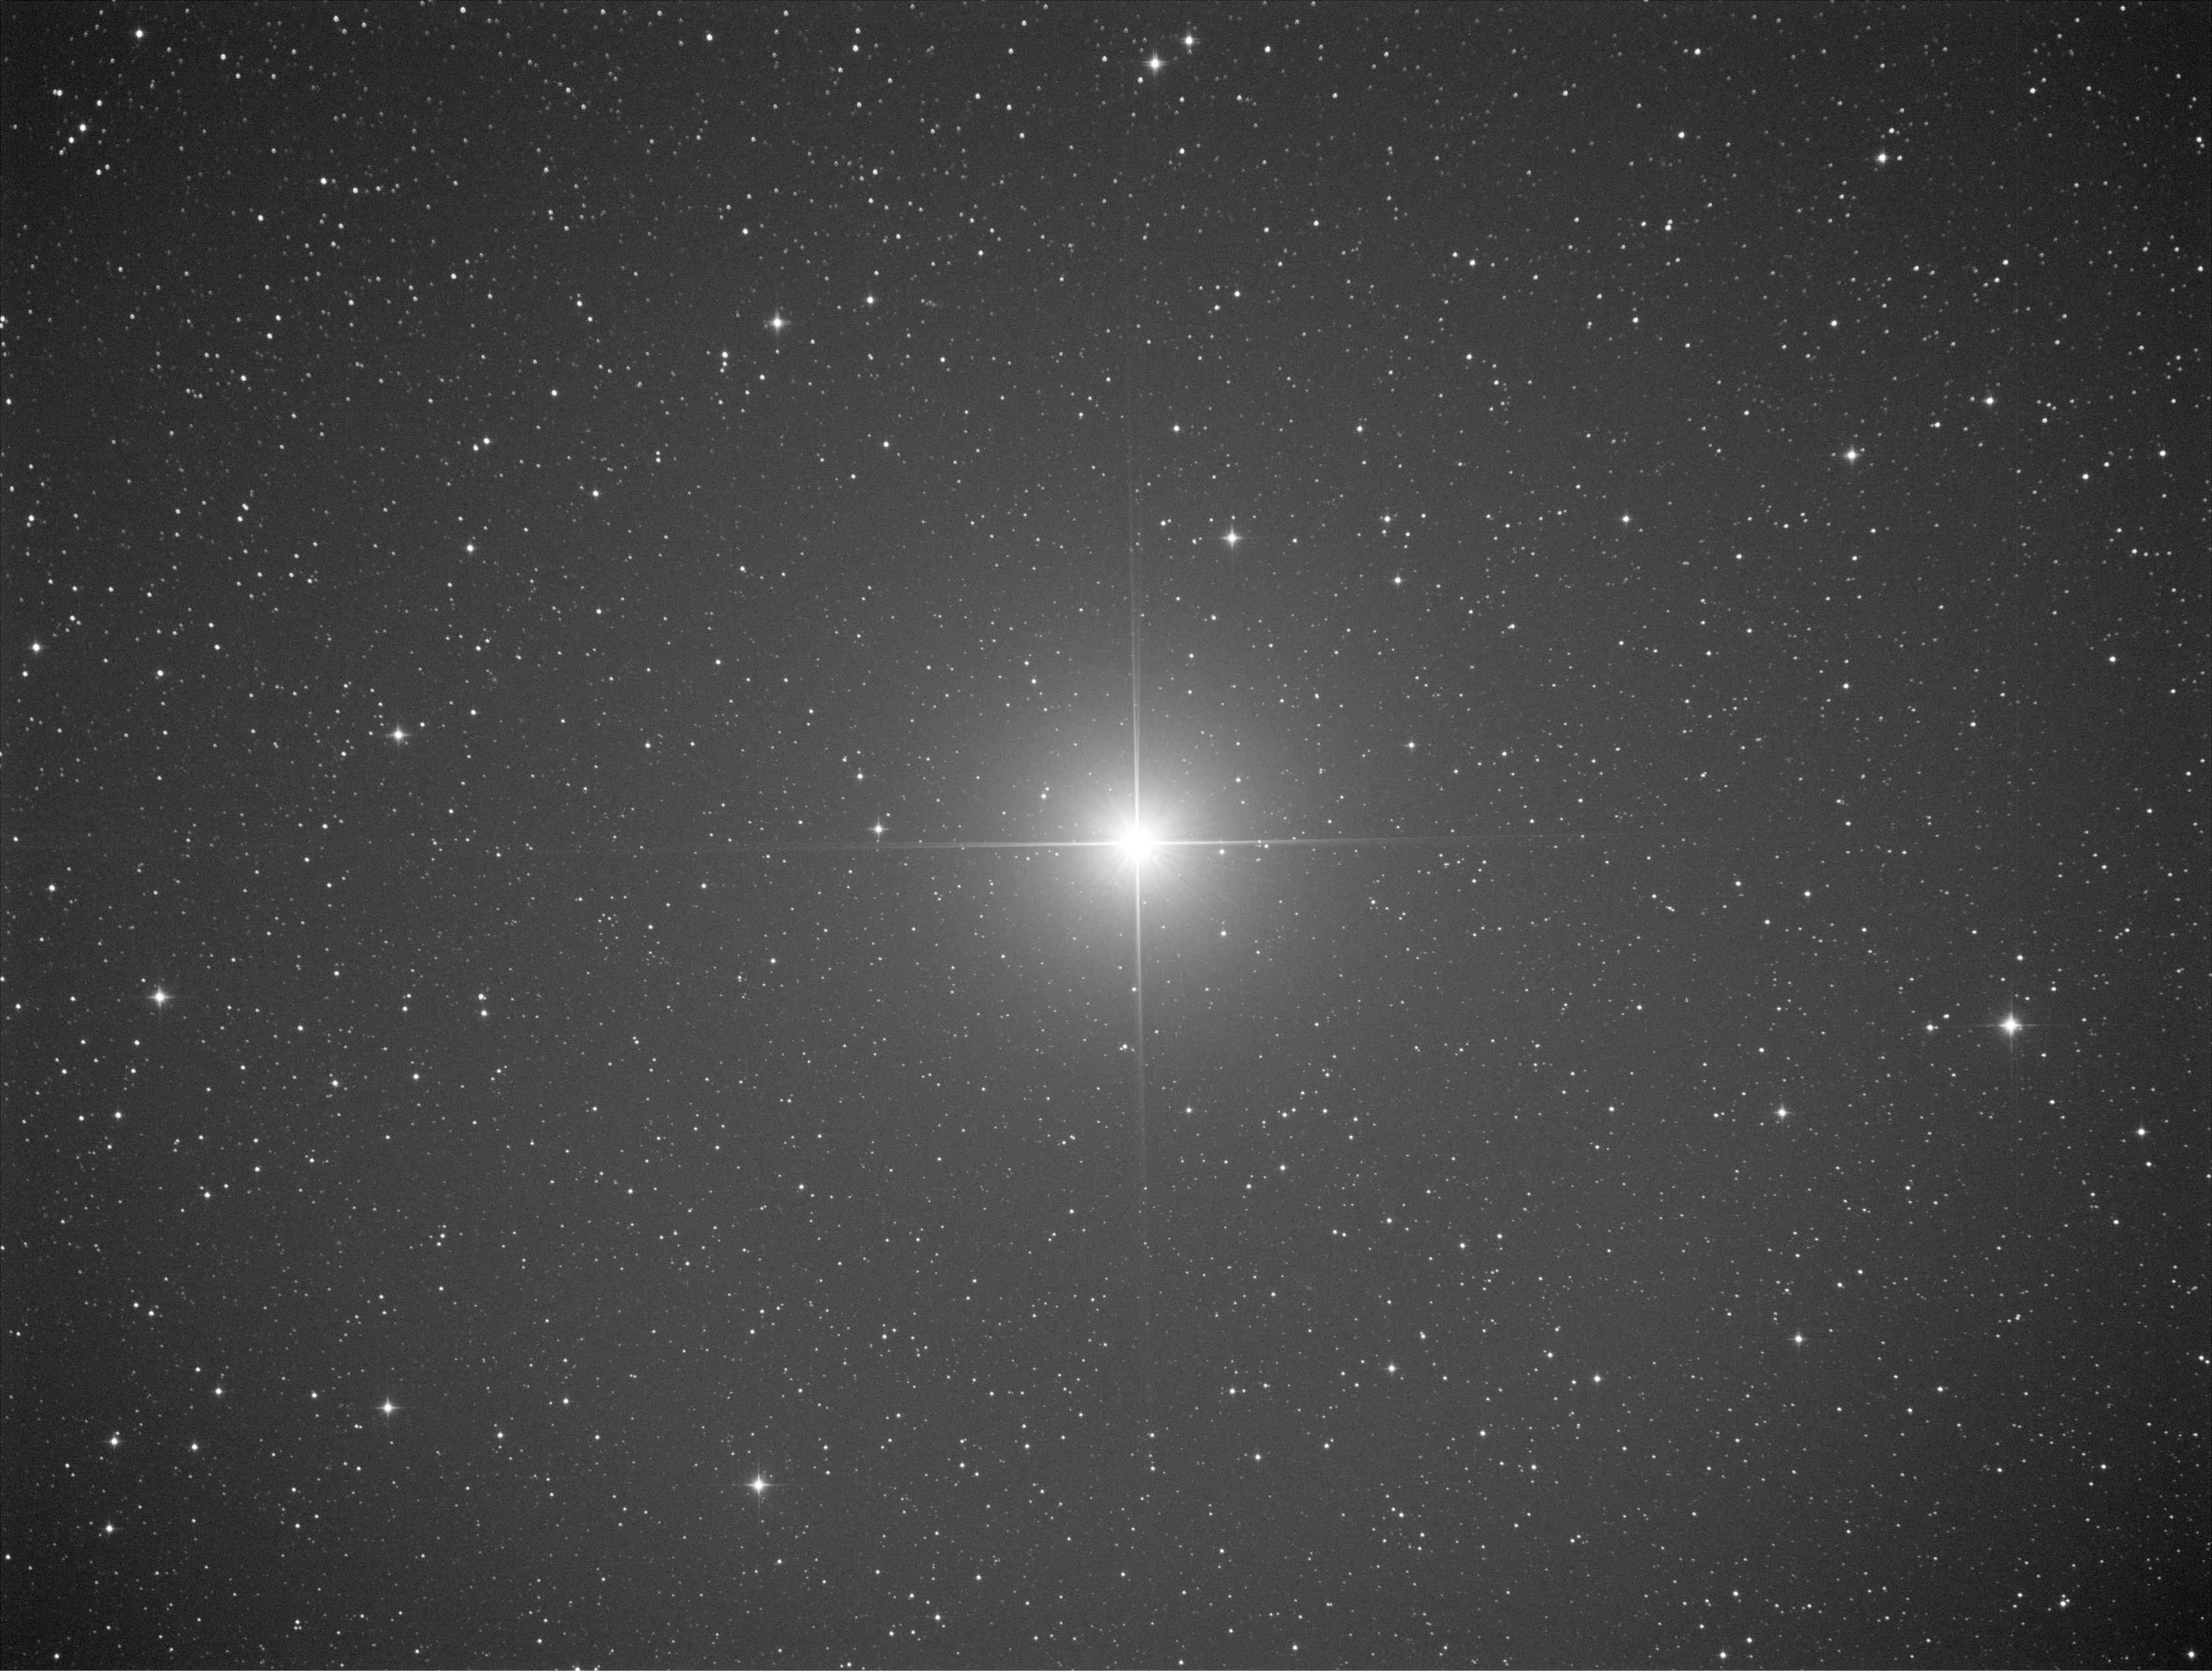
Upper side of the picture has donuts and double diffraction spikes – as bad as before. Vega has obviously diverging difraction spikes, which is caused by not parallel spider wanes. This I will correct later.
What CCD Inspector says? Well, he gently advised me not to be afraid and push more:
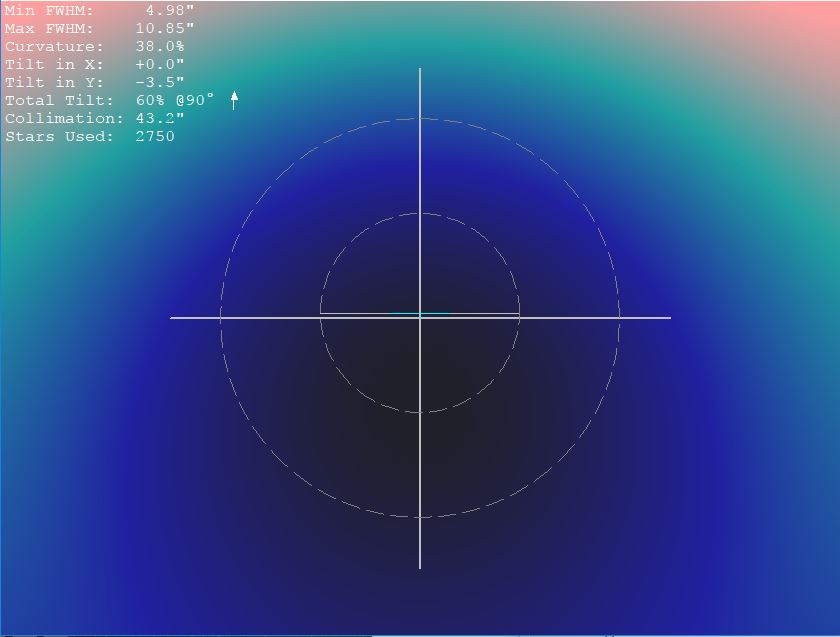
So, I took the advice and turned by one full turn:
CCD Inspector:
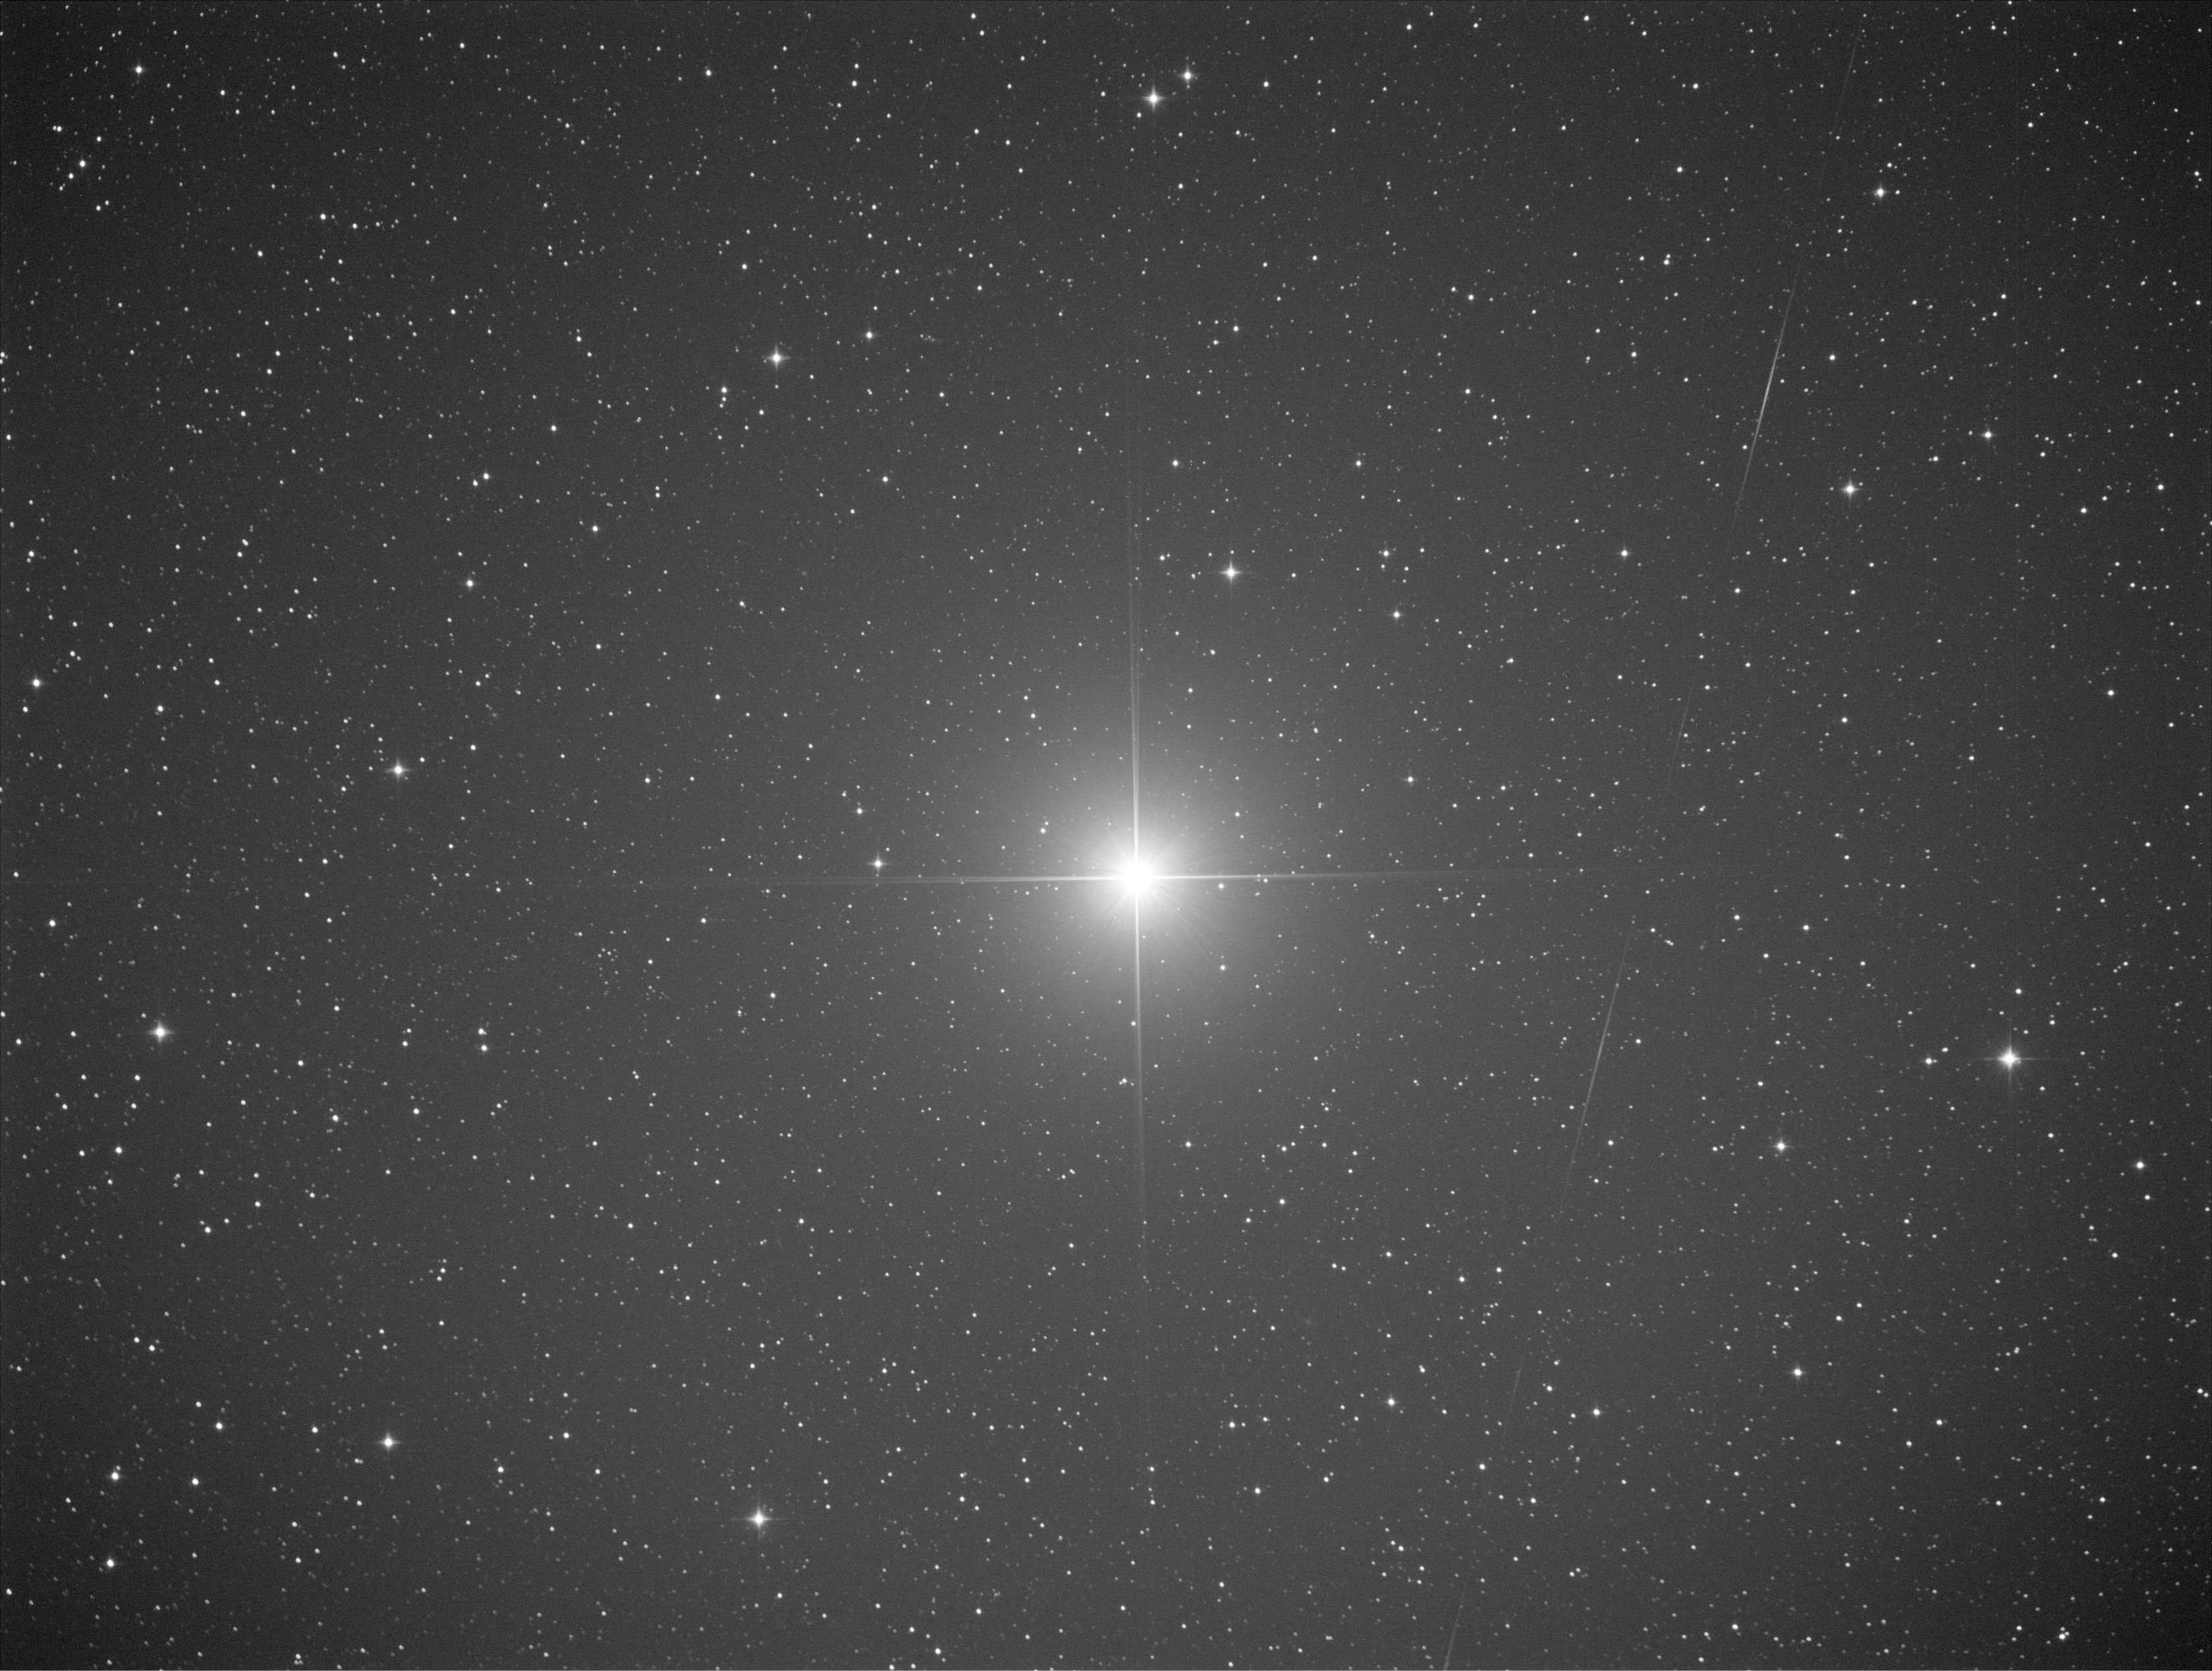
Well, it was too much, so I turned ¼ turn back and here we go:
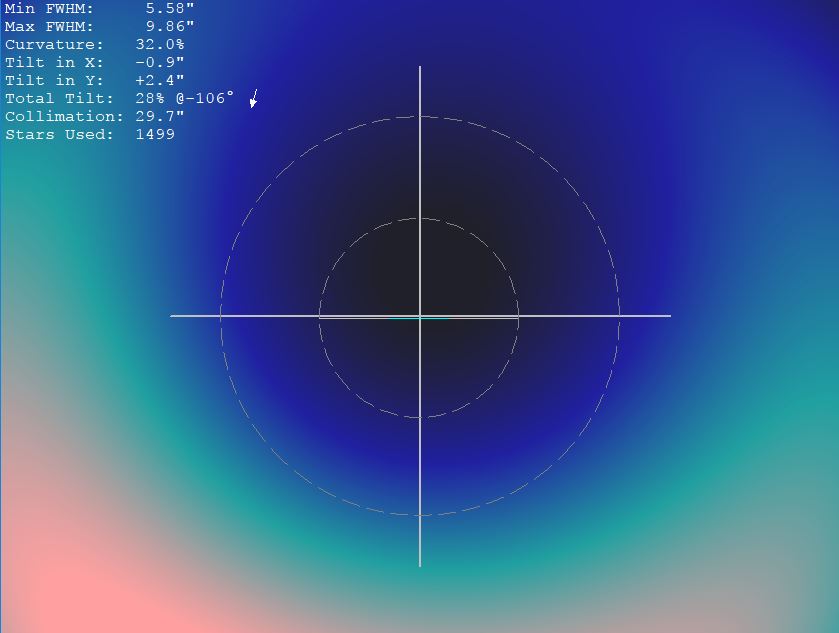
CCD Inspector:
This should be nearly perfect. I was so excited and happy for a short time. If we have a look at the two brighter stars at upper center part of the picture, we can see that these stars have still double diffraction spikes. On the other hand I got rid of donut shape stars even in the corners.
Conclusions^2
Tilting ring definitely improved the situation and it’s only way how to get acceptable pictures from ASA 0.73 reducer. However, the problem was only reduced, not fully eliminated and some stars in the corners have still double diffraction spikes. Very helpful tool in this process is CCDInspector and I would advise to purchase it, if you want to perform similar exercise.
Dear, my name is Lorenzo. I have found your blog looking online for something to help to solve my problem. Basically I have the same problem you have with ASA coma corrector but with my Epsilon 180. As you maybe know this telescope has a dedicated coma corrector so I cannot solve changing it.
I would like to know if you found a solution to this problem.
In particular I get doubled spikes couple on one corner but along a single axis. This is little bit different compared to your case since you get both defocused spikes on corner. My concern is about coma on my case. However, since coma has to be radially on the top right corner I expect both spikes doubled unless they are orientated along radially direction but it not my case.
I also collimate using catseye.
In your case I have few suggestions. First, I read you tried rotating the camera and you have found the same thing concluding that the problem is in the mirrors. I disagree. If you rotate the camera and nothing changes problem is on the camera, meaning that it is on rotating reference.
To demonstrate this point try to decollimate the telescope heavily and take images rotating the camera. You will found that field curvature will rotate.
Second you mentioned secondary mirror. I believe the centering of secondary mirror on the focuser it is not so important. If you have right tilt, let say the plane of the mirror is parallel to the plane of focuser drawtube, thus I expect the position of mirror will influence only full light field of the telescope but not coma.
Also about the tilt of secondary mirror with respect to focuser in principle it should not exist. You have not to adjust the focuser in any way since when collimate the telescope you adjust the secondary mirror to have its axis aligned to the focuser, since chesire eyepiece is fixed on the focuser. What do you think?
I do not know if you know this collimator http://www.fernrohr-service.de/4.html. It uses reflection of led on different lenses in order to collimate the scope. I was thinking to buy it and thus try to collimate keeping coma corrector inserted. Unfortunately, the guy who build them it is not so responsive and he does not speak english. I hope to get it.
I hope you can get some useful information from what I wrote. I hope if you can solve your problem maybe I can do it either.
Please feel free to contact me for anything using also my email address.
Dear Lorenzo,
Thank you for the comment. I am really happy that my coma correction exercise triggered some interesting discussion. Unfortunately, I have to say that I haven’t solved the problem yet. I just stopped using ASA reducer.
Based on your experience with Epsilon, it seems that to reach f 2.8 with Newtonian telescope is always problematic.
Regarding the rotation of the camera – I expected that if the problem would be between the camera and the corrector, the rotation would cause the defocused stars at the bottom of the picture and not at the top, like in case of the initial set-up. But I was wrong. The upper part of the picture remains defocused. So most probably the problem is between the camera and the corrector. I purchased tilting mechanism with T2 thread, so I will place it between the corrector and the camera and we will see. So, thank you very much for the comment!
On the other hand, recently I tested new color camera ZWO 1600 MC. This camera has similar size of the sensor and the outcome was nearly the same – same defocused stars at the upper side of the picture. This means that the both sensors are parallel to T-thread flange, but the corrector must be tilted in order to reach flat and focused image on the whole sensor.
Regarding the collimation, you can off course purchase more precise tools for collimation, but I think the ultimate test of the collimation is the star test. With mire de collimation tools you can simple check if the defocused star is circular – if it is, you are done.
Anyway, it seems that the coma correction exercise has to be extended.
Jakub
You may want to check the flange to sensor specification for the ASA corrector. I believe it is 65mm not 55mm. This could introduce field curvature which may help to explain your field dependent defocus issue.
Peter
Dear Peter, thaks for the comment, but the back focal distance should be 55 mm from the T-thread, this means 65 mm from the flange. I tried also to extend the back focal distance to 65 mm from the T-thread, but it was significantly worst.
Thank you for doing this comparison, it is super helpful. And your approach is pretty solid. There is just one thing you potentially missed. You can try changing spacing over what is specified by manufacturer and get better results. For instance I’m using MPCC and there is absolutely no coma – pinpoint stars all over the field. And I’m at 57mm spacing. Though my scope is f/5, maybe it will be different for f/4.
The f4 scopes are absolutely more problematic then the f5.
I have tested the MPCC K3 with my GSO 250 f5 and results are good.
With my 200 f4 are worse. Because of spherical abberration the stars are very blur, fat and unsharp.
Yes, I fully agree with you Tommaso. The slower the scope, the less coma it has. F4 is probably the fastest newton, which can be easily corrected.
[…] use focal reducer ASA 0.73. Recently, I managed to improve the picture quality of this reducer by adjustment of the tilt. The nebula can be located in constellation Cepheus, but it cannot be spotted visually because […]
I just wanted to say thank you for this article. It’s exceptionally useful and I very much enjoyed it
My pleasure! I am happy that it was useful.
Hi All,
I have experienced similar issues with separated spikes using Bader CC and F5 scope. As it turned out the issue was caused by spider wanes that were not aligned partendicular. At first my guess was also that the camera attached was tilted.
I think Your case maight be similar. If You have fast scope and CC used has factor 0,73 then any misalignments are exposed more deeply. If CC was bad then how the stars are round. Also I have spoted double spikes for other CC test images like for GPU vega right spike arm.
I don’t know but maybe You should give it a try one more time cause F ratio under 3 maight be very proficent.
Regards
Jerzy
Hello !
Thank tou for your article.
I have a question for you because I am not a specialist in this field…
I have a GSO150/600 with f/d=4. Ok I need a corrector.
What I need with this ? Ring T2 or other rings ? I have to obtain 55mm (or 70mm) between the captor (of my Atik Infinity) and the Lens?
Thnak you for your help,
Nicolas
Hi Nicolas,
yes, you need the extension rings. Atik Infinity has back focal distance 13 mm (https://3ainmfntxe31vi9qd1pxgpd1-wpengine.netdna-ssl.com/wp-content/uploads/2015/10/Infinity_mech.pdf).
So, you need 42 mm extension ring.
You can order them at TS https://www.teleskop-express.de/shop/index.php/language/en/cat/c124_Verlaengerungsringe.html
Unfortunately, they don’t have exactly 42 mm, so you have to combine them.
Regards
Jakub
Very helpful article as I’m considering a 10″ ONTC myself. My 3 choices of cc are the Paracorr type 2, GSO coma corrector and and the Explore scientific.
How are you liking the ONTC ? Do you have any problems with it, or is there anything you would change about it ?
Just trying to decide if i snould go with the ONTC or if i can get by with the cheaper UNC version and with the money saved buy a small apo triplet around the 400-500mm fl for wide field to compliment the UNC.
Cheers,
Rich.
Hi Richard,
Well, I am quite happy with ONTC. In fact I have two of them – 10“ and 6“ both f4 to cover focal length from 1000 mm to 600 mm. I picked Feather touch focusers for both and I don’t regret. I really like carbon tubes, because I don’t have to refocuse whole night, even if the temperature changes by 10 °C. What I don’t like are the spider wanes. There are holes in the tubes, where the spider is attached. In case of 6“, the holes were not drilled precisely and spider wanes were not perpendicular to each other, which yields in ugly multiple diffraction spikes. This I had to modify by myself.
I was searching for an upgrade, but there is nothing better on the market in this price level. Better Newtonians are probably only ridiculously expensive ASA telescopes.
Regarding the coma correctors, as I wrote in the article, Explore scientific is probably the best corrector in terms of corrected field and vignetting. Disadvantage is slightly prolonged focal length. I didn’t test Paracorr, but I assume it will have the same performance as Explore scientific, but it’s significantly more expensive.
Best regards
Jakub
Hi jakubK,
Thanks for this very very valuable comparison. I encounter some problems with my own GPU cc on a Skywatcher 200/800 F4 (high FHWM, spherical aberration). I tried to be as precise as possible to reach a backfocus distance of 53.66mm, so I suppose that my collimation is not good enough. I would like to know which software you use to make the defocused star test (with the concentric circle overprint)?
I also use a Howie glatter laser collimator with tublug but it’s not clear for me how to achieve a proper secondary/focuser alignement with this device? Do you have any advice?
Thanks in advances,
Julien
Hi Julien,
the software for the collimation is called Mire de Collimation and it can be found here: http://sweiller.free.fr/collimation.html
I used it just to check the collimation, because Howie Glatter laser is very good and the Catseye method is super accurate.
It was not needed to tune the collimation on the star test.
For the alignment of the secondary with the focuser I used Concenter chesire. There you can directly see how well your secondary is aligned with the focuser.
Best regards
Jakub
Hi, i’m Luis from Lima Peru
Pretty useful and practical review. Even, i think should be updated with new models.
Did you have the opportunity to test the GSO coma corrector. It’s relatively cheap and several brands “rebranded” this product (also known as TPO or Astrotech). Probably is the most missunderstood product in the market. Backfocus should differs depending the focal length of telescope. In general lines, it has a tolerance of about ± 10 mm (70mm minimal backfocus and 80mm max), so is not easy testing al its real capabilities.
If you cand do so at some point, this will be a wider excercise.
Regards.
Dear Luis,
well, for me the excercise is over. I found suitable corrector for my setup. I don´t have a reason to buy additional correctors. If you have good experience with this corrector you can share the images with me and I can post it here.
Best regards
Jakub
Hi Jakub, thanks for answering.
About myself, I’m still looking the best performance, but I’m strongly incline to choosing the ES Coma Corrector. I acquired the GSO CC I previously commented you with poor results. First, the field corrected is too short (20mm) compared with my camera sensor size (ASI294MC 27.1mm). Second, the backfocus is too much variable. Even testing it at 80, 77.5, 72.5mm I found coma even at center with decent collimation. Directly to trash.
Despite i got the opportunity of testing Skywatcher Quattro coma corrector with high success (almost no coma), it was borrowed so I’ll afford mine next week. Until now, the Explore Scientific is my first choice, because backfocus is so stable compared to other models if I consider the focal length.
Thanks again for you didactic exercise!!
Thank you for your work. I’m having a similar problem. I have the GSO 2 inch coma corrector. It’s basically fixing all the corners of the image instead the upper left corner. The coma there is actually worse with the CC. If i rotate the camera, the coma doesn’t change direction (still on the top left). Does that mean I have a tilted sensor, or poor collimation, or sag? How can I tell?
Clear Skies!
Dear Anthony. It’s nicely described here: https://astronomy-imaging-camera.com/tutorials/reason-of-field-tilt-problems-and-how-to-solve-it.html I would suggest you to get a CCD Inspector and rotate the camera with the corrector in the focuser by 180°. If the CCD inspector will show the same results, you have sensor tilt problem. If the CCD Inspector will show turned picture by 180°, you have optics tilt problem. Sensor tilt problem can be fixed by the tilt adapter and very nice tutorial how to do it is here: https://www.youtube.com/watch?v=HYitCpbN4yI&t=658s (thanks Lorenzo for sharing the link) I know, it’s in Japanese, but the video is self-explanatory and I corrected my sensor according this tutorial easily.
I currently use the Baader MPCC MK3 on my 130PDS scope and am having a hard time with it due to the indent on the barrel causing tilt when I tighten it down in the focuser. With it being a doublet corrector I am also convinced that it is introducing a small amount of focus shift between RGB filters.
I noticed that you have gotten the new TS Maxfield Coma corrector. I was wondering if this would be an improvement over tha Baader and how it compares to the ES corrector that you have been using. I am not sure but I suspect that on my tiny 130PDS the ES is too long at 10cm and will poke into the light path but the TS Maxfield is only 7.2cm long.
I have a ASI1600mm pro so I am not looking for a huge corrected field per say, but I am looking for close to perfect corner stars with a sensor of that size.
Any insights would be appreciated, I do not that you are considering adding the new corrector into this comparison from reading the rest of your blog.
Many thanks
Adam
Dear Adam,
Recently I tested TS Maxfield corrector, but with ASI 071 camera, which has diagonal 29 mm and F4 250/1000 mm Newtonian. It seems that this corrector is also sensitive on sensor tilt, because left side of the image suffered for coma. I rotated the camera and the results were identical – left side of the image. This means tilt problem. ASI 071 has push pull screws integrated in the flange, therefore I was able to fix it – more or less. But the coma was still present in the corners. However, your ASI 1600 has significantly smaller diagonal – 22 mm, therefore it might not be that critical. Moreover, you have F5 scope, therefore it could work.
Anyway, if I compare ES HR and TS Maxfield, ES is clear winner for f4 Newtonians on APS-C sensor. The coma was completely eliminated, whereas in case of Maxfield still present in the corner. ES HR is from the flange 85 mm long and not 100 mm. TS Maxfield is slightly shorter (72 mm), but ES prolongs the focal length by 6%, which shifts the focal plane outwards, therefore I would not worry that the corrector is going to stick in the OTA and block the light.
Maxfield could have advantage for you that it reduces the focal length by 5%, so you will have bigger field of view (but this shifts focal plane inwards) and it’s significantly cheaper.
IMHO, both correctors should work for your telescope/camera. You should decide based on budget (Maxfield) or if you plan to upgrade the sensor (APS-C) or telescope (F4 Newtonian) in the future (ES HR).
Jakub
Thanks for the reply. I am very close to getting acceptable corners with the Baader MPCCMk3 so if you believe the TS to be an improvement over the 2 element Baader then I am hopeful it will work for me.
Ahoj,
výborné porovnanie.
Všimol som si že si začal používať komakorektor TS-Optics 2″ 3-Element MaxField. Mohol by si napísať prečo si začal používať tento pomerne lacný korektor? Uvažujem o kúpe korektoru pre N250/1000. Uvažoval som medzi GPU 2″ aplanatic alebo ES HR 2. Potom som si všimol že si začal používať TS-Optics 2″ 3-Element MaxField.
Čo by si odporučil?
Ďakujem
S pozdravom
Lukáš
Zabudol som uviesť, že by som používať korektor pre kameru QHY 10 a neskôr pre ASI 1600MMC.
Pozrel si tvoje posledné fotky a zdá sa že pre QHY 10 to nebude vhodný korektor. Inak na 8300ke si ho skúšal?
Ahoj Lukáši. MaxField jsem začal používat na zkoušku ale s jinou kamerou – ZWO 071, která má diagonalu 28.4 mm. Test coma korektorů byl proveden s MII 8300, která má diagonálu 22.7 mm. Abych nepletl hrušky s jabkama, tak jsem to zatím nezahrnul do testu. Nicméně, MaxField už je pro APS-C na hraně a v rozích je už koma viditelná. Pro 4/3 senzor (ASI 1600, G2 8300) by to mohlo ještě být OK. Jestli se rozhoduješ mezi GPU a ES, tak bych jednoznačně volil ES. ES sice prodlužuje trochu ohnisko, ale kreslí daleko hezčí hvězdy, je kratší a neviggnetuje tak moc. Pozor však na zaostření. Mám newton od TS, který umožňuje posouvat primár. S ES korektorem musí být primár posunut o cca 30 mm ve směru od sekundáru, aby bylo možné zaostřit. Korektory Baader, GPU, MaxField nepotřebují posun primáru. Naopak ASA reduktor potřebuje posunout primár cca 30 mm ve směru k sekundáru. To vše platí pro 250/1000 newton. Mám ještě menší 150/600 a tam jde zaostřit bez posouvání zrcadla u všech korektorů.
Jakub
Ďakujem za plnohodnotnú odpoveď.
Takže ak to chápem dobre, tak by som pri ES mal skrátiť ohnisko o 30mm na 970mm “posunúť primár k sekundáru”. To by znamenalo, že výsledné ohnisko by bolo 970*1,06=1028,2mm, čo by nebolo na škodu veci.
Ale Bohužiaľ nemám posuvný primár na mojom SW N250/1000 CF. Samotná úprava by nemusela byť nejak extra zložitá, ale moc si na to netrúfam. Inak pomohlo by ak by bol korektor bližšie k sekundáru? Výťah nemám originálny, ale JMI EV-XTnM 3″. Ale ako tak uvažujem, tak by to asi viacej vinetovalo.
Asi sa skúsim poobzerať po nejakých bazarových 2,5″ alebo 3″ keď už mám 3″ výťah.
Ďakujem že si ma upozornil.
Lukáš
Ahoj, tak nakoniec som kúpil na skúšku bazarový MaxField.
Ale nie je mi úplne jasná jedna vec, keď je napísané pri komakorektoru – 55 mm working distance from the M48 thread, tak ktorá vzdialenosť to je?
Od začiatku závitu na korektore M48 smerom ku kamere, alebo presne opačne? Prípadne od veľkej podložky s nápisom COMA REDUCER CORRECTOR?
Jedná sa o tento korektor:
https://www.teleskop-express.de/shop/pr … ektor.html
Pri MPCC mi to bolo jasné, ale tu sa strácam keďže korektor má aj vnútorný závit.
Ahoj Lukáši. Working distance je vzdálenost od příruby korektoru k sensoru – 55 mm. Jetli máš ASI 1600, tak ta má vzdálenost 17.5 mm os sensoru na venkovni přírubu (https://astronomy-imaging-camera.com/product/asi1600mm-cool), pokud máš nasazený 11 mm T kroužek. Pak potřebuješ ještě 37.5 mm. ZWO dávají ke kamerám rovnou dva kroužky – 21 mm a 16.5 mm. Musíš je spojit a našroubovat na kameru a korektor. Kroužky jdou koupit na TS, tak je musíš nakobinovat aby ti dohromady vyšlo 55 mm. Z vlastní zkušenosti vím, že +- 1 mm nehraje žádnou roli.
Hi Jakub,
My comment is inspired by but 100% related to your excellent anaisys.
It is about Samyang 500mm f/6,3 catadioptric lens, my specimen is pretty bad (I wrote about it on CN, see here: https://www.cloudynights.com/topic/461883-dslr500mm-f63-mirror-lens/?p=7942081
I believe my specimen has manufacuring fault (something is misplaced a bit) as there are specimens of the same lens that do not have coma (found them on Astrobin).
So I decided to play a bit with spacers to see what is happening if I move elements to and fro.
Do you have any ideas as to what could be moved to improve this?
Thank you in advance!
Bojan
Dear Bojan, I tested only the coma correctors for Newtonian telescopes. Do the all corners look the same? I mean if you have the same deformation of the stars in every corner, your chip is perpendicular to the optical axis. If not – you have bad stars only in one corner, you can fix is with the tilter. Some cameras have the tilter integrated – like ZWO cooled ones. If you soot with DSLR, you would prolong back focal length if you place the tilter between the camera and the lens and you would make the stars even worst. These catadioptric lenses are very cheap, portable, but they cannot beat classical refractors or Newtonians with coma corrector in terms of star shapes.
I recently purchased a TS Maxfield corrector and am having some issues with reflections. Do you have any comments as to the performance of each of the correctors that you have tested in respect to reflection / AR coating performance.
Dear Adam, do you use any filter in the optical train? If yes where is it? I had some reflections when I placed IR UV cut or LPS at the end of the coma corrector. It can be improved if you place the filter between the corrector and the camera – as close to the sensor as possible.
Hi Jakub,
thanks for the excellent comparison and explanations!
I am looking at the Skywatcher Quattro-8S as my preferred choice for an astrograph, and I know that Skywatcher has its own coma corrector specifically for this f/4 OTA. Have you ever tried this corrector as well? Am I too naive thinking that, since they built it specifically for this Newtonian, it should work at least as good as the corrector from ES?
Thank you very much for your reply!
Best,
Stefano
Hi Stefano,
Sorry for my late reply. I am not sure which corrector from Skywatcher you mean exactly. You can find at least two on the internet. One has reduction factor 0.9 and it is short. This one I didn’t test. Second one is long one without focal length reduction. This long one is very similar to GPU corrector, which I tested. I cannot garantee that it is exactly the same, but I assume so. GPU is quite OK for smaller sensors, but it vignetts strongly, therefore you will have to use flats.
Best regards
Jakub
Hi Jakub,
thank you very much for your reply! I meant this corrector: https://www.skywatcherusa.com/products/sky-watcher-quattro-coma-corrector
Maybe it’s like the second one you mentioned. I’ve read all over, and it looks like it works great assuming one is using the correct focal distance, different for every OTA focal length. Also on vignetting I haven’t read any really bad reviews… hopefully is not too bad!!
Thanks again, and clear sky!
Stefano
Hi Stefano,
Yes this is probably re-branded GPU. It is not a bad corrector. It has some vignetting, but you can easily correct it by flats. The advantage is that it doesn’t change the focal length.
Jakub
Hi
Thank you for the effort to make this comparison.
I have read on the TS website that the ASA corrector should not focus on the center, but on the final third of the field.
Have you taken these indications into account?
“…Dont´t use a star in the middle of the field for focusing, but use a medium-bright star in the outer third of the field…”
https://www.teleskop-express.de/shop/product_info.php/language/en/info/p4685_ASA-2–0-73x-Reducer-und-Koma-Korrektor-fuer-Newton-Teleskope.html
Best regards
Hi Alejandro,
no, I just used the star in the middle. Honestly, I think to focus the star in 1/3 of the field wouldn’t help, because the stars in the upper corners were completely defocused. Tilting ring solved this problem. In my opinion, this corrector/reducer is suitable for F5 primary mirrors, but for F4 mirror the usability is quite questionable. I know, F2.9 sounds great and turns F4 newtonian into super fast telescope, but only theoretically. The speed is not everything, one should also be focused on the quality of the pictures. TS offers new hyperbolic newtonian, which this speed and they claim that the full frame sensors are corrected. I haven’t tested this telescope, but you can find many positive comments on CN.
Best regards
Jakub
Thank you very much for your reply!
Sharpstar telescopes are impressive:
150/420 f/2.8
200/640 f/3.2
But for a Newton 12″ f/4 there is only the option of adding a reducer.
Could you do the test focusing between the center and the edge, or in the first third from the center to the edge?
Another option is to mount the Newton with a 3 “focuser and test the x0.85 reducer.
Best regards
Thank you kindly for this comparison, super useful 🙂
I’m using the SW 130PDS with an ASI290MC-Cool without a CC, because the chip is so tiny I can get away with it..! However, I’m thinking of getting a larger sensor in the near future, so a good CC is on the list. Based on your excellent post above and readings from the wider community, the ES CC or the TS Maxfield seem like good, affordable choices.
I have a question for the ES CC if you could help me please; does the shoulder ring on the M48 thread unscrew? This would enable it to be threaded inside my Lacerta FUFmpcc adapter, which would provide a solid connection. I can see that the ES CC can be threaded into this adapter, but would need a stop thread somehwere. I would rather not clamp and thread the CC.
Thanks again
Thank you kindly for this comparison, super useful 🙂
I’m using the SW 130PDS with an ASI290MC-Cool without a CC, because the chip is so tiny I can get away with it..! However, I’m thinking of getting a larger sensor in the near future, so a good CC is on the list. Based on your excellent post above and readings from the wider community, the ES CC or the TS Maxfield seem like good, affordable choices.
I have a question for the TS MAXFIELD if you could help me please; does the shoulder ring on the M48 thread unscrew? This would enable it to be threaded inside my Lacerta FUFmpcc adapter, which would provide a solid connection. I can see that the ES CC can be threaded into this adapter, but would need a stop thread somehwere. I would rather not clamp and thread the CC.
Thanks again
Hi, if I do understand your question, TS Maxfield has male M48 thread, so you can attach Lacerta adapter. Just remember to keep proper distance 55 mm to the chip. You can buy many different adapter lengths and even M48 adapters to M42 are available.
Jakub
[…] for modern high-resolution sensors up to APS-C size and uses FPL-51 low dispersion glass. Click here to see a comparison of popular coma […]
Hi Jakub
Thank you for the comprehensive comparisons.
I am interested in the ASA 0.73 corrector reducer. How would you expect it to perform with a smaller sensor?
The KAF8300 you tested has a 22mm diagonal. My sensor has a 17 mm diagonal.
Hi Brad, well, it’s hard to say. I tried this corrector with second camera ZWO 1600, which has the same diagonal as KAF 8300 and I got the same tilt. This means that it’s the corrector and not the sensor. The tilter partially solved this issue. On the other hand, when I purchased the ASA reducer, I was able to make good pictures without the tilter. This could mean, that something moved inside the reducer. It could be that if you get new corrector it will not have this tilt problem. However, I would be prepared for some tilting. Nowadays, all ZWO, as well as MII cameras have the tilter integrated. Don’t forget the purchase CCD inspector as well.
Hi – great write up, and a lovely table showing results. Thanks for posting this.
I have one query regarding the figure for focus shift. I’m not sure quite how to read this – does it mean shift with respect to the native focal plane of the scope?
The reason I’m asking is because I want to design an imaging Newtonian with minimum secondary diameter and I need to get the camera as close to the secondary as possible – but still allow room for a coma corrector with minimal intrusion into the tube. How do I know at what point in the light cone the coma corrector needs to go? Hope that makes sense!
Thanks – Tom
Hi Tom, I think the best would be to make a drawing – there you will see the light cone and who it reflects from the secondary. If you want to make a newtonian with small secondary, it will have to be quite slow one – F6, F8. The slower newtonians suffer less for coma. Here it depends how big sensor you will use. It could be that you don’t need a coma corrector at all. There are ways how to calculate that, but I don’t have experience with building the newtonian from scratch. You can probably find somebody who did it and get some hints.
Jakub
Hi Jakub – thanks for your reply. Take your points about the design – nonetheless is there some way of knowing where a coma corrector goes in the light path? Its significant if the scope has limited back focus ie focal plane is closer to secondary.
What does “inward shift” refer to in your table? Maybe this is what I need?
Thanks tom
If the corrector works as a reducer, it shifts the focal plane inwards. If the corrector works as a barlow lens (like TeleVue Paracorr increases the focal length by factor 1.15) it shifts the focal plane outwards. There is very nice feature of TS Newtonians – you can shift the primary mirror back and forth and this allows to use all coma correctors, which are on the market.
Love your article, i am in the same situation with the same scope (N-AG10) and the TSNTRED 0,85 reducer. Having quite some problems. I have a thread on CN; https://www.cloudynights.com/topic/700009-collimation-tilt-or-astigmatism/
/Daniel
Hi Daniel, thanks for sharing this. TSNTRED 0.85 was on my radar for an upgrade from 2″ to 3″, but based on your experience I will not go for it. 3″ Wynne correctors are well proved with reduction 0.95. It seems that everything below F3.8 for newtonian is not realistic. Now I test FastStar Hyperbolic 150 mm F2.8 and I am getting coma in every corner on APS-C sensor – they claim that it can correct whole full frame, but the reality is far away.
Your test is wonderful. I have a Newton 250 F4 Skywatcher and with Baader Mpcc Mark III I don’t get good results. My next purchase would like to be ES Hr coma corrector. I have so many doubts if my Ts V-Power focuser will be able to go at focus. This focuser has a 30mm drawtube excursion. Currently with the Baader I reach the fine focus with a 10mm excursion of the drawtube. I noticed that the Es Hr needs + 35mm to get the perfect focus.I’m not sure if I can use the new cc. I don’t want to move mirrors. With an extension on Focuser I will be able to solve the problem? Can you help me to understand? Thanks Maurizio
Hi Maurizio, you can buy an extension ring for the TS V-Power focuser. You place it between the base and focuser’s body. If you want to be sure, you better buy two of them, they are not that expensive. You can combine them if one would be not enough. I did the same thing with Feather Touch focuser – the extension ring was just more expensive.
Thanks for the reply. Why did you move the primary mirror instead of adding an extension tube to the focuser?
Hi Maurizio, I have two Newtonians: 250 f4 – this one has the moving mirror feature. Second one is 150 f4, which has the primary mirror fixed. So, the only way to get TeleVue Paracorr (which I purchased recently) to focus is to use the spacer.
Jakub
Hi, thanks a lot for the amazing article. It has a lot people with coma problem on ther fast newtonian.
Do you have any information concerning the TS-Optics NEWTONIAN Coma Corrector 0.95x Maxfield – 3-element – 2″ connection? It seems a newer version not available when you did the review of other models.
https://www.teleskop-express.de/shop/product_info.php/info/p3822_TS-Optics-NEWTONIAN-Coma-Corrector-0-95x-Maxfield—3-element—2–connection.html
Hi Andre, yes I have this corrector, but at the time I wrote this test, it was not available. Here are some picture I made with this corrector, but with bigger sensor (ASI 071) than was used in the test. It’s not a bad corrector, but probably it needs some sensor tilting.
Jakub
I’ve been looking everywhere for this information!! I’m going with the Explore Scientific! Thank you!
Hello Jakub,
I’ve just read that you recently purchased the Televue CC. is it possible to know how is Paracorr doing in comparison to other Coma Correctors? That’s the one i would like to buy for a 16″ F 4.5 Self Made Newtonian
Hi Mario. Televue 2 inch paracorr is probably the best corrector, but it increases the focal length by factor 1.17. Moreover, it’s expensive. You will not make a mistake with this corrector, but it has the disadvantages mentioned above.
Couple of points
1) Your Secondary isn’t centered. That is somewhat obvious in most of your collimation pics
2) Your focuser wasn’t aligned to your optical axis. Being the only reducer out of the bunch the ASA makes this very evident.
3) You could have rotated the ASA in your tests to rule out tilt of an element in the corrector.
4) You are lumping in a 0.73x reducers with 1.0 and 1.15 devices the performance is going to be different. There are reasons that a 3″ version of this device was made….
ASA no longer makes correctors and its a real shame, probably in part due to mis-information in the market.
Dear Mark, thank you for your constructive criticism. You know, this is always welcome. I tried to do this comparison according to my best knowledge.
To your points:
1. I collimate both mirrors by Howie Glatter later (I turn with the laser in the focuser, and the dot stays exactly spot on the location) and then I adjust them (very slightly) by CatsEyes. I don’t know a better way how to align the mirrors. After that, I centered the secondary by the Concenter eyepiece. Do you know a better way how to center the secondary? Do you think that this is not properly centered secondary?
2. Based on what evidence did you concluded this statement? Maybe I am wrong, but if I collimate the Newt with a laser, I somehow align the optical axis with the focuser.
3. Actually I did and the top side was still out of focus. This clearly points to the tilt problem. I managed to solve it partially by the tilting adapter, but you probably have read it.
4. I tried to compare 2″ coma correctors, which were at that time available, no matter if it was a reducer or an extender. Moreover, I compared the performance on a relatively small CCD chip micro 4/3. For such a small chip, you don’t need 3″ correctors. These are necessary for much larger camera sensors, like full-frame 36x24mm.
You are right, ASA doesn’t produce these correctors anymore, maybe there is a reason for that. However, these reducers are still available in TS. Or if you are interested, I can sell you mine, because I still have it, but I don’t use it.
Hi, sorry for my poor english but i have some questions about the es coma corr.
-How did you estimate the optimum backfocus of rhe es coma corr ?
-i can read that the BF would be around 56mm but you said 55mm for 1000mm focal lengh.
Thanks for your work,
Hi, it’s a very good question. Nearly all coma correctors have back focal distance 55 mm, so I just used this value and didn’t experiment with different BFDs. I found here the recommendation for 1000 mm should be BFD 56 mm. This means that the corrector could work even better. If I will find the time, I can do a comparison of 55 mm vs 56 mm.
Good post. I’m facing a few of these issues as well..
Tis is a terrific analysis and very much appreciated!
I’m an “intermediate” astrophotographer and I made a decision to try to learn how to image with a newtonian. Understanding the issues from my research, I bought a GSO 6″ f/4. Of course getting collimation and coma correction is a challenge (I knew that ahead of time).
With some effort my results have gone from “terrible” to just “mildly bad” with respect to coma. I’m working with a second-hand Baader MPCC mk III now, and my results are improving. After reading this I’m going to try some sensor tools (starting with SharpCap collimation because I already own that) and maybe moving on to CCD inspector.
At some point I’ll take the dive and buy an ES CC, but I want to understand the analysis first.
Again thanks so much for this very worthy effort!
-Jim
Hi Jim, recently I have been using TS-MaxField coma corrector and I am very happy with it. At the time I wrote the article, MaxField was not on the market, therefore it’s missing there. The advantage of MaxField over the ExploreScientific is that it works as a gentle reducer (factor 0.95) and ExpSci works as a gentle Barlow lens (factor 1.06). With MaxField you get a larger field of view and the stars are OK even in APS-C sensor corners.
Hey that’s interesting, I’ll check that one out. I do want to preserve my field of view! Thanks!
Excellent article! It has a new sharpstar 1x ed MPCC 4 elements full frame coma corrector. Do you have any information about the quality of this corrector? Thanks
Hi Jonas, I don’t have this corrector, and I don’t plan to buy one anytime soon. You know, I have too many coma correctors at home 🙂 However, I found on the firstlightoptics.com site the available coma correctors and Sharpstar “full-frame” corrector is one of them. If you look at the spot diagram, it’s the same as the spot diagram for GPU coma corrector, which means, it’s just a re-branded GPU. I would bet my GPU coma corrector on it. BTW, this corrector is not able to correct the full-frame sensor, as nearly all 2″ CCs.
Hi,
based on your coma corrector tests, I recently purchased an Explore Scientific HR CC. My scope is 10″ f3.9 and uses a Moonlite focuser with three securing screws. I see your Feathertouch focuser on your 10″ f10 had similar focuser setup. I find I cannot get the HR CC nice and flush at the focuser. Do you have any issues like that? It tends to cause coma in one corner of the images. All CCs would have similar issues except maybe the Baader which screws into the end of the camera. Have you found a better way to secure the CC to the focuser? I thought maybe a set of three small clamps would work.
Regards…
Tom
Hi Tom, first of all, you have to determine if you have an optical problem or a sensor tilt problem. Take a picture with your setup and then turn the camera by 180° and compare the picture. If the bad stars will be located in the same corner, most probably you have a sensor tilt problem. If the bad stars will rotate and will be in the opposite corner, you have an optical problem. A detailed description is here.
Thanks, I will check the ZWO site. One thing I noticed with the ES CC, when I remove the upper eyepiece holder and screw in either the 48 or 42mm adapter, the adapters leave a little bit of thread of the CC outside so that the face of the adapter that lies against the face of the Moonlite focuser does not completely sit against the bottom of the CC adapter. I can see a tiny bit of light between them when I shine a flashlight through it. Not sure this is normal.
In your test of the various coma correctors, Did you use 3 locking screws in the focuser of your scope or did you use threaded connections?
Hi Thomas. I used 2″ FeatherTouch focused, which has 2 radial locking screws.
Thanks Jakub.
Hey Jakub. Awesome reviews here.
I have an issue with my 8″ f5 ONTC and GPU coma corrector.
I chose the GPU because it threads straight into the TS V series focuser so I have no tilt problems.
But it does stick out into the light path, not a lot but I think enough to cause a bright halo on all my LRGB frames. At least I think it does… I don’t have any major light leaks from other sources.
I shoot in Bortle 7 skies, so quite bright.
Do you think the corrector is the cause for the halo? Is there any point in changing it with a different coma corrector? Or any other solution you recommend?
Thank you and clear skies !
Tudor
Hi Tudor,
I think that the protruding corrector into the OTA could cause strange halos around the bright stars. You have two options: either to shift the primary mirror towards the focuser or to change the corrector. Recently I have been using TS Maxfield and I am quite happy with it. It’s quite short, not that expensive, reduces the focal length by 5% and the tilt is not that sensitive.
Dear Jakub!
I am a Masterstudent at the University of Vienna and I am currently writing my masterthesis on optical systems in Astronomy. I was looking for a nice example of Coma and I found your image: https://www.astrofotoblog.eu/wp-content/uploads/2017/03/Coma_cr.jpg
Would you be okay with me using the image with appropriate credits to you? Thank you in advance!
Cheers
Tobias
Hi Tobias, sure, you can use this picture for your thesis. It was taken by a Newtonian telescope with a 200 mm aperture, a focal length of 1000 mm, and a camera Canon EOS 40D. Obviously without any coma corrector. Let me know if you would like to get the full uncropped image.
Fantastic, thank you very much!
The full image without cropping would be very nice. I think you should see my email address. If you agree, please give me your full name for the credits.
Cheers
Tobias
[…] to this comparison of different coma correctors, the ES HR should also provide better illumination of the sensor with less vignetting than the […]